DNS, WebRTC, and TLS Leaks — The Most Common Mistakes
When you connect to a VPN or use a proxy, it is assumed that your real IP address and online activities remain hidden. But in practice, this is not always the case. There are so-called leaks — technical mechanisms that cause some data to be transmitted outside the secure channel.
DNS, WebRTC, and TLS leaks are situations where technical data is exposed due to network or browser settings: for example, the DNS server, real IP, or connection parameters. Such leaks do not reveal your browsing history, but they can expose a mismatch between the IP address, DNS server, and other connection parameters, which can act as a trigger for anti-fraud systems.
In this article, we will look at how DNS, WebRTC, and TLS leaks occur, how to detect them, and what measures can help reduce the risks.
What are DNS, WebRTC, and TLS leaks really?
DNS, WebRTC, and TLS operate at different levels of network interaction. Therefore, the mechanisms of data exposure differ in each case. In one case, requests bypass the secure channel; in another, the browser directly transmits network information; in the third, the parameters of the encrypted connection are analyzed.
Let's break down each type separately to understand the risks and ways to protect yourself.
DNS Leaks
DNS (Domain Name System) is a system that translates familiar website names into IP addresses. When you enter an address in your browser, your device first sends a DNS request to find out which IP to connect to, and only then is a connection to the site established.
When using a VPN, it is assumed that all requests pass through an encrypted tunnel and are processed by the VPN provider's own DNS servers. However, in some cases, the system continues to send DNS requests directly to the ISP's server. This is what is called a DNS leak.
In this case, the ISP sees which domains the device is requesting, even if the main traffic goes through the VPN. At the same time, the content of the pages and the transmitted data remain encrypted. The websites themselves and anti-bot systems do not have access to the user's DNS requests. They can only detect the problem indirectly — for example, if the DNS server belongs to one country or provider, while the public IP address belongs to another network.
The causes can vary: incorrect network configuration, lack of built-in DNS leak protection in the VPN, protocol conflicts, or specific features of the operating system.
WebRTC Leaks
WebRTC (Web Real-Time Communication) is a technology built into modern browsers that allows establishing a direct connection between users. It is used for video calls, voice communication, online conferences, and data transfer directly in the browser window without installing additional software.
For the connection to work correctly, WebRTC requests the device's network information, including its local and external IP addresses. In some cases, WebRTC can transmit network information directly, bypassing the VPN tunnel. The browser can transmit the real IP address through special data exchange mechanisms (for example, ICE candidates — a list of possible network addresses and routes that the device offers for a direct connection), even if the website traffic goes through a VPN or proxy.
As a result, a webpage with WebRTC enabled is capable of determining the user's real IP. At the same time, the VPN itself continues to work, but some network information is exposed directly. This is exactly why WebRTC leaks are considered one of the most common problems that reduce the level of anonymity when using a VPN or proxy.
TLS Fingerprint: What it is and why it gives you away
TLS (Transport Layer Security) is a protocol that encrypts data between the browser and the website. Thanks to it, the connection is displayed as HTTPS, and the content of the pages remains protected from interception. But TLS has a side effect that few people think about — the TLS fingerprint.
When a browser connects to a site via HTTPS, the first thing it does is send a ClientHello message to the server — a kind of "business card." It specifies which encryption methods the client supports, which TLS extensions it uses, and in what order it lists them. This message is not encrypted — the server sees it even before a secure connection is established.
Every browser and every program sends its own unique set of parameters in the ClientHello. Chrome lists ciphers and extensions in one order, Firefox in another, and a Python script or a bot based on standard libraries in a third. This combination is the TLS fingerprint. It can be compared to handwriting: you write the same letters, but your characteristic style can distinguish you from others.
There are standard methods for calculating such fingerprints — JA3 and the more modern JA4. They take parameters from the ClientHello (list of ciphers, extensions, supported algorithms) and turn them into a short hash — a string of characters that can be used to match the client with a known browser or program.
Why the TLS fingerprint is important
Many anti-bot and fraud protection systems analyze the TLS fingerprint passively — they do not need to execute scripts on the page or check cookies. It is enough to look at the ClientHello. If a request comes with a Chrome User-Agent header, but the TLS fingerprint matches a Python library, the server instantly understands that it is not dealing with a real user. Such a connection can be marked as suspicious, receive a CAPTCHA, or end up blocked.
This is the first line of defense, which triggers even before analyzing behavior on the page. That is exactly why even perfectly configured HTTP headers will not help if the TLS fingerprint gives away automation.
How to check for DNS, WebRTC, and TLS leaks
Checking for leaks is a mandatory step if you use a VPN or other anonymization tools. Let's break down how to check this in practice.
Checking for DNS leaks
A DNS leak is easiest to detect through online services. The check takes a few minutes and does not require special skills.
You can use the following for this:
To check, first connect to your VPN or proxy, then open one of the DNS testing services. Sometimes the result loads immediately, but in some cases, you need to run the test.
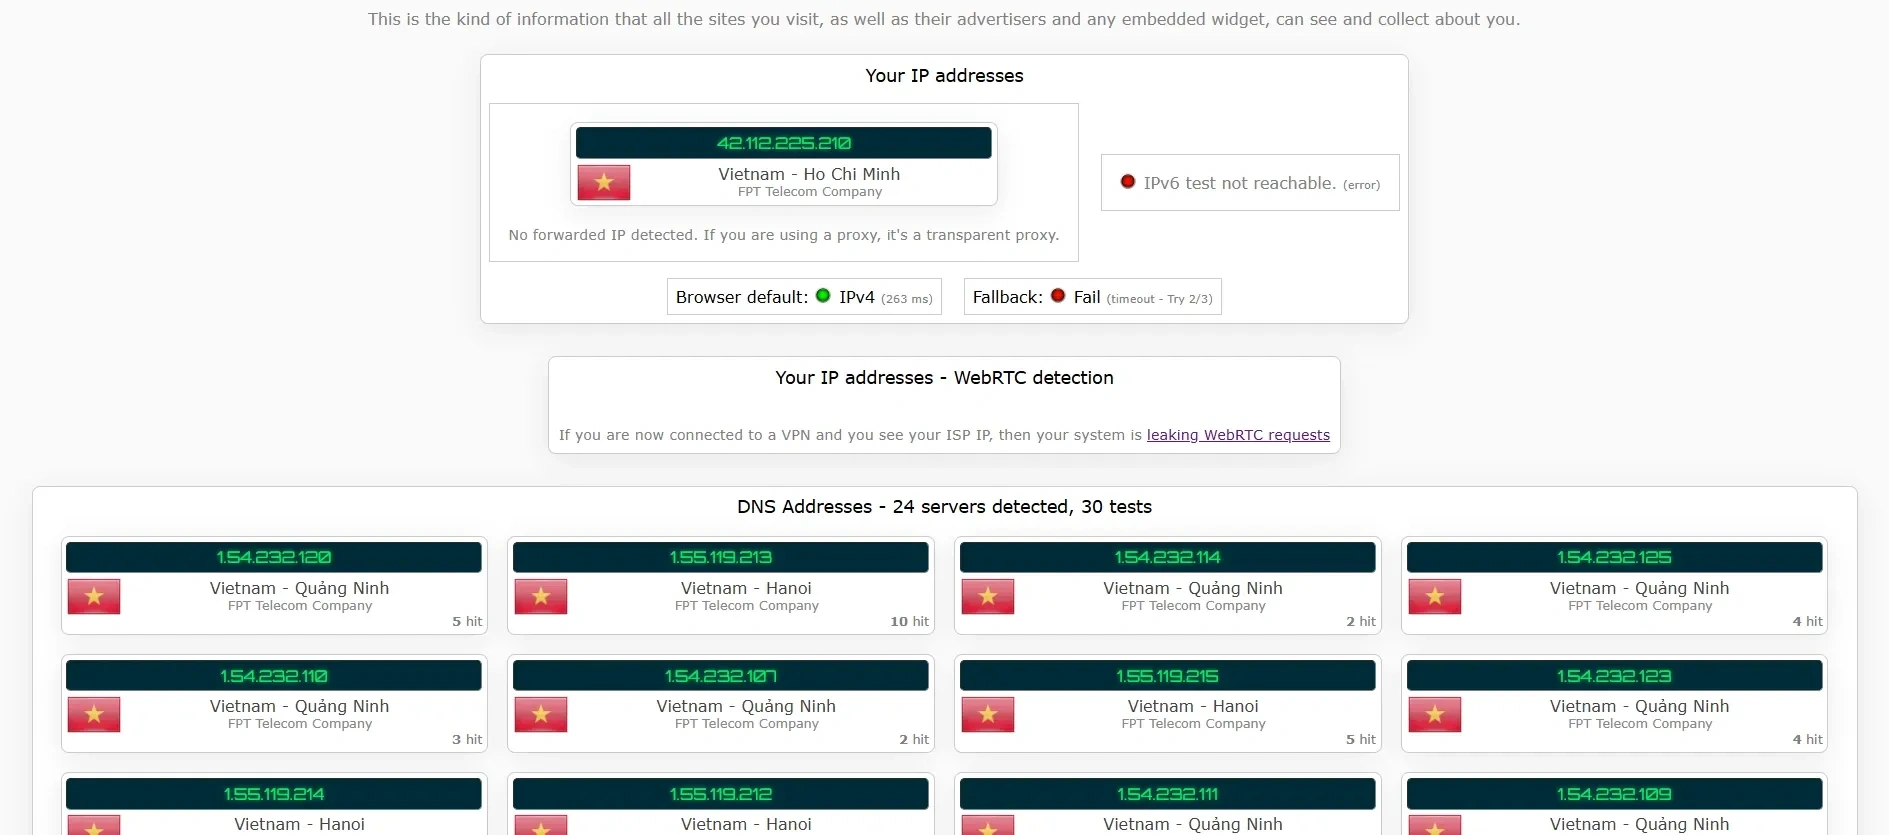
The report will show the DNS servers through which your requests pass. If the VPN provider's servers or public DNS (for example, Cloudflare or Google) are listed, the protection is working correctly. If the name or IP of your ISP is displayed, this is a sign of a DNS leak.
You can also check the DNS being used without online services.
If you have Windows:
- Open the command prompt (Win + R → cmd).
- Enter the command:
nslookup example.com - The Server line will indicate the DNS server processing the request.
If you have macOS / Linux:
In the terminal, run: nslookup example.com or dig example.com
If your ISP's DNS is displayed while the VPN is on, it means the requests are bypassing the tunnel and the protection is configured incorrectly.
Checking for WebRTC leaks
You can check for a WebRTC leak using special online services. The procedure is similar to DNS testing.
You can use the following for this:
To check, first connect to your VPN or proxy, then open one of the services. Usually, the result is displayed automatically, but sometimes you need to start the test manually.
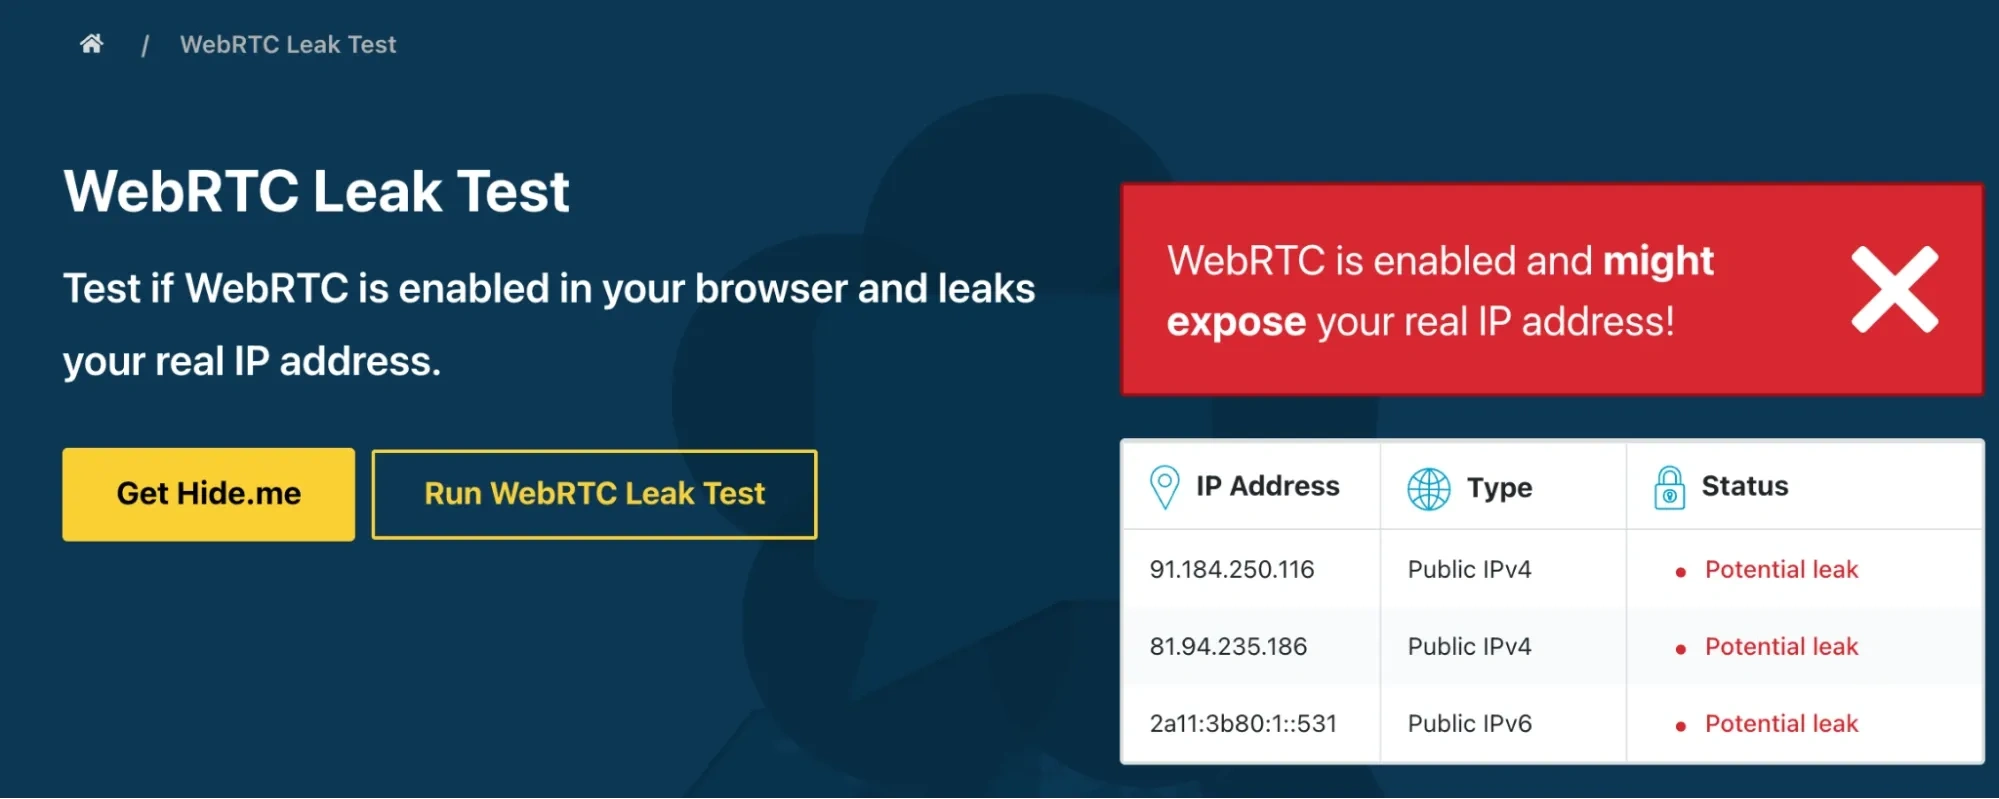
The report will indicate the public IP address and network parameters that the browser transmits via WebRTC. If your real ISP IP address is displayed instead of the VPN IP, WebRTC is exposing data directly. If only the VPN server's IP is listed, there is no leak. Some services simply inform you whether there is a leak.
In addition to online tests, it is important to check whether WebRTC is enabled in the browser itself.
If you have Firefox, enter about:config in the address bar. In the search bar, find the media.peerconnection.enabled parameter. If the value is true, WebRTC is active. If false, WebRTC is disabled.
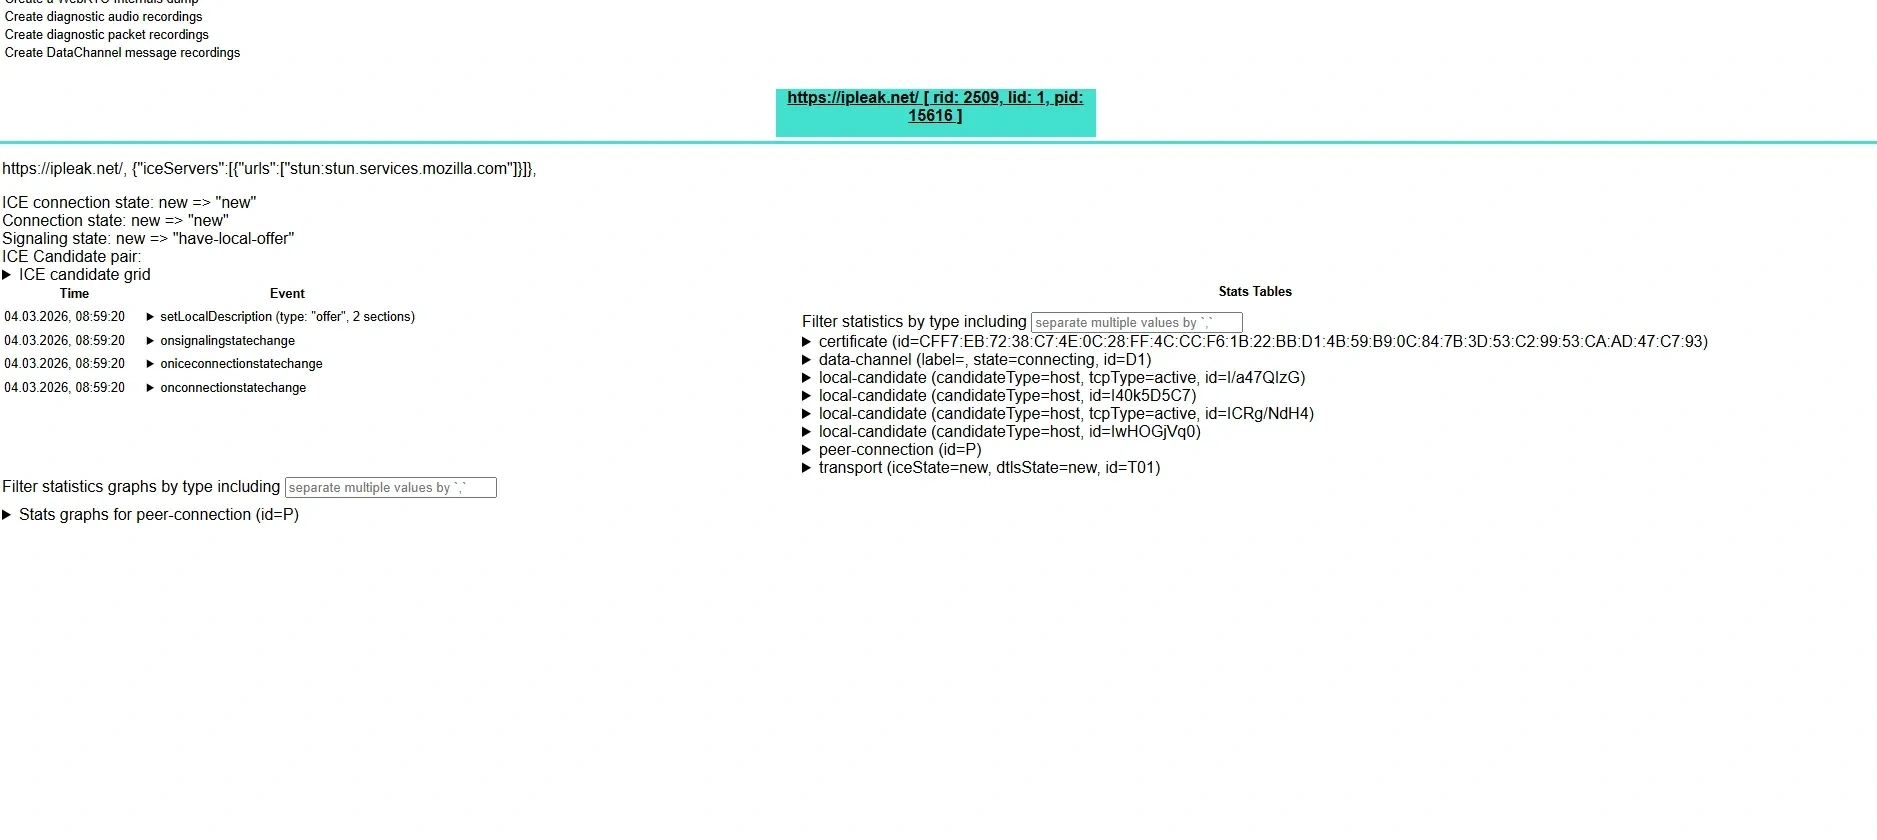
In Chrome and Edge, there is no built-in WebRTC status indicator. You can check its operation through the internal diagnostics page: open chrome://webrtc-internals (or edge://webrtc-internals) in the address bar. If connection activity is displayed there when visiting sites or running tests, WebRTC is working. If connections are not created, transmission is restricted.
In the Brave browser, open "Settings → Privacy and security". There you can find the WebRTC handling parameters and determine whether the transmission of local IP addresses is allowed.
Checking the TLS fingerprint
You can check your TLS fingerprint using the tls.peet.ws service. It shows your browser's ClientHello parameters, the calculated JA3/JA4 hash, and allows you to compare it with the fingerprints of popular browsers. This way, you can see if your connection looks like a regular Chrome or stands out from the rest.
How to protect yourself from leaks
Protection against leaks requires a comprehensive approach. It is not enough to simply turn on a VPN — it is important to properly configure the system and browser, as well as regularly check the connection. Let's start with protection against DNS leaks.
Protection against DNS leaks
The first step is choosing a VPN service with built-in DNS leak protection. Such a feature is usually called DNS Leak Protection and means that all DNS requests are automatically routed through the secure servers of the VPN itself.
Such protection is implemented by many major providers, for example, NordVPN, ExpressVPN, and Proton VPN. When using such services, DNS requests are not sent directly to the ISP, even if the system is configured by default.
The second layer of protection is manually configuring DNS servers. You can specify public DNS that are not associated with your ISP. The most common options are Cloudflare (1.1.1.1) and Google (8.8.8.8).
You can configure DNS in the network connection settings of your operating system. In Windows, this is done in the adapter properties; in macOS, in the "Network" section. Also, some modern browsers allow you to enable the use of Secure DNS directly in the settings.
The combination of a VPN with activated DNS leak protection and manually set DNS servers significantly reduces the risk of transmitting requests directly to the ISP.
Protection against WebRTC leaks
WebRTC works at the browser level, so protection is configured exactly there. If you use a VPN but have not restricted WebRTC, the browser can still expose your real IP.
The first method is disabling WebRTC in the browser settings. In Firefox, this is done through the about:config page: you need to find the media.peerconnection.enabled parameter and set the value to false. After this, the browser will stop using WebRTC to establish direct connections.
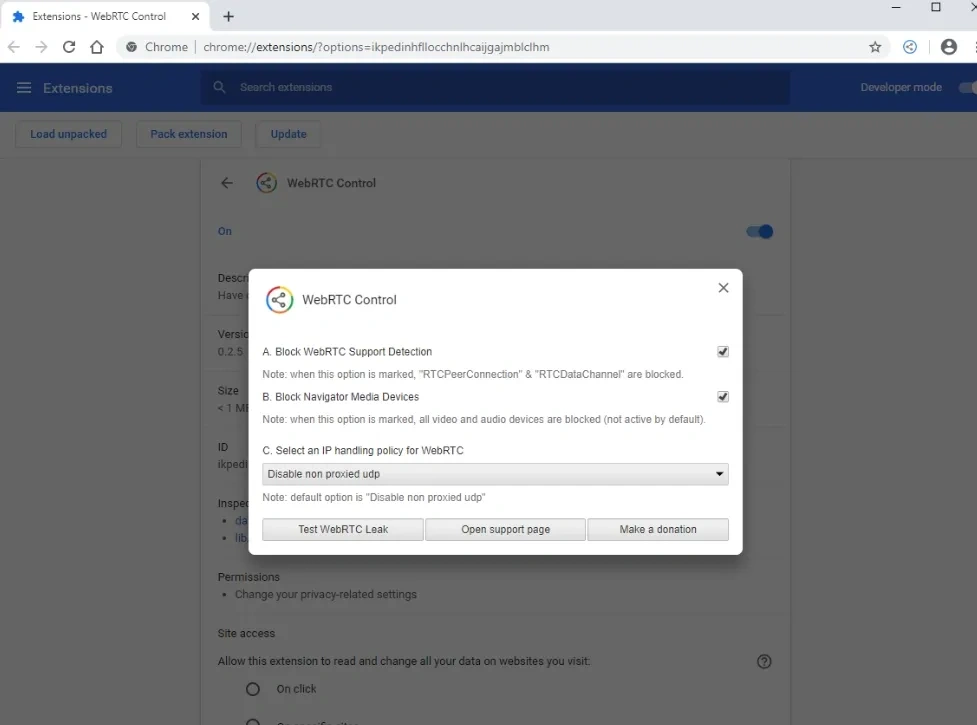
In Chrome and Edge, it is impossible to completely disable WebRTC using standard tools. In this case, extensions are used that block the transmission of network data via WebRTC. Popular options are uBlock Origin (with additional configuration) and WebRTC Control. They restrict the transmission of the real IP through browser mechanisms.
The third option is using browsers with enhanced privacy. For example, Brave does not block WebRTC by default, however, this parameter can be changed in the browser's privacy settings.
After making changes, it is recommended to recheck the connection via an online test to ensure that the real IP is no longer displayed.
Protection against TLS leaks
It is impossible to disable sending the ClientHello — without it, an encrypted connection will not be established. The goal is not to hide the fingerprint, but to ensure it does not stand out among millions of regular users.
The most reliable way is to use an up-to-date version of a Chromium-based browser. In this case, your TLS fingerprint will match the fingerprint of a huge number of Chrome users, and anti-bot systems will not see anything suspicious.
Problems arise when something non-standard appears in the chain: an outdated browser, an atypical TLS library, or an automation tool. The fingerprint immediately becomes rare, and therefore noticeable.
In Linken Sphere, this problem does not exist. The browser runs on an up-to-date Chromium engine, so each profile, when connecting, sends the same set of ciphers and extensions as a regular Chrome of the corresponding version. The TLS fingerprint will not be unique — it will simply match thousands of real users. This is exactly what is needed for proper masking.
Conclusion
You can reduce the risk of leaks by following a few simple rules:
- Use a reliable VPN with DNS Leak Protection and a Kill Switch.
- If necessary, manually specify public DNS servers.
- Check the WebRTC status in your browser and disable it if required.
- Regularly check your connection for DNS and WebRTC leaks.
Such measures do not guarantee complete anonymity, but they significantly increase the level of protection.
Frequently Asked Questions
DNS translates a website address into a server IP address. WebRTC is a browser technology for direct connections (calls, video chats). TLS is an encryption protocol that protects data between the browser and the website (HTTPS).
No. It does not save history on your device, but it does not hide your IP address or prevent DNS or WebRTC leaks.
No. A VPN hides your IP and encrypts traffic, but if configured incorrectly, DNS or WebRTC leaks are possible.
A Kill Switch is a feature that blocks the internet connection if the VPN drops. This prevents traffic from being transmitted directly through your ISP.
This is a mechanism that routes all DNS requests through VPN servers, preventing the system from accessing your ISP's DNS.