Keenetic Router as a Proxy Tool

Introduction
Sometimes, there's a need to proxy the traffic of devices without modifying their software. This can be useful when working with physical devices or software that doesn’t support proxying without breaking the functionality of essential protocols.
There are third-party solutions on the market that usually come in the form of specialized firmware with extended functionality for Raspberry Pi or other single-board computers. The cost of such firmware ranges from $400 to $700 (not including the cost of the device itself).
However, this option is hardly affordable, considering the setup complexity, high price, and mixed reviews on dedicated forums.
That’s why we decided to explore alternative solutions accessible to everyone, allowing the same task to be solved with fewer expenses.
Keenetic Routers
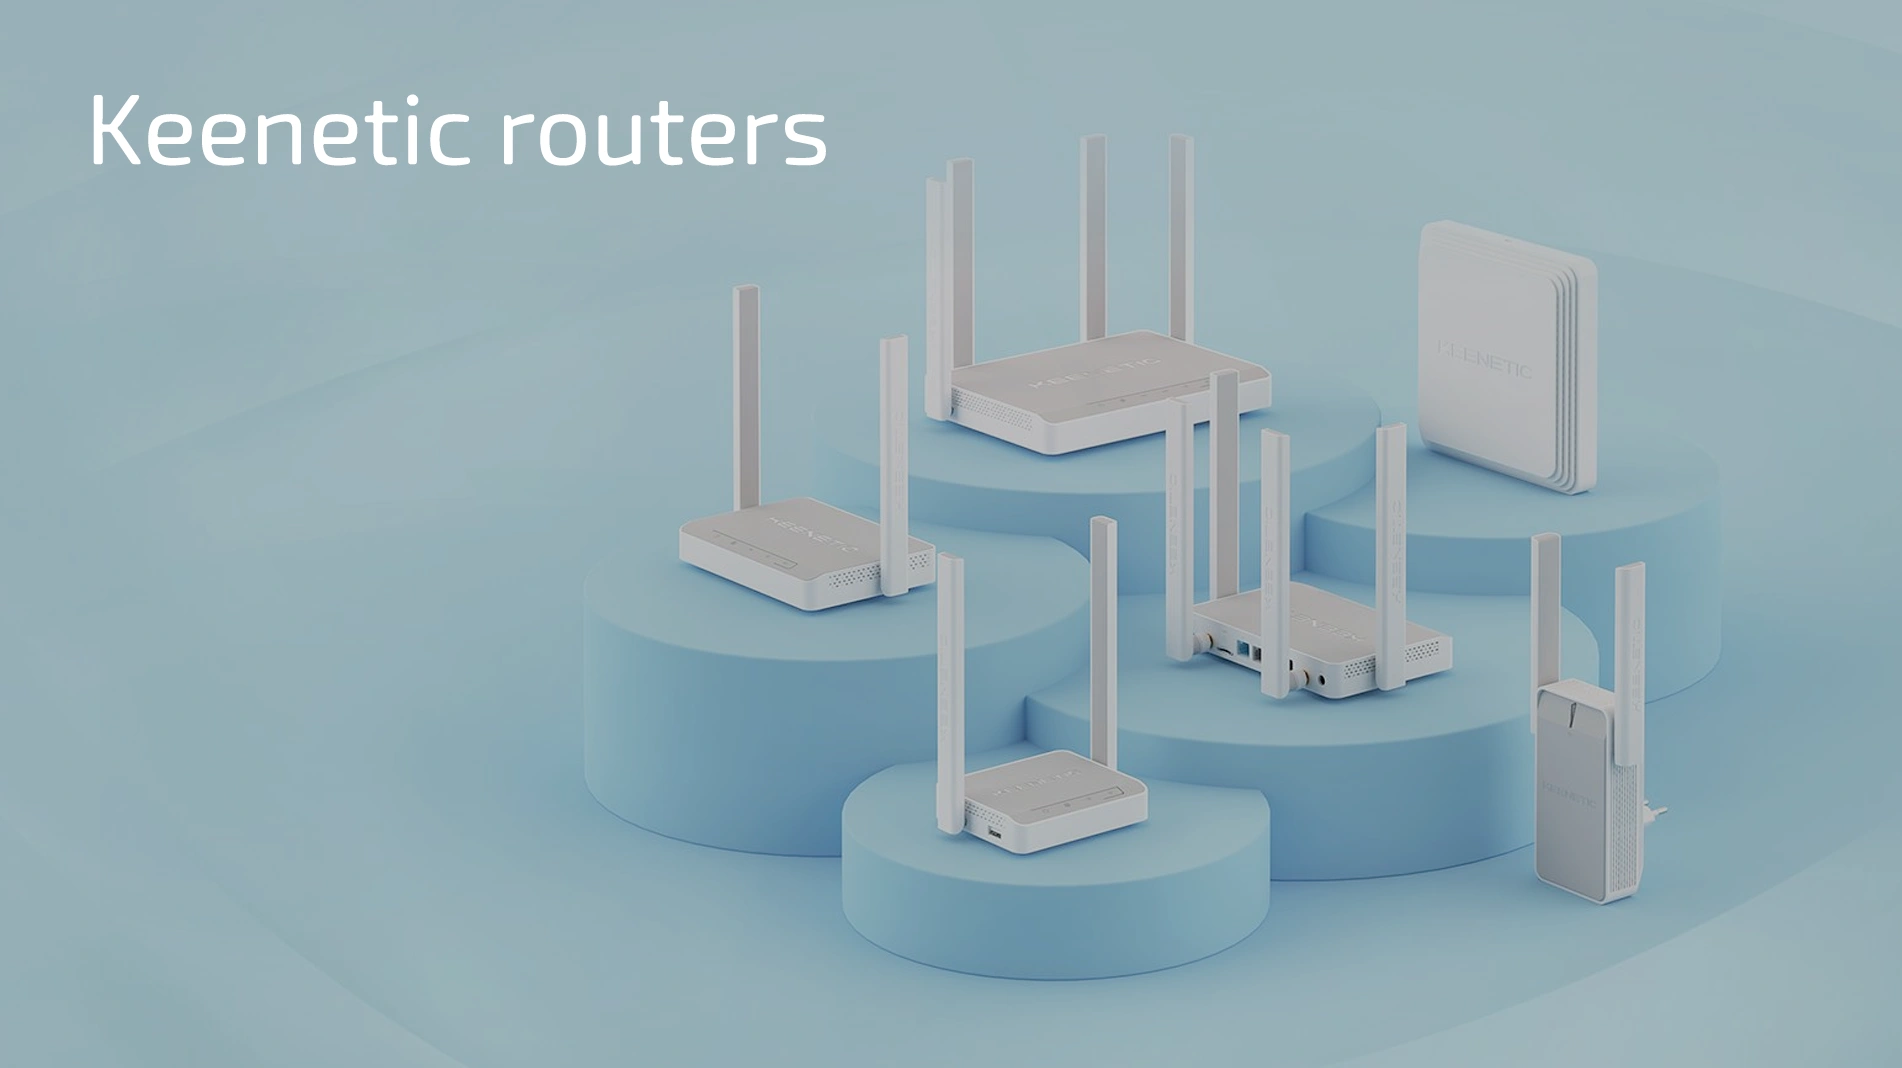
While searching for a suitable router for this task, we turned our attention to the Keenetic lineup. These devices are marketed as premium-functionality solutions at a reasonable price.
Advantages
- Stable performance and high throughput thanks to powerful hardware and optimized software
- Flexible configuration — suitable for both beginners and advanced users
- Mesh Wi-Fi support — the ability to create a seamless network from multiple devices
- Security — regular updates, WPA3 support, and built-in protection mechanisms
- Modular system — users can choose the needed features (VPN clients, servers, proxies, channel balancing, etc.) via KeeneticOS
- Advanced proxying capabilities — support for Socks5, OpenVPN, WireGuard, L2TP, PPTP, and other connection protocols
- Affordable pricing — a mid-range device can be found for under $100
- Support and active community — discussions on dedicated forums and a large user base
Model and Selection
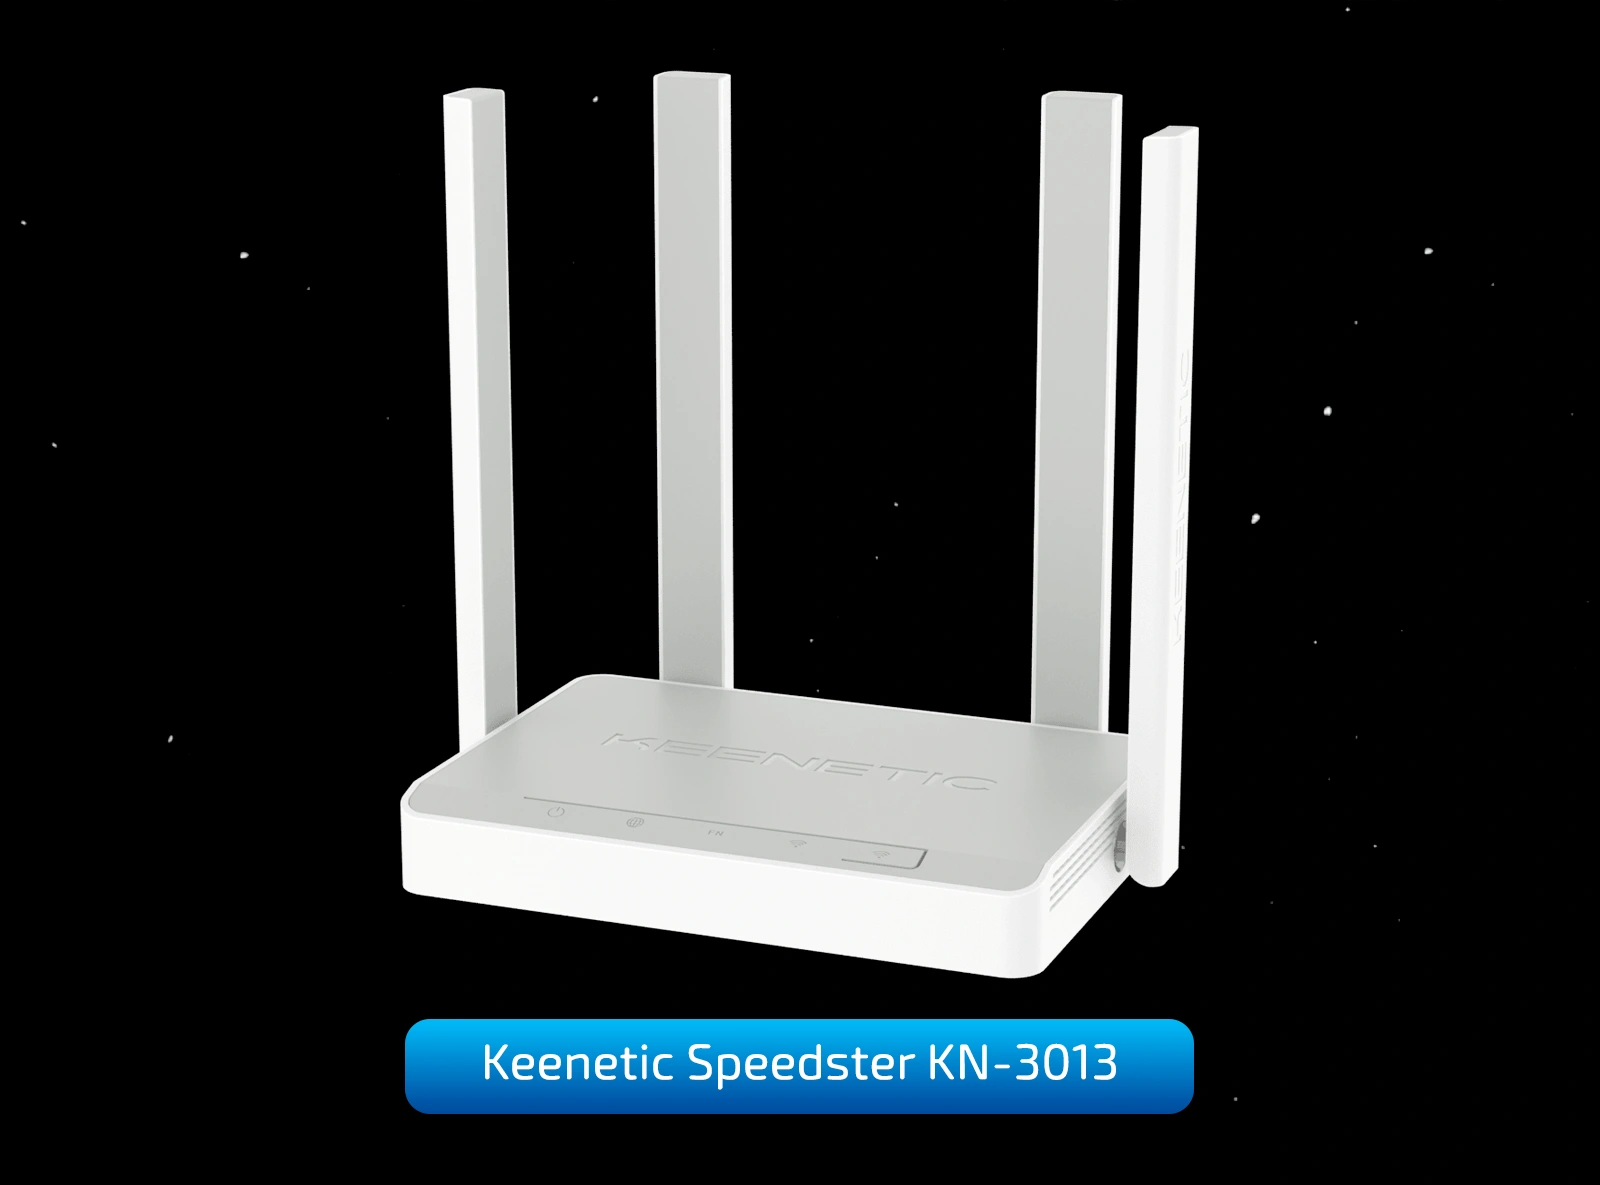
This guide uses the Keenetic Speedster (KN-3013).
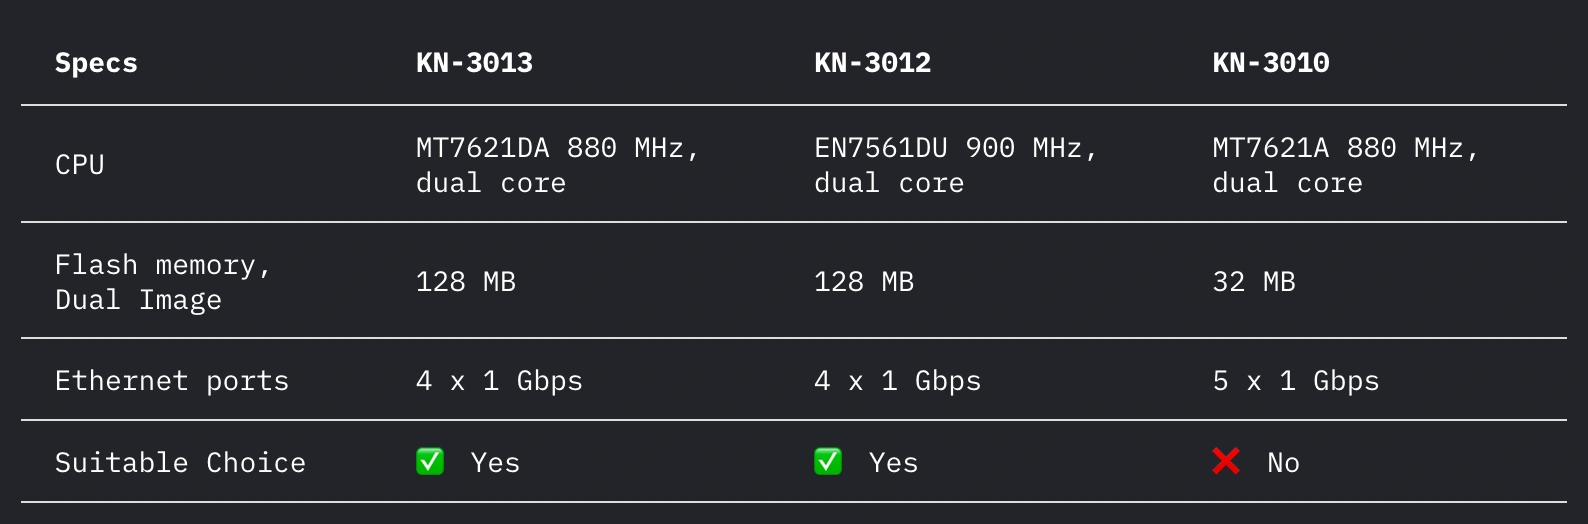
This model has three revisions, differing mainly in processor type and flash memory size. It is recommended to choose KN-3013 or KN-3012. The KN-3010, however, is not suitable due to insufficient flash memory. Each connection config or installed software module takes up some space, not to mention the operating system itself.
Other Keenetic routers are also suitable, as they all run on KeeneticOS, which supports the required connection protocols.
When choosing a device, consider the following specifications:
- Flash memory size — 128 MB or more is recommended
- RAM — minimum of 128 MB
- CPU clock speed — 800 MHz or higher is recommended
Package Contents
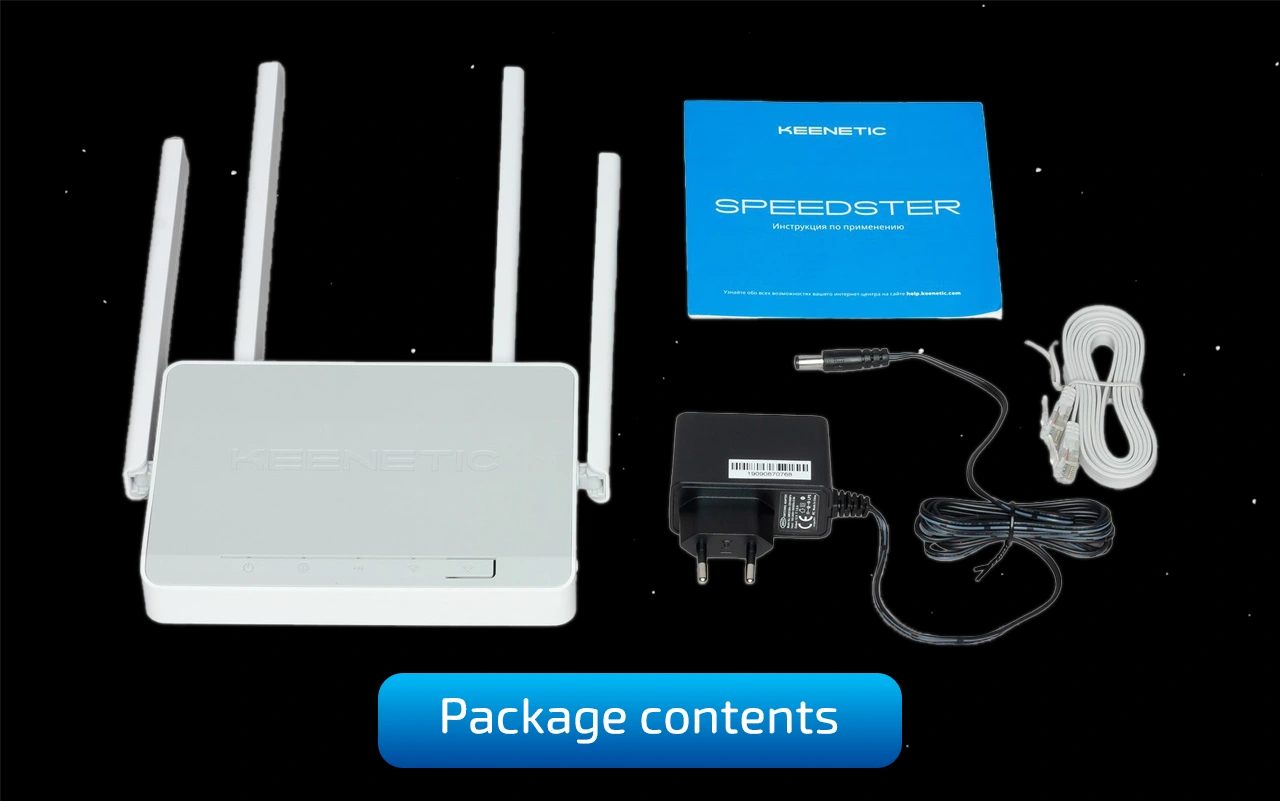
The package includes:
- Router
- Ethernet cable
- Power adapter (100-240V)
- Manual
Getting Ready for Setup
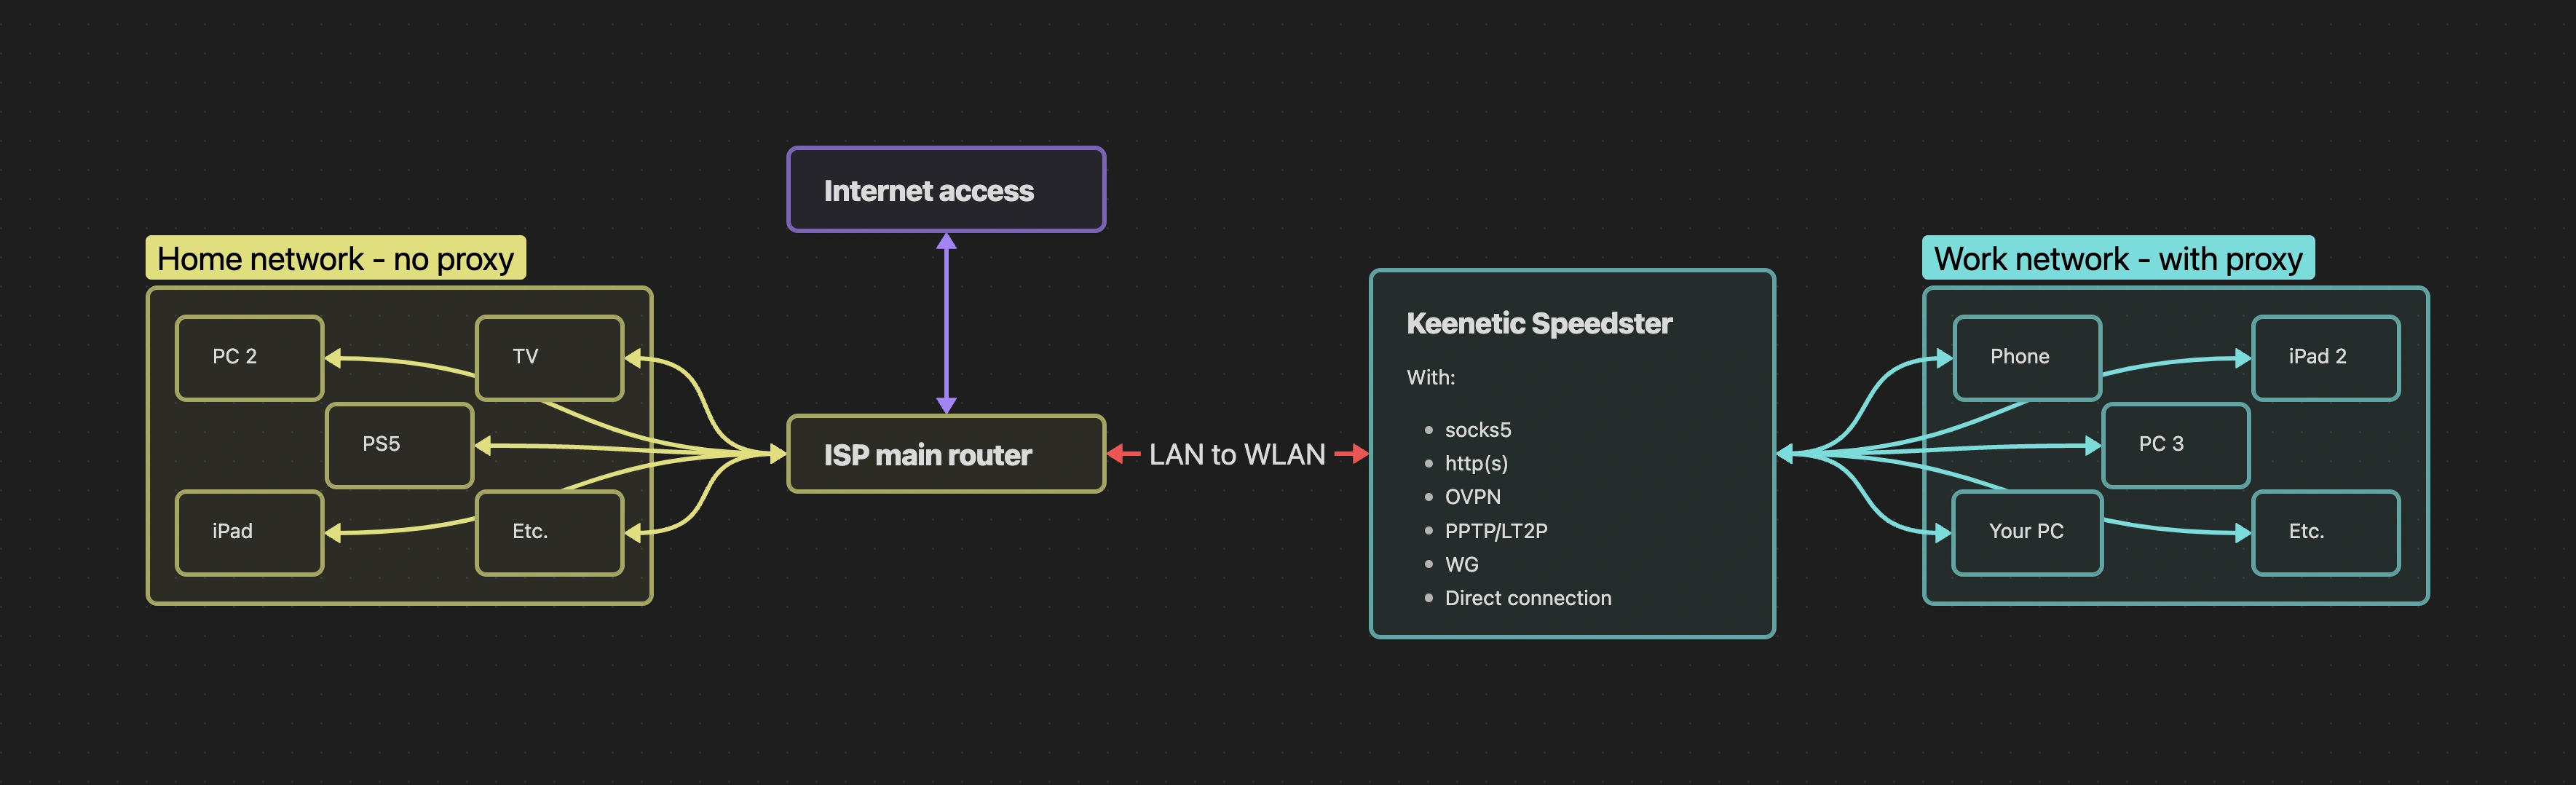
The diagram above clearly shows how the network will work. The Keenetic is connected to the main router and creates a separate network. This setup does not affect your main home network: the primary router is only used as a gateway to the internet, and only devices connected to the Keenetic network will be proxied.
Preparation Steps:
1. Take the router out of the box and position the antennas for use.
2. Connect the router to the power supply.
3. Check the sticker on the bottom of the device. It contains connection details.
- SSID (Wi-Fi network name)
- Password
- Setup address —
my.keenetic.net
Once powered on, the router will automatically create a Wi-Fi network. Use the details from the sticker to connect.
Router Setup
After connecting to the Wi-Fi network, open a browser on your device and go to my.keenetic.net to begin setup.
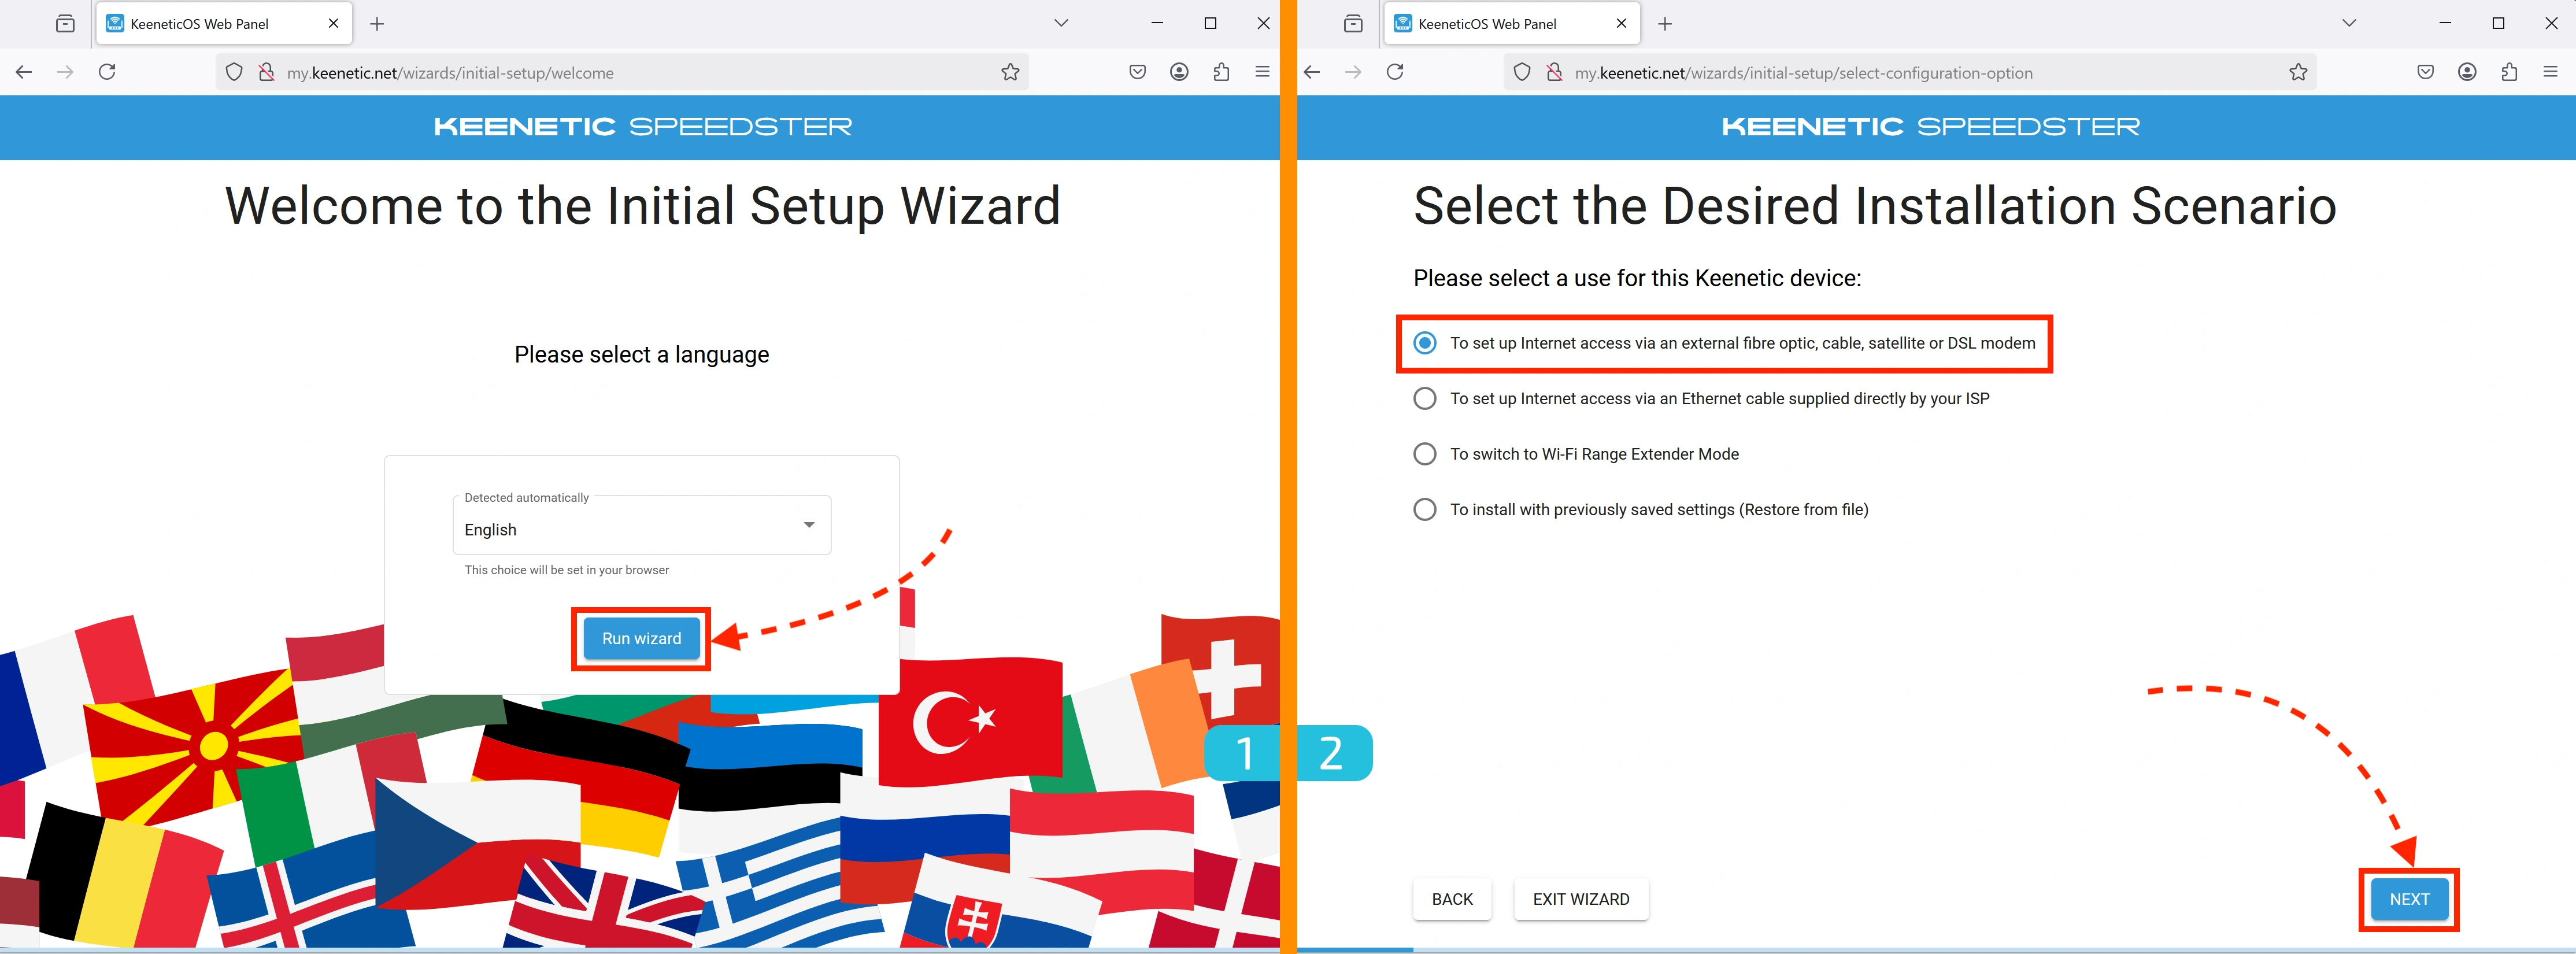
1. Language Selection
Choose your preferred language and click the "Run wizard" button
2. Usage Scenario
Select the first option: "To set up Internet access via an external fibre optic, cable, satellite or DSL modem"
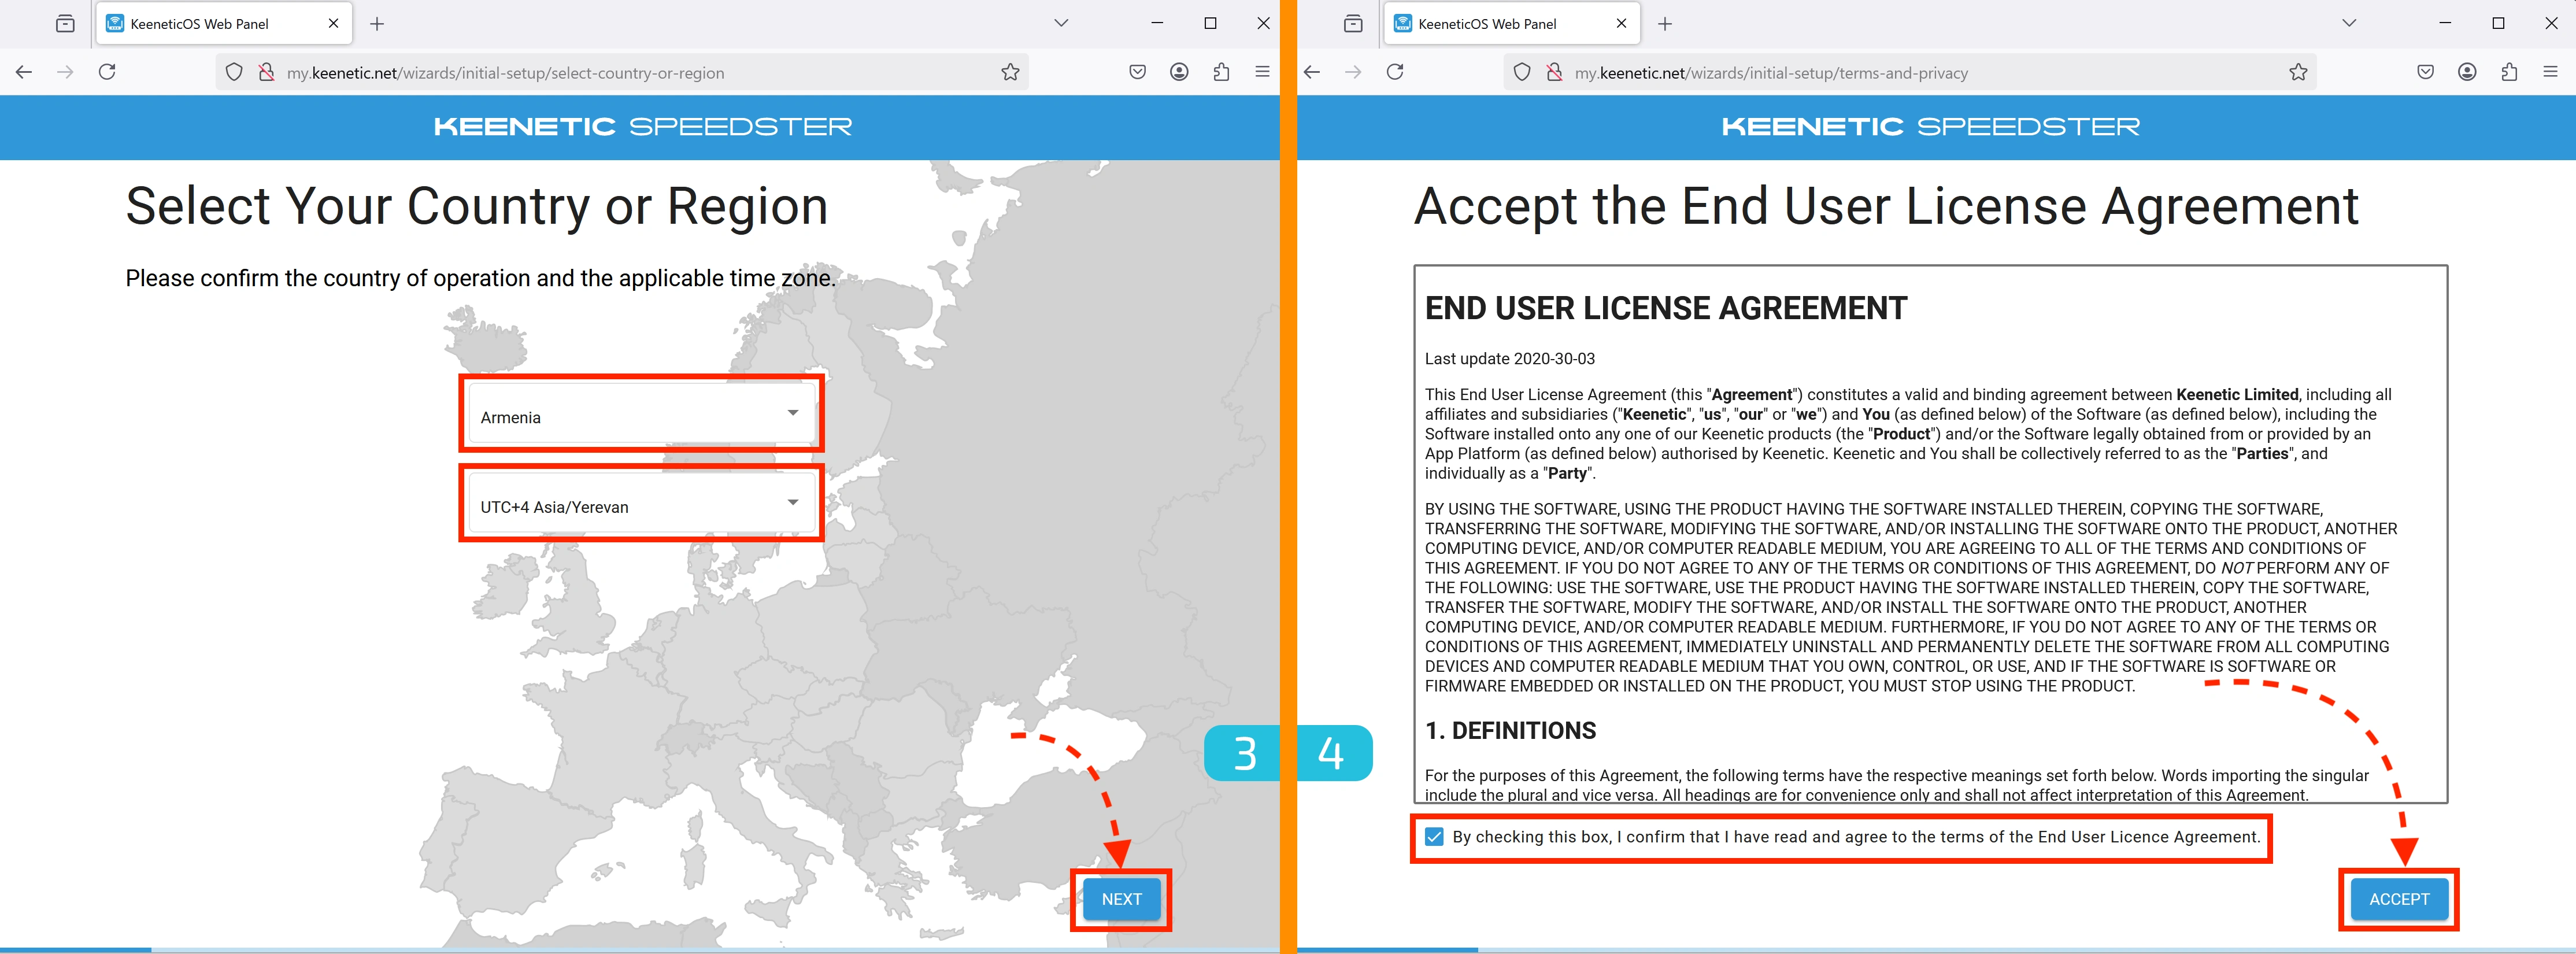
3. Region Settings
Select your country and time zone.
4. User Agreement
Agree to the terms of use. At this stage, you may need to wait a few minutes for the checkbox to become active.
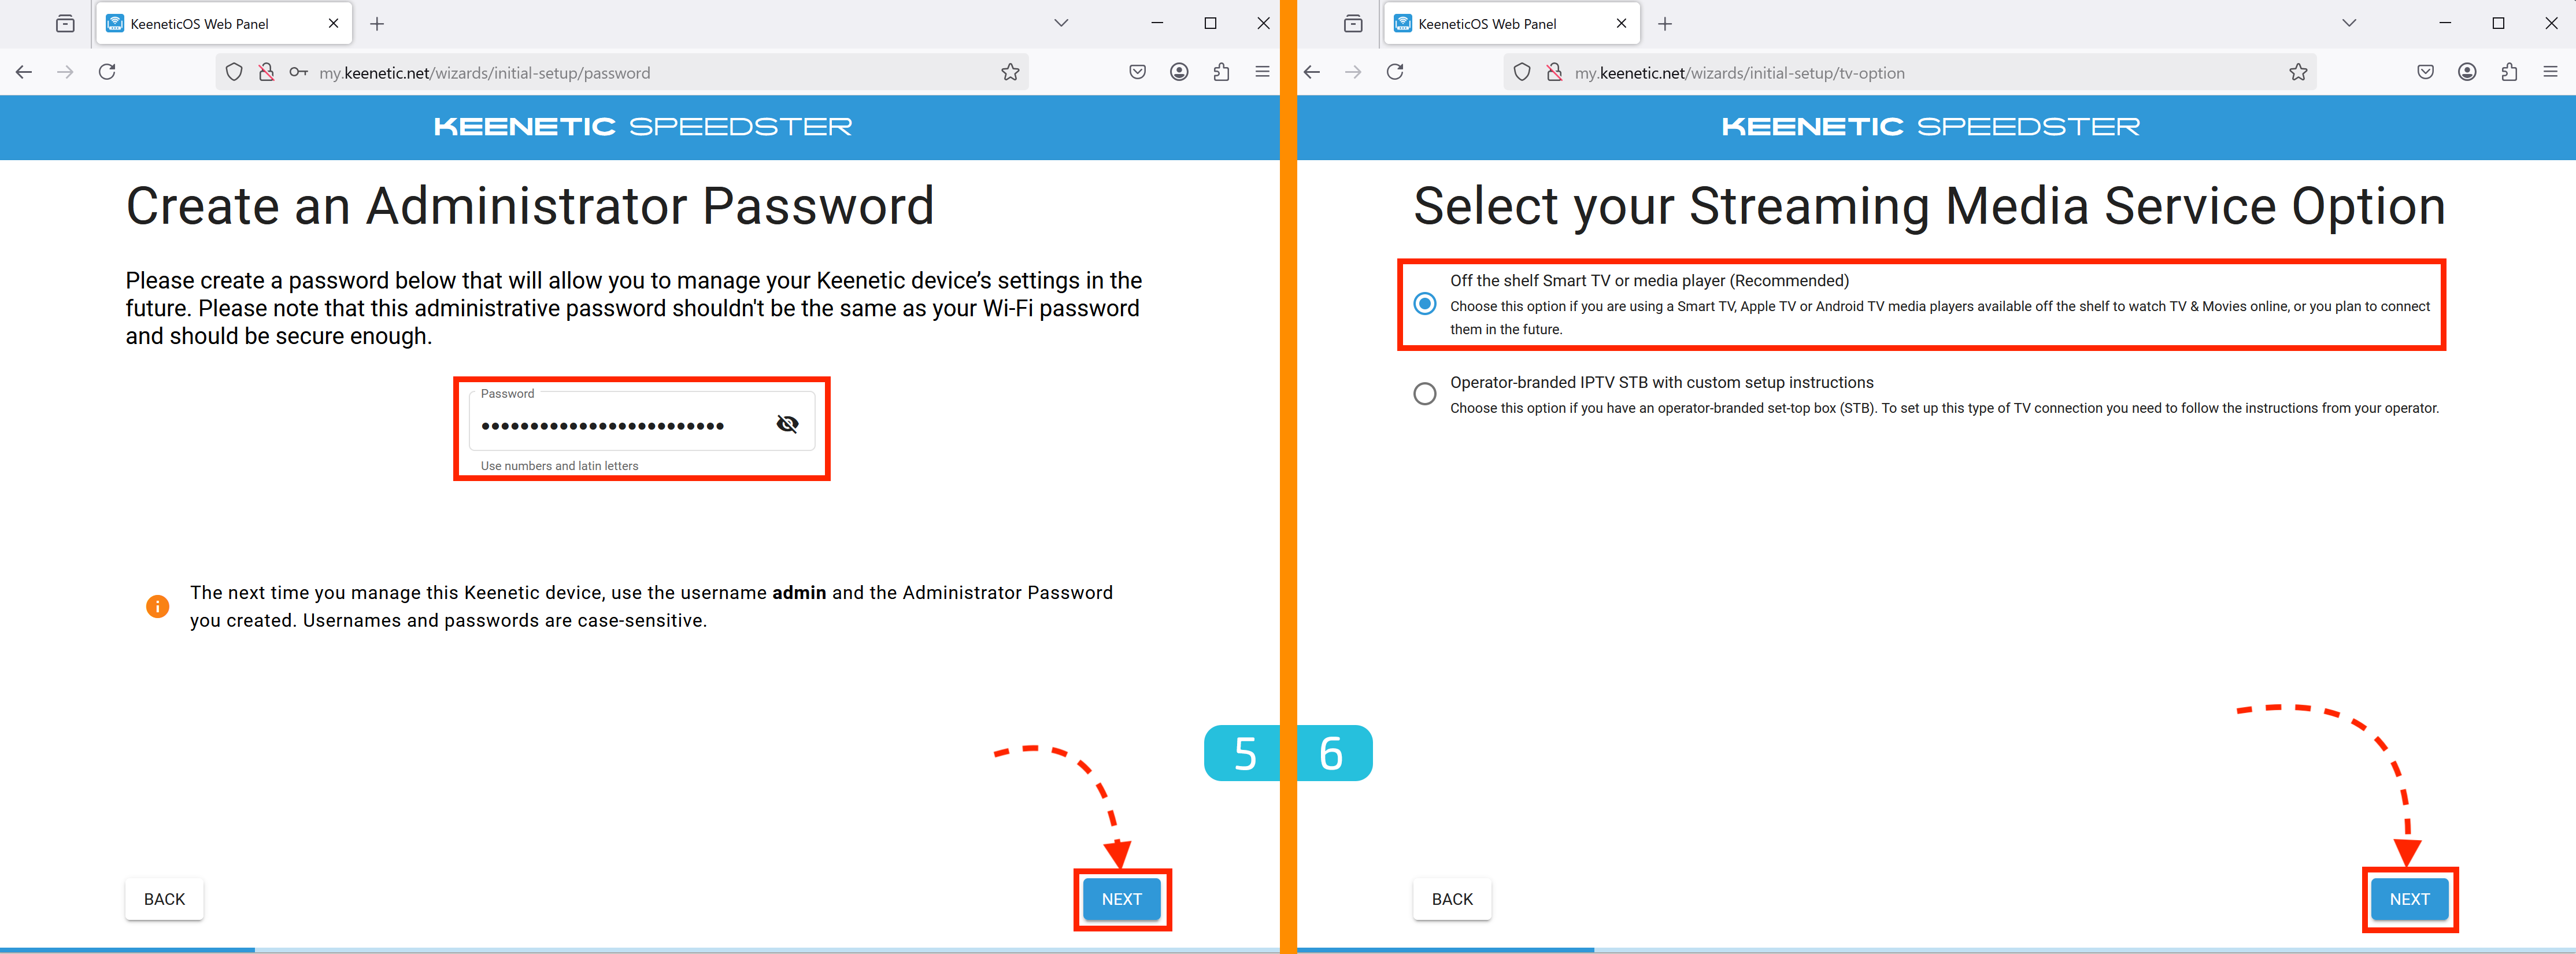
5. Administrator Password
Set the administrator password that will be used to log into the device's control panel. Make sure to save it!
6. Media Service Setup
Select the first option: "Off the shelf Smart TV or media player (Recommended)"
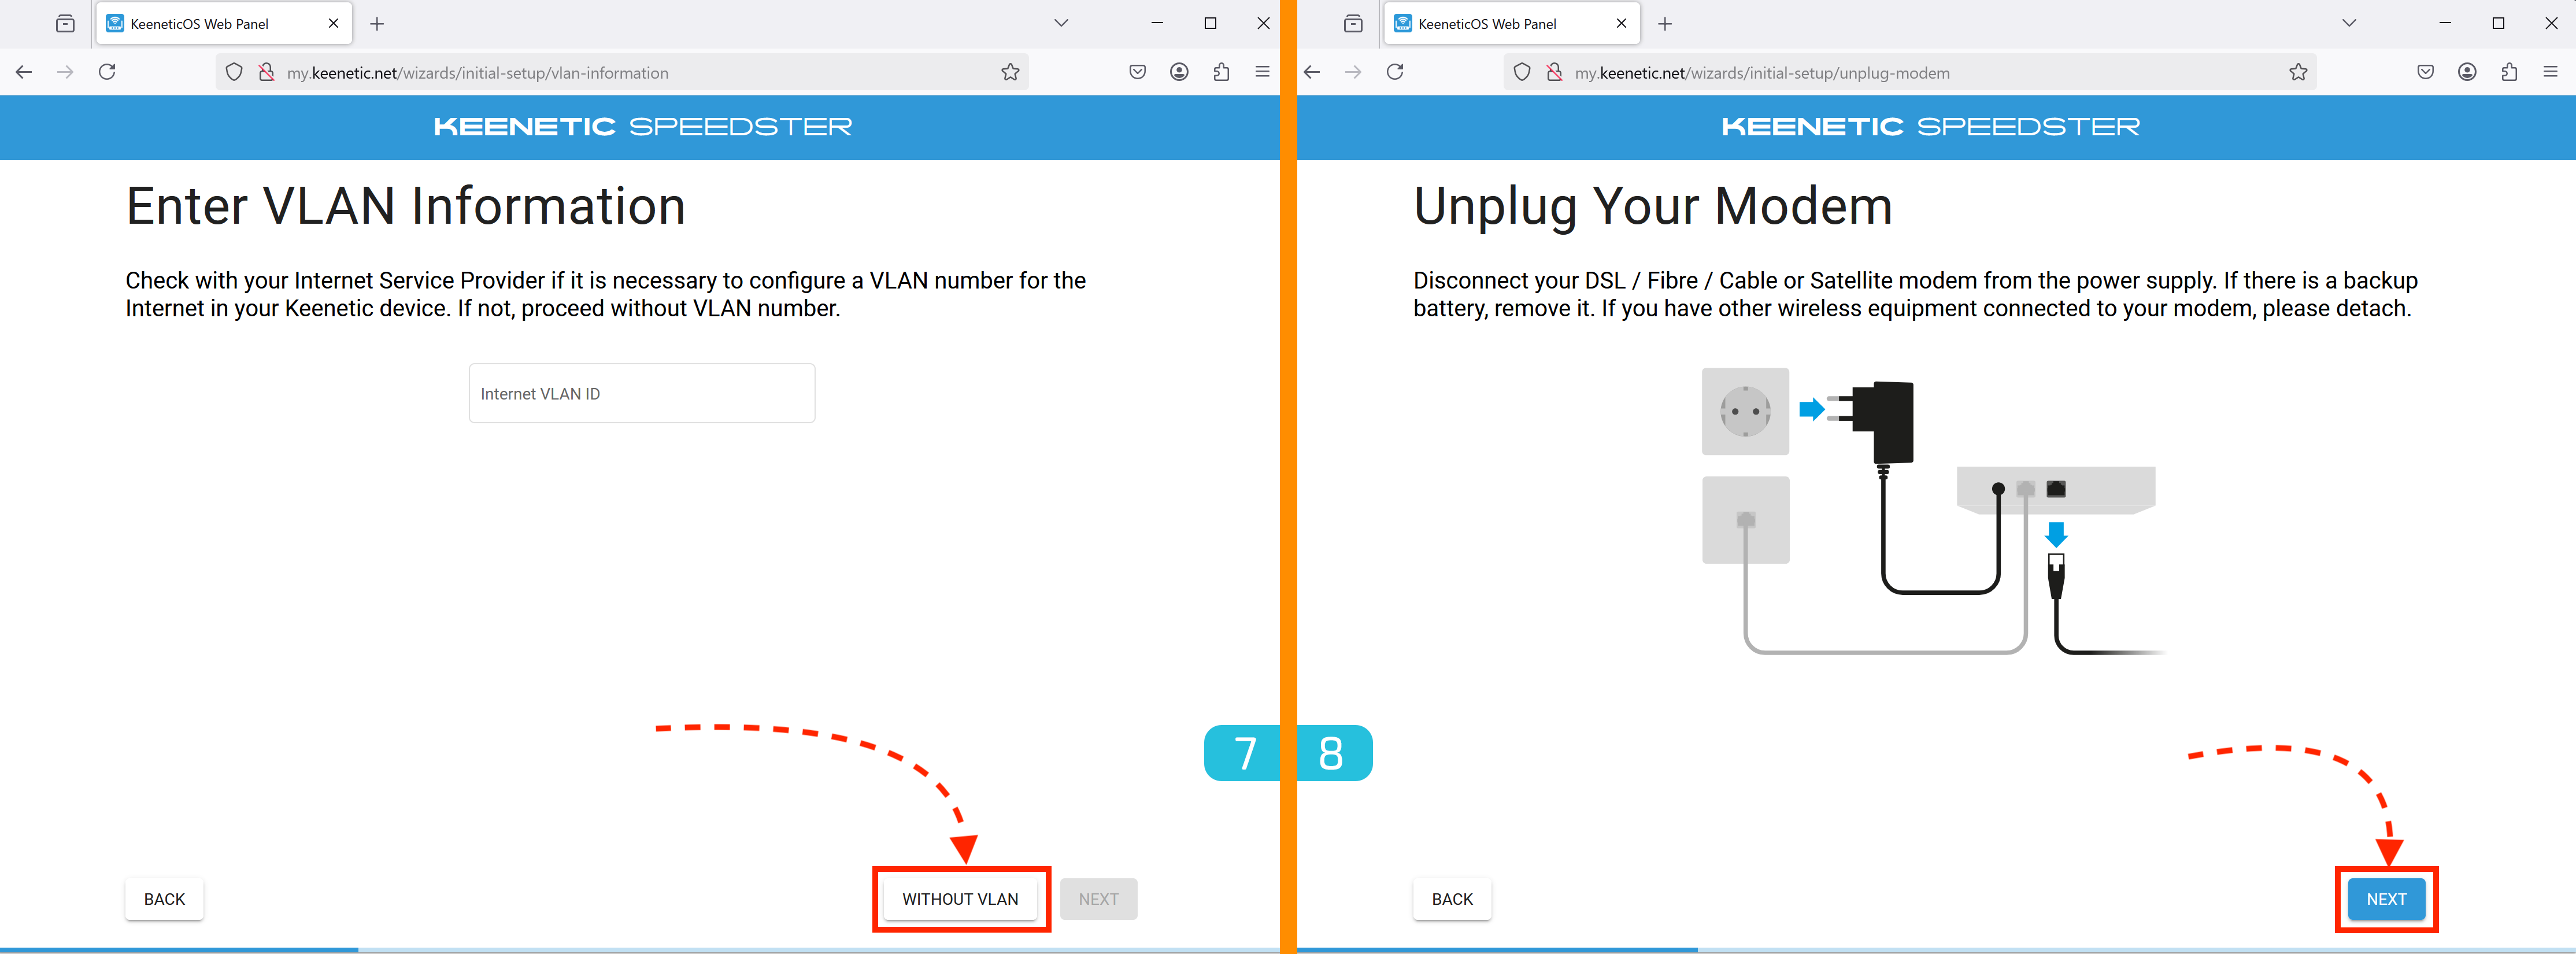
7. Internet Connection Setup
Since the Keenetic will be connected to a pre-configured router from your internet provider, click "WITHOUT VLAN".
8. Turning Off the Main Router (Optional)
In most cases, there's no need to turn off your main router.
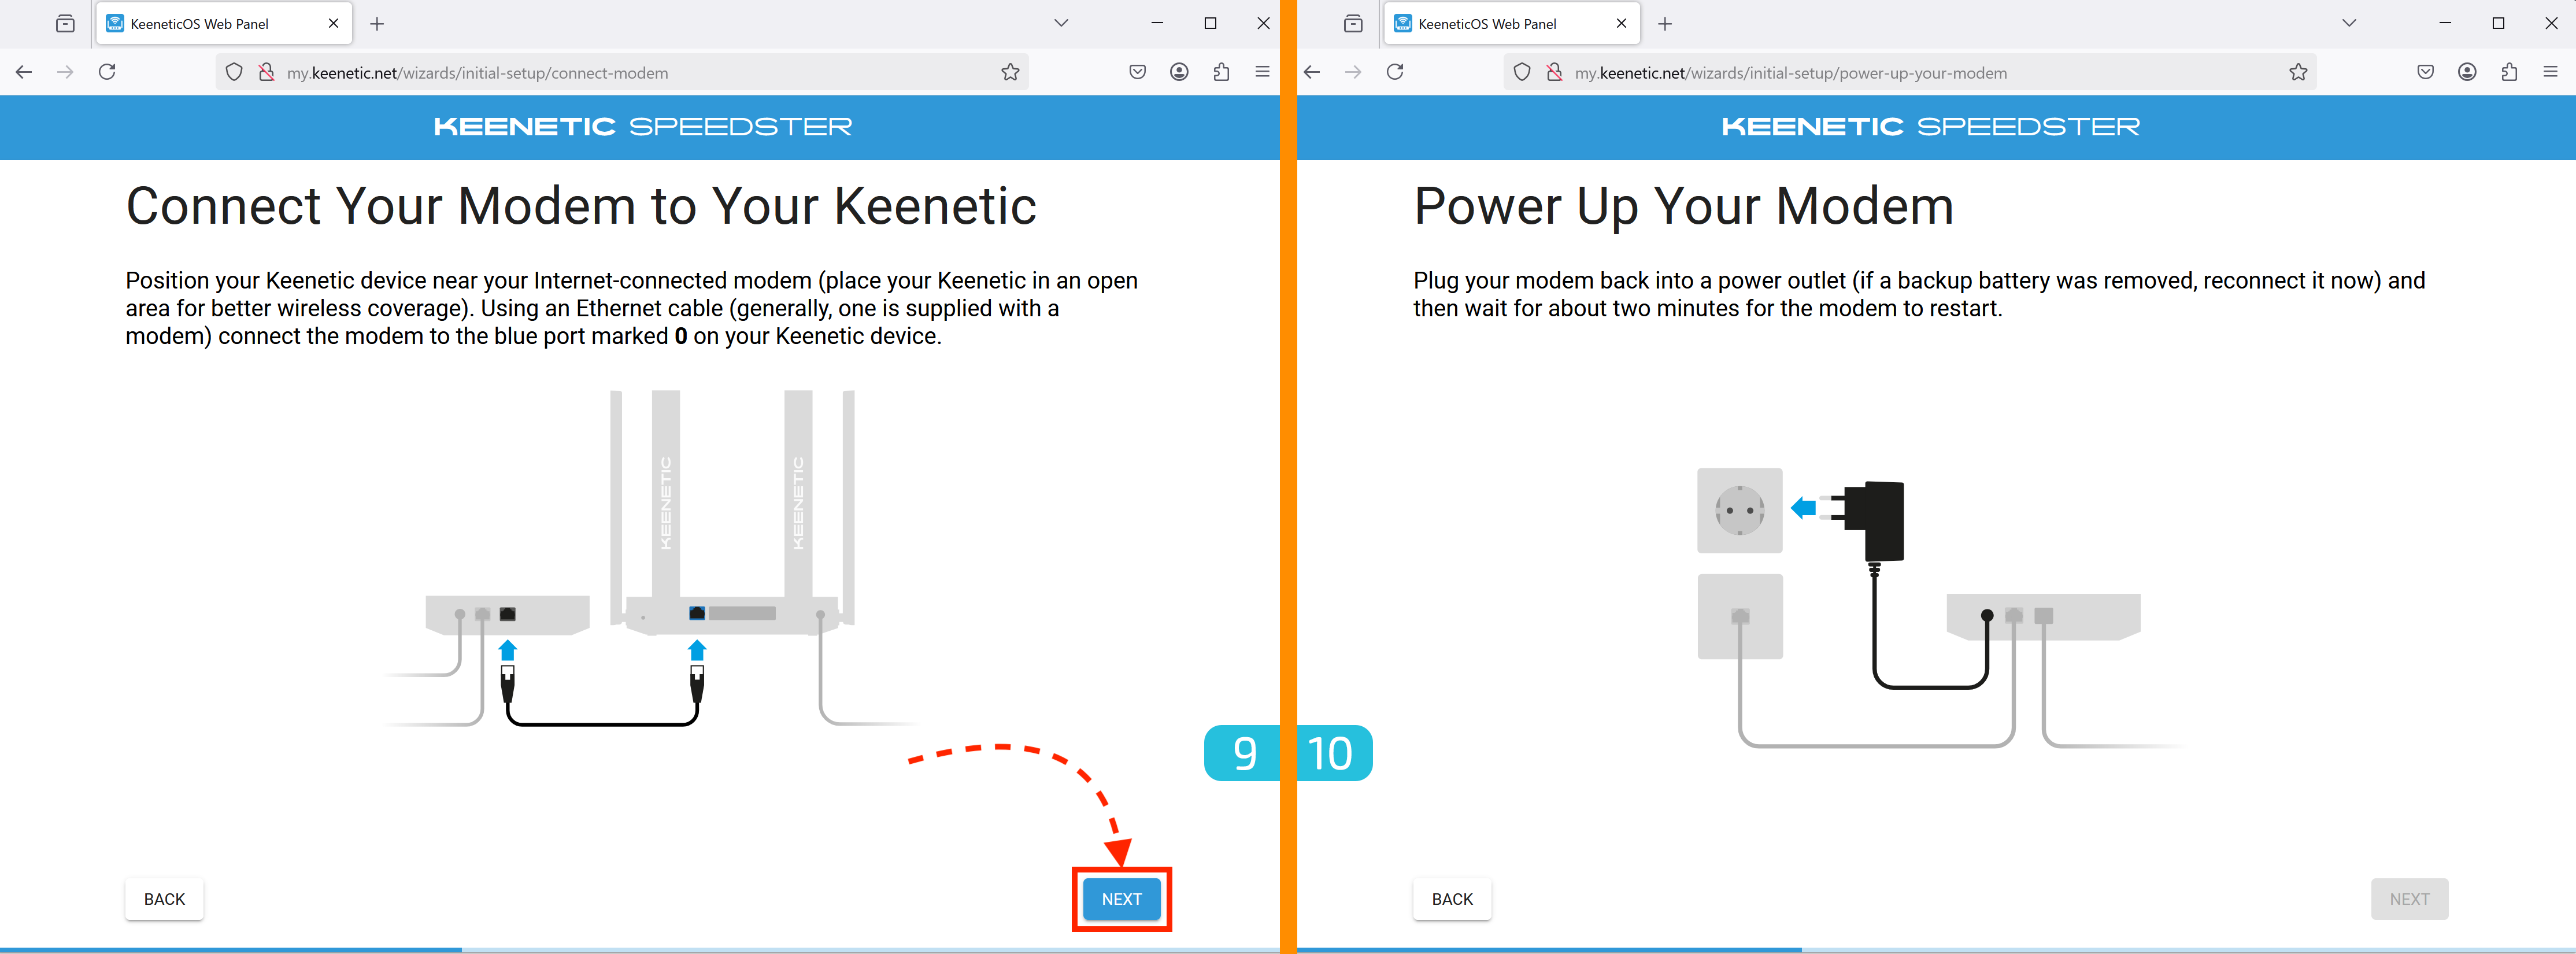
9. Connecting Keenetic to the Main Router
- Place the Keenetic device near your main router.
- Take the Ethernet cable included in the package.
- Connect one end to the main router (use the white or yellow Ethernet port, not the blue one!).
- Connect the other end to the WAN port (0) on the Keenetic — it's blue.
10. Powering On the Main Router
If you turned off the main router in step 8, turn it back on now.
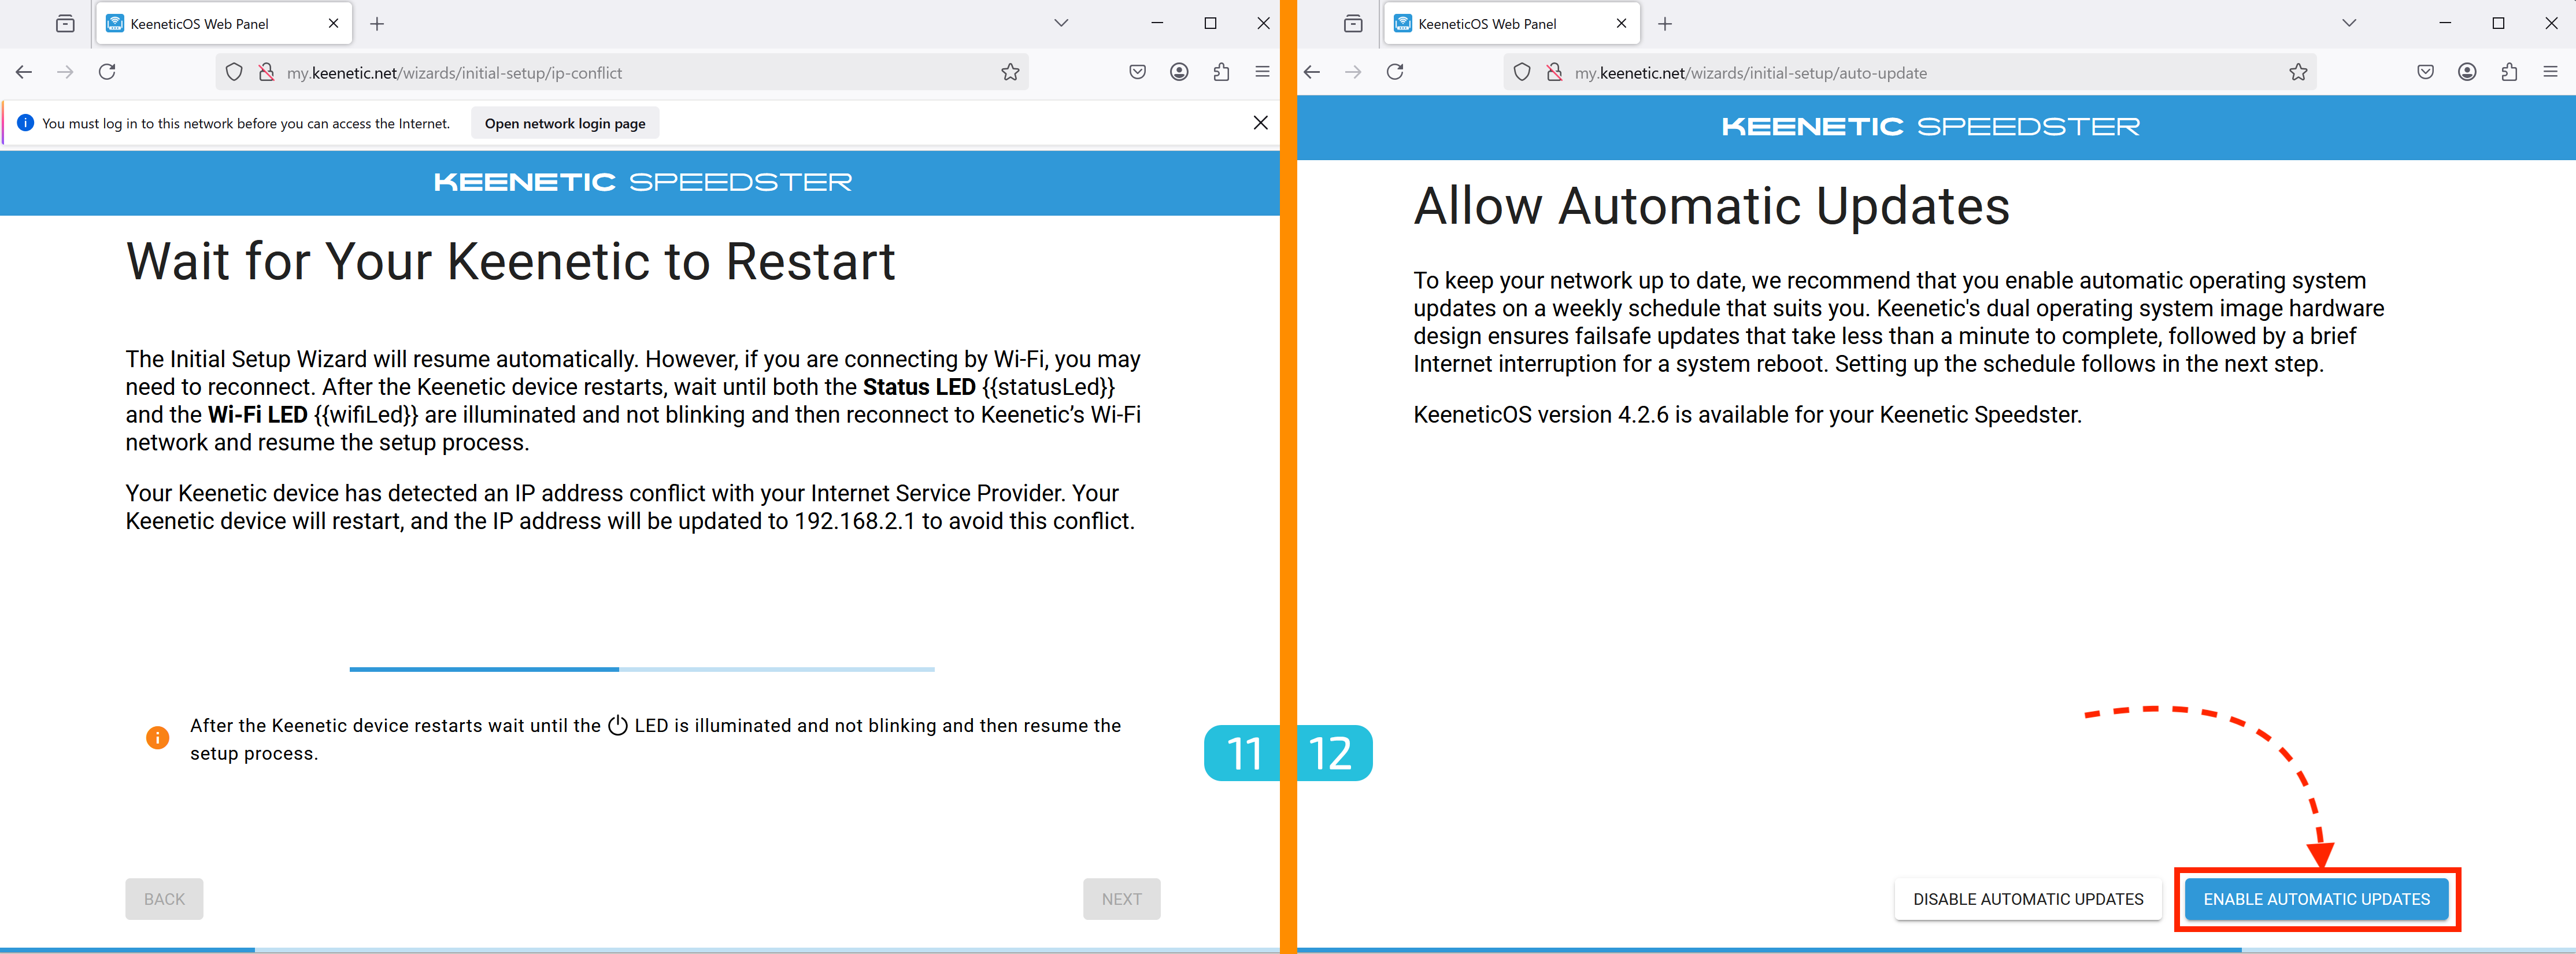
11. Waiting for Reboot
Wait for the device to finish rebooting (this may take up to 2 minutes).
12. Enabling Automatic Updates
Allow the device to install updates automatically.
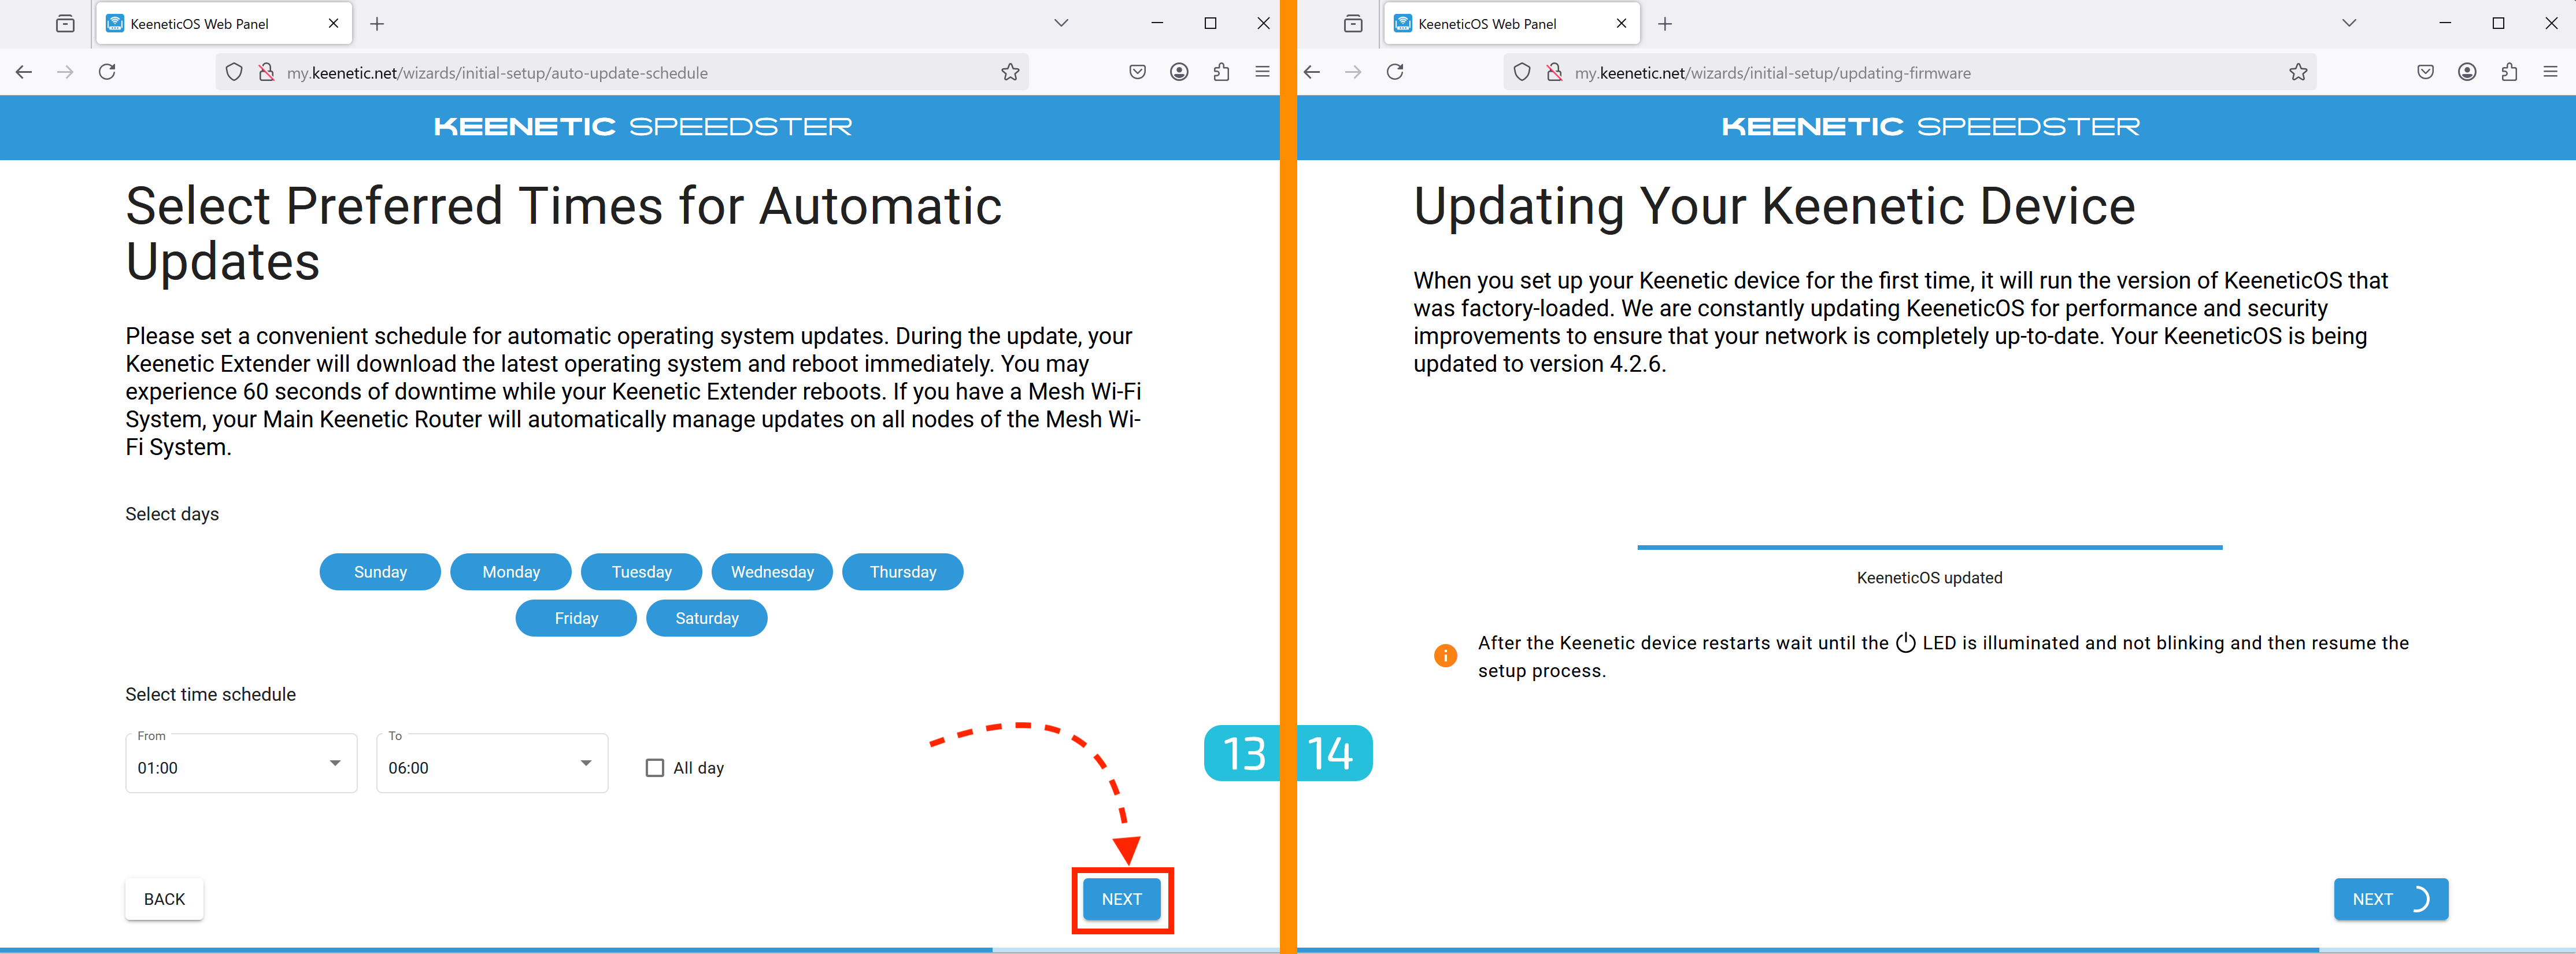
13. Update Schedule Configuration
The update process may cause up to 60 seconds of downtime, so it's recommended to set a convenient update schedule. If you're unsure, leave the default settings — you can change them later.
14. Firmware Update
Wait for the firmware update to complete (this will take no more than 3 minutes).

15. Wi-Fi Network Setup
At this step, you can change the Wi-Fi network name and password (by default, they match the info on the sticker). These settings can be changed later.
16. Let's Encrypt Certificate Issuance
Keenetic will automatically issue a certificate to support HTTPS connections in the device control panel.
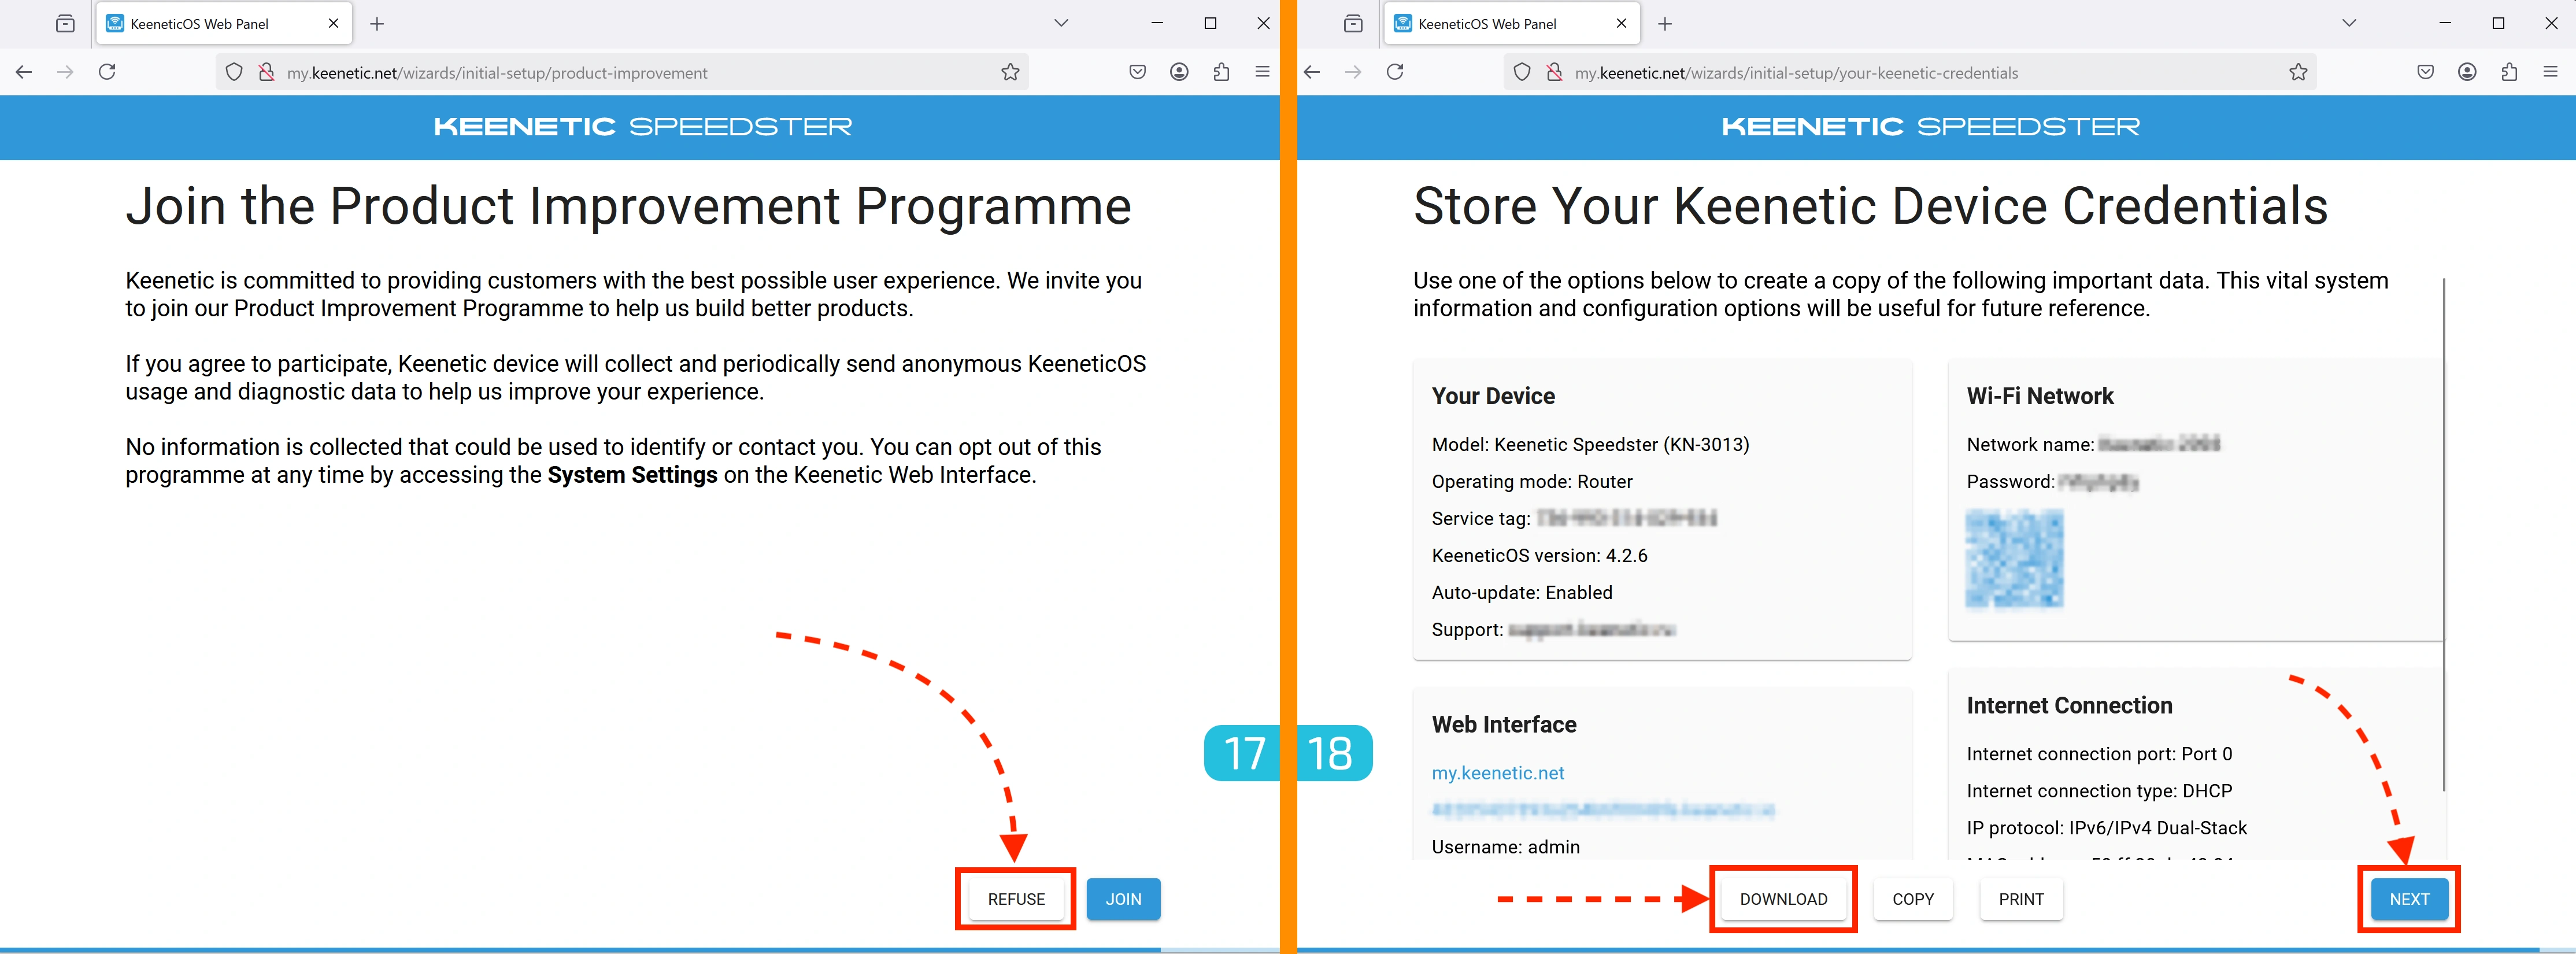
17. Declining the Improvement Program
When prompted to join the product improvement program, choose to decline.
18. Saving Access Data
At this stage, it is recommended to save all access credentials for the device. This will help avoid having to reconfigure it in the future.
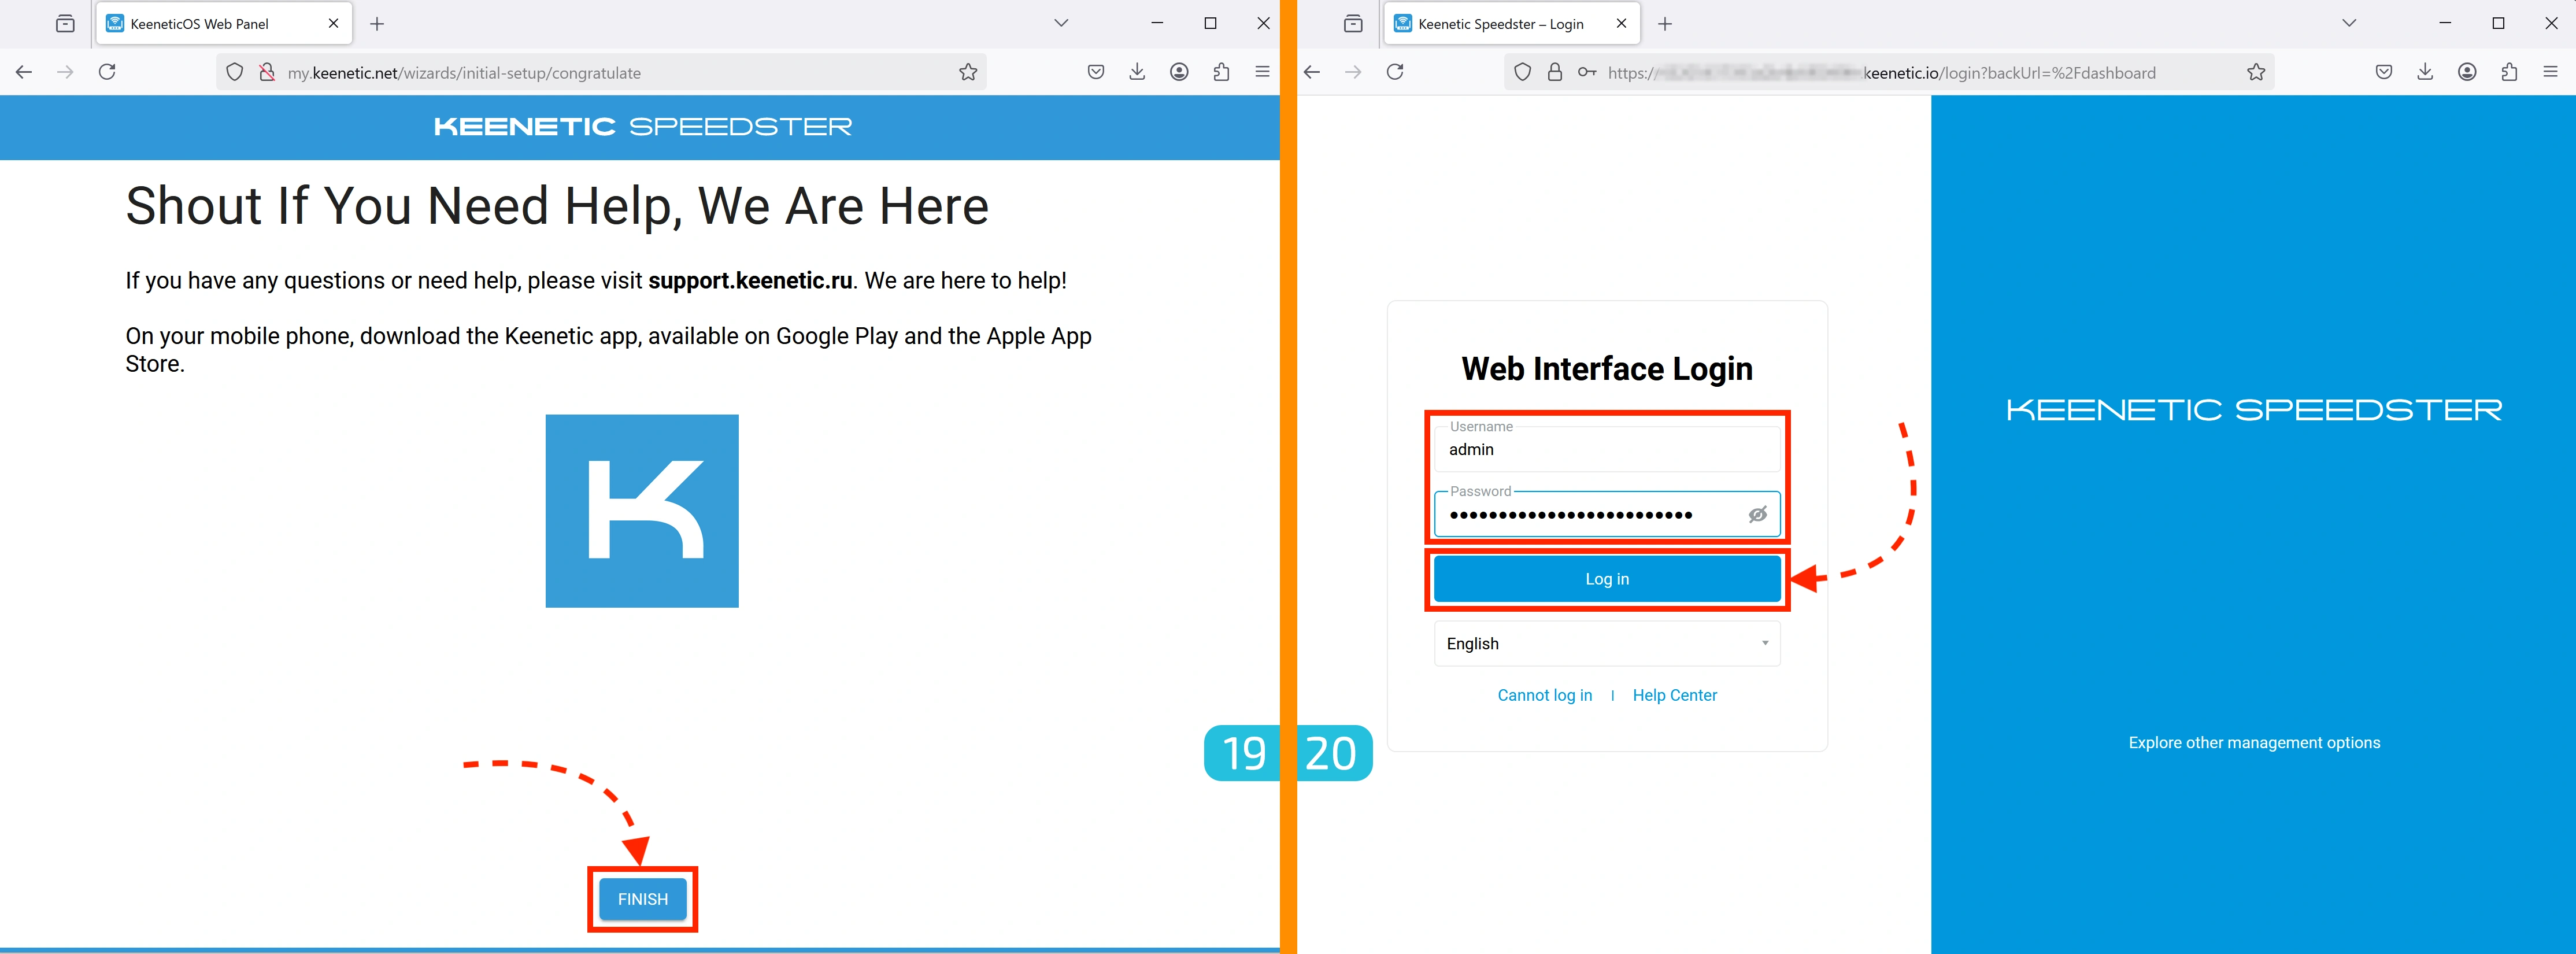
19. Completing Initial Setup
Click "Finish".
20. Logging into the Control Panel
After completing the setup, you will be redirected to the control panel login page. Enter:
- Username —
admin - Password — the one you set in step 5
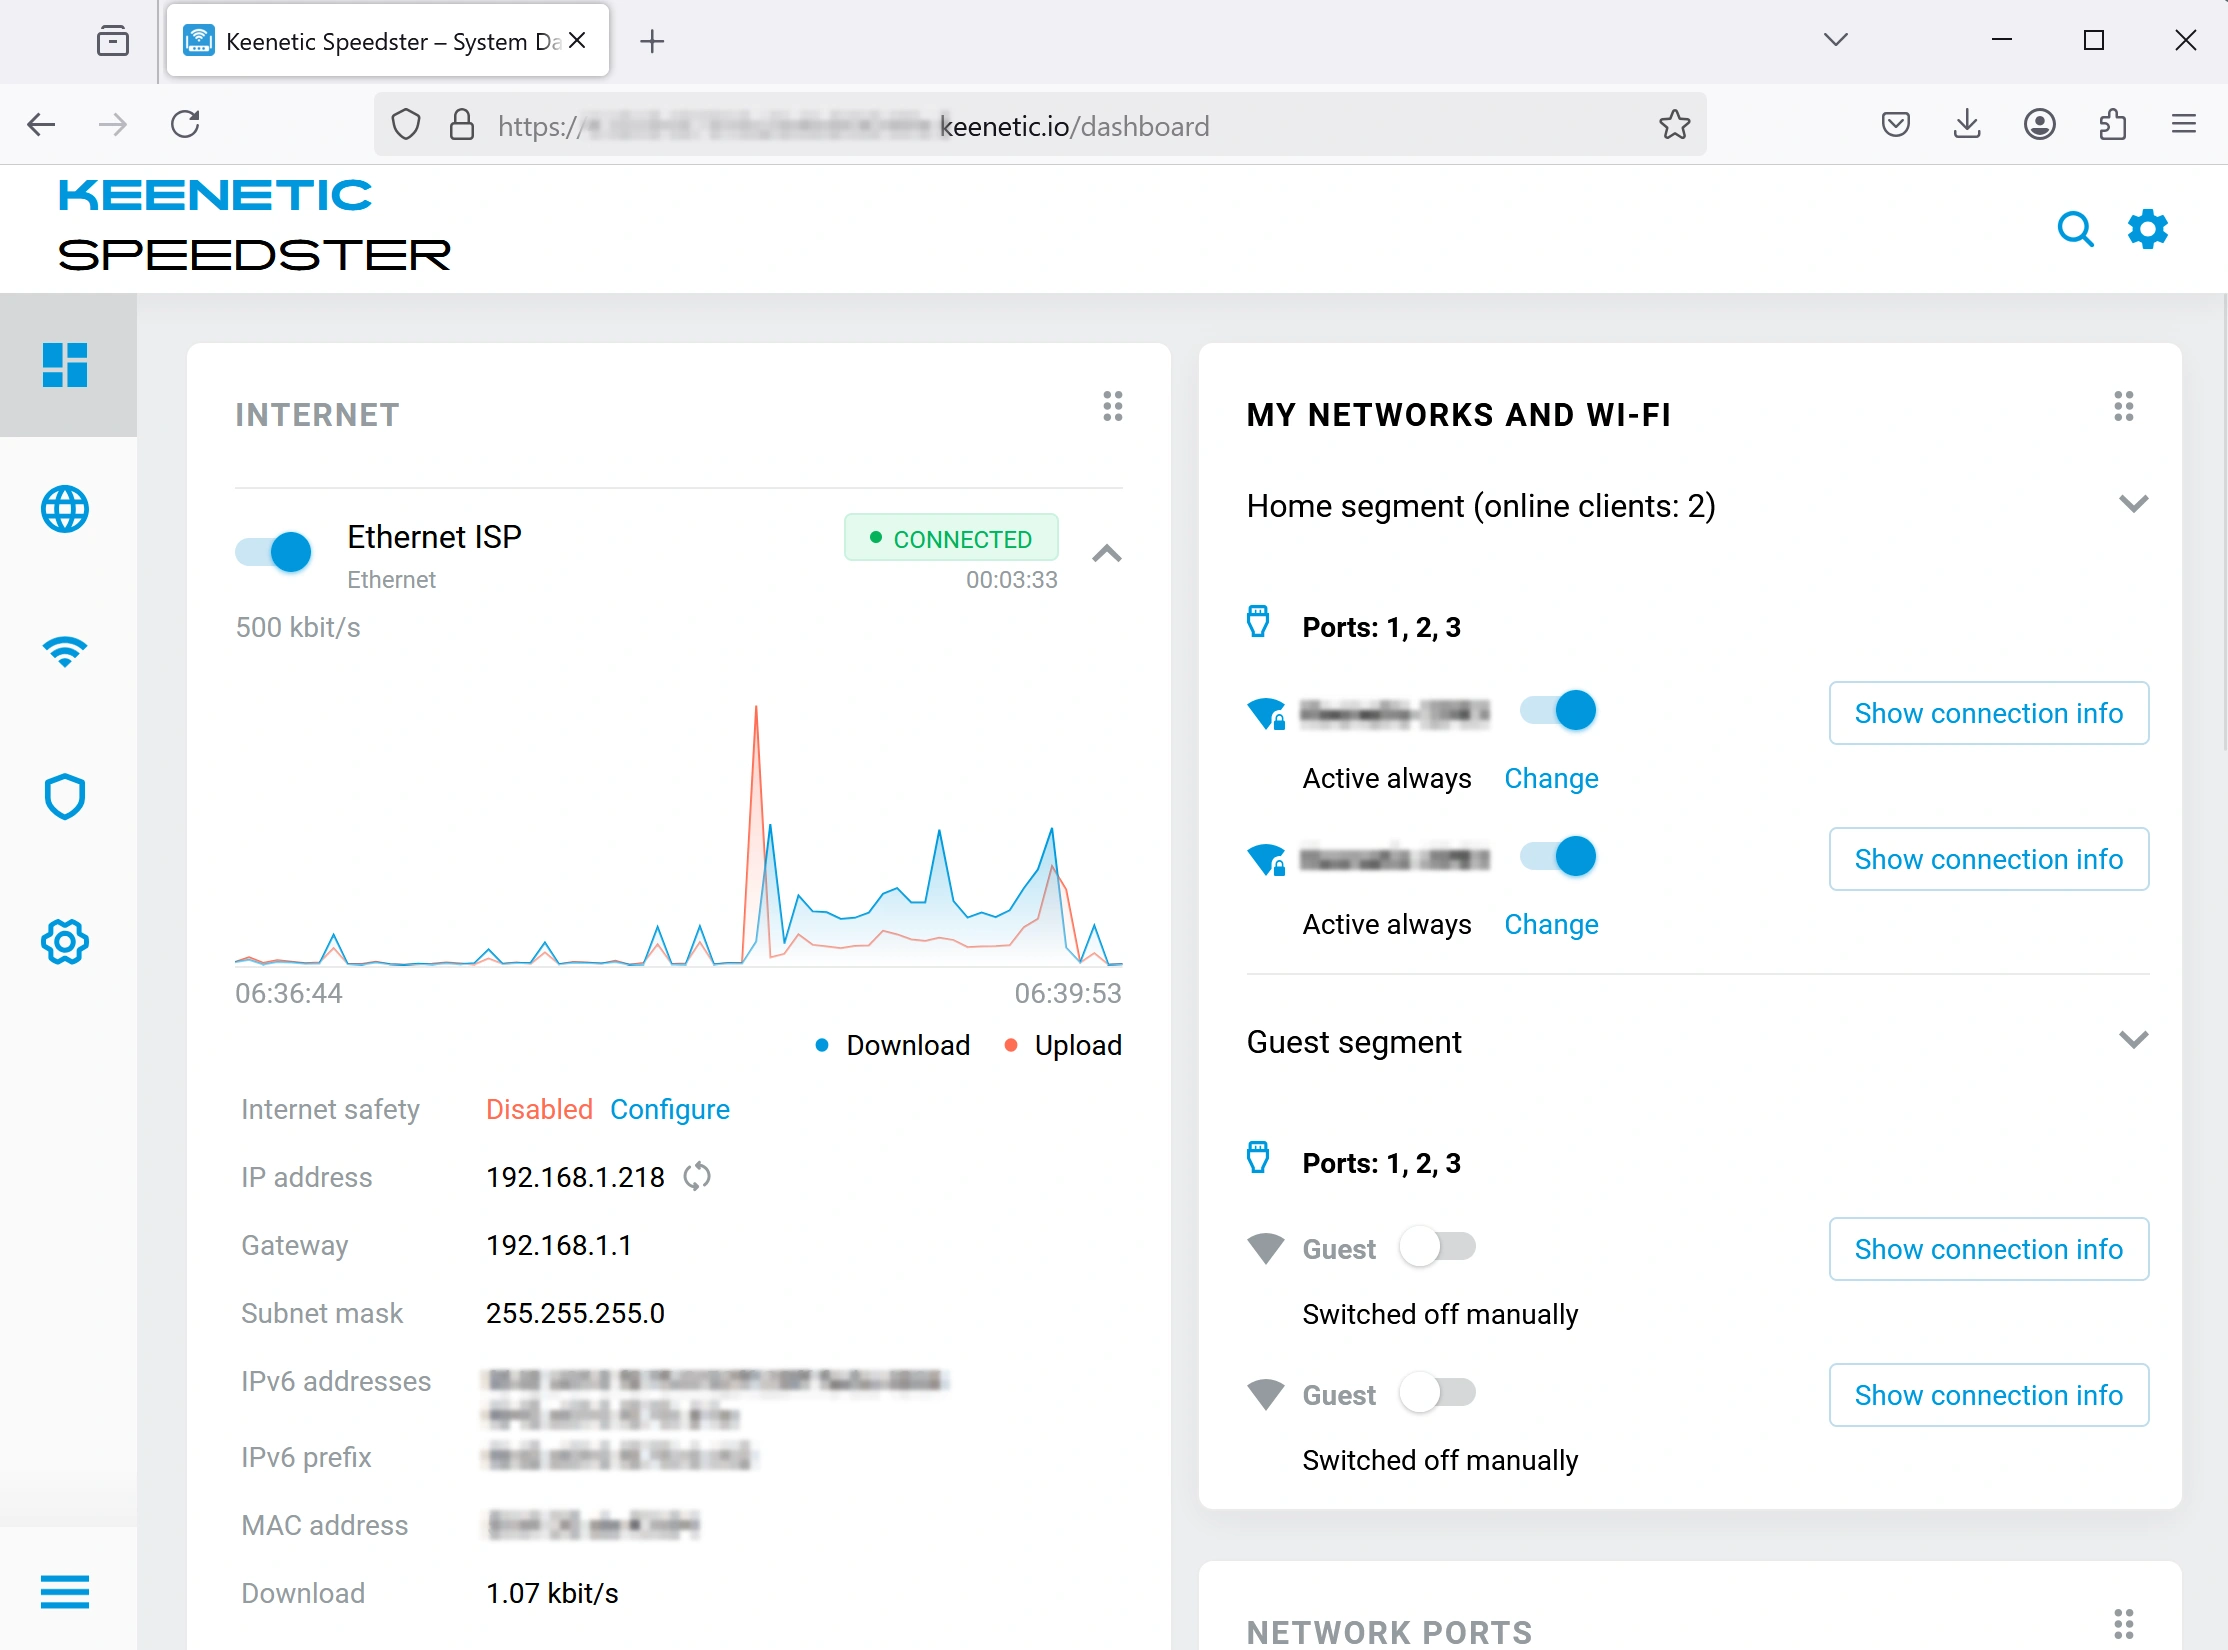
You are now in the router’s control panel. At this point, it simply passes the internet connection through the cable from the main router without applying any proxy tools.
Installing Components
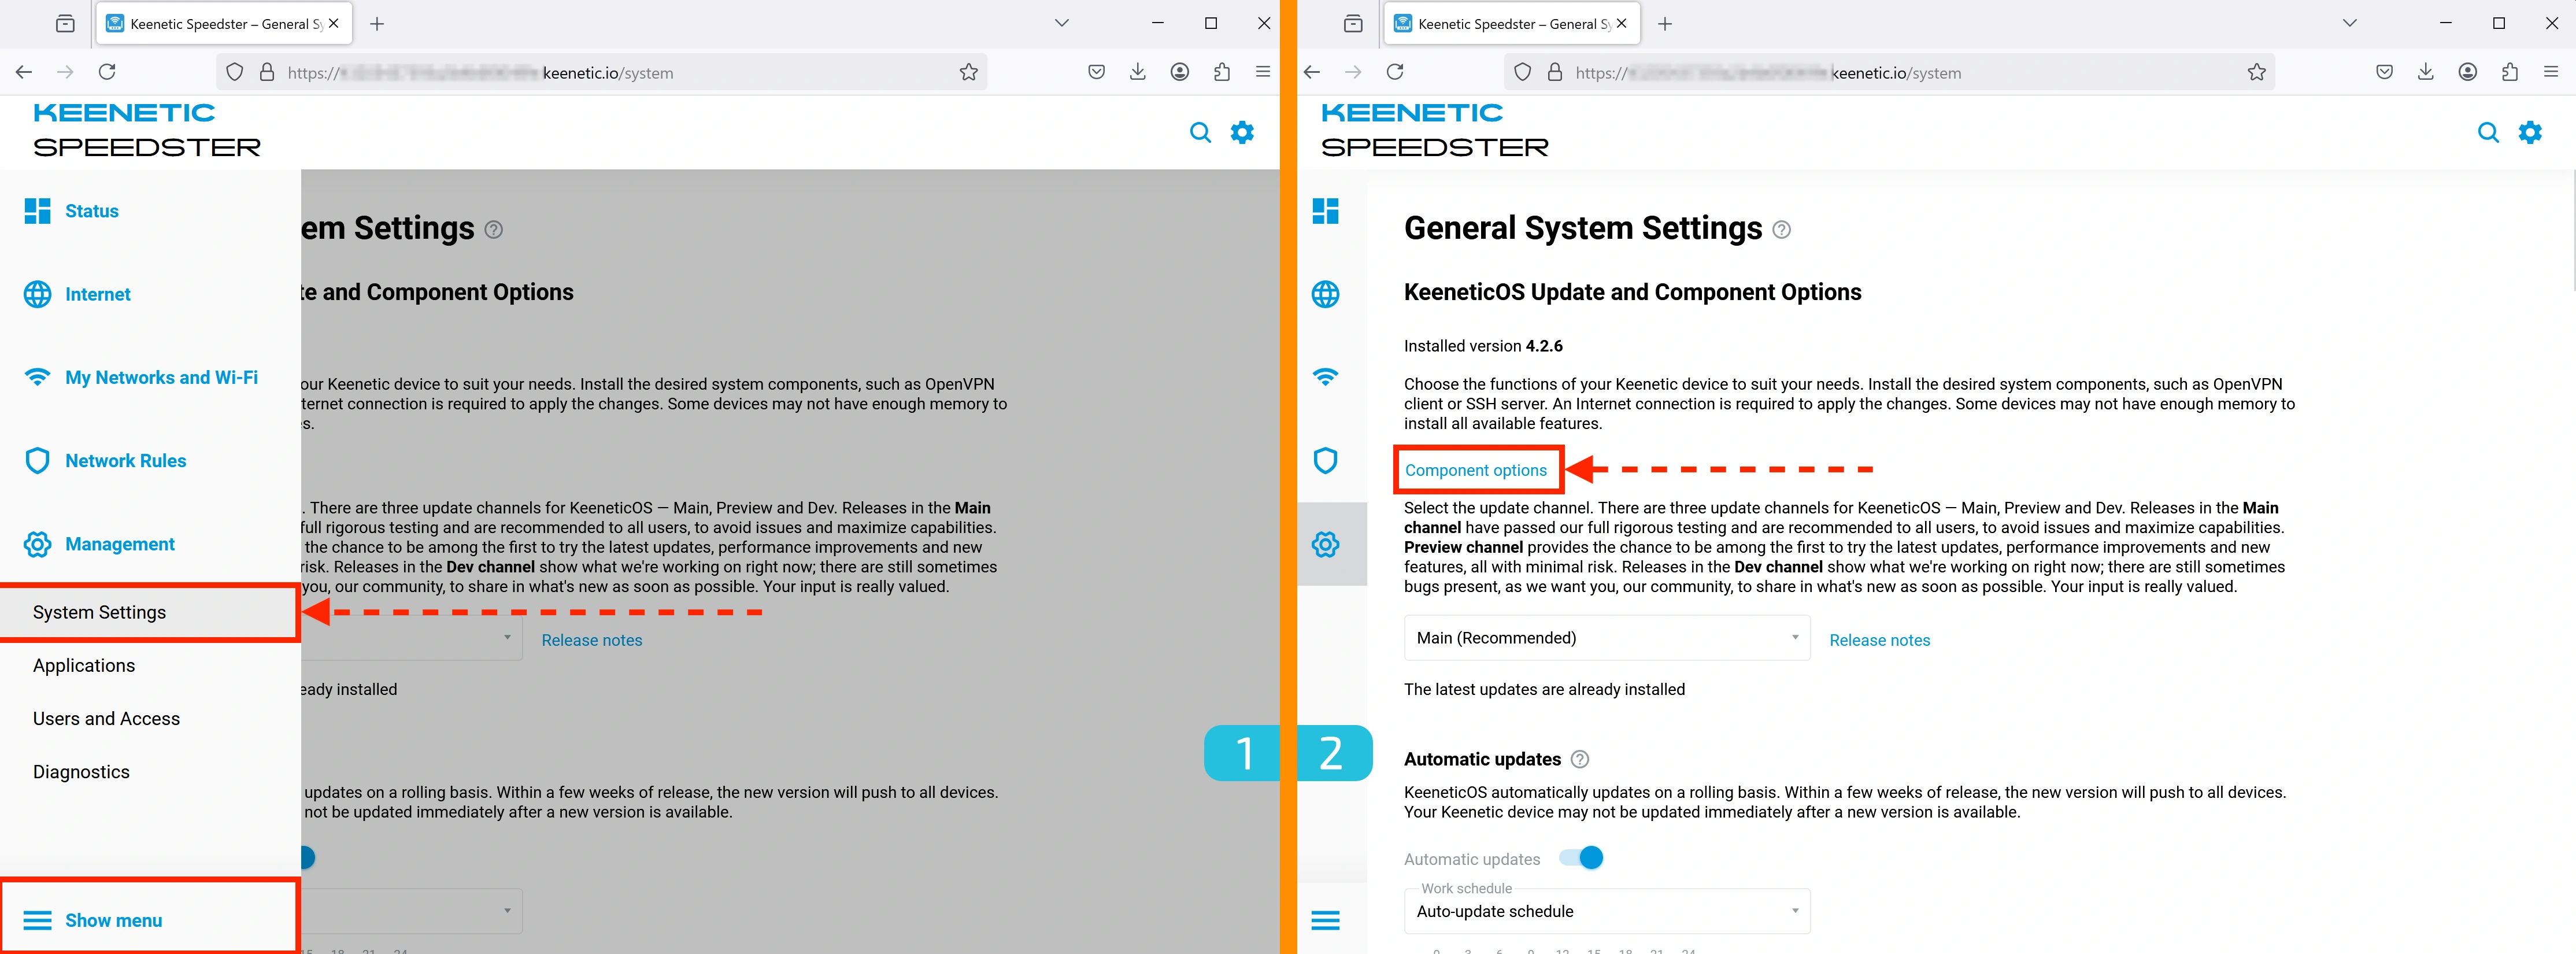
1-2. Accessing Settings
- Go to Management → System Settings
- Click "Component options"
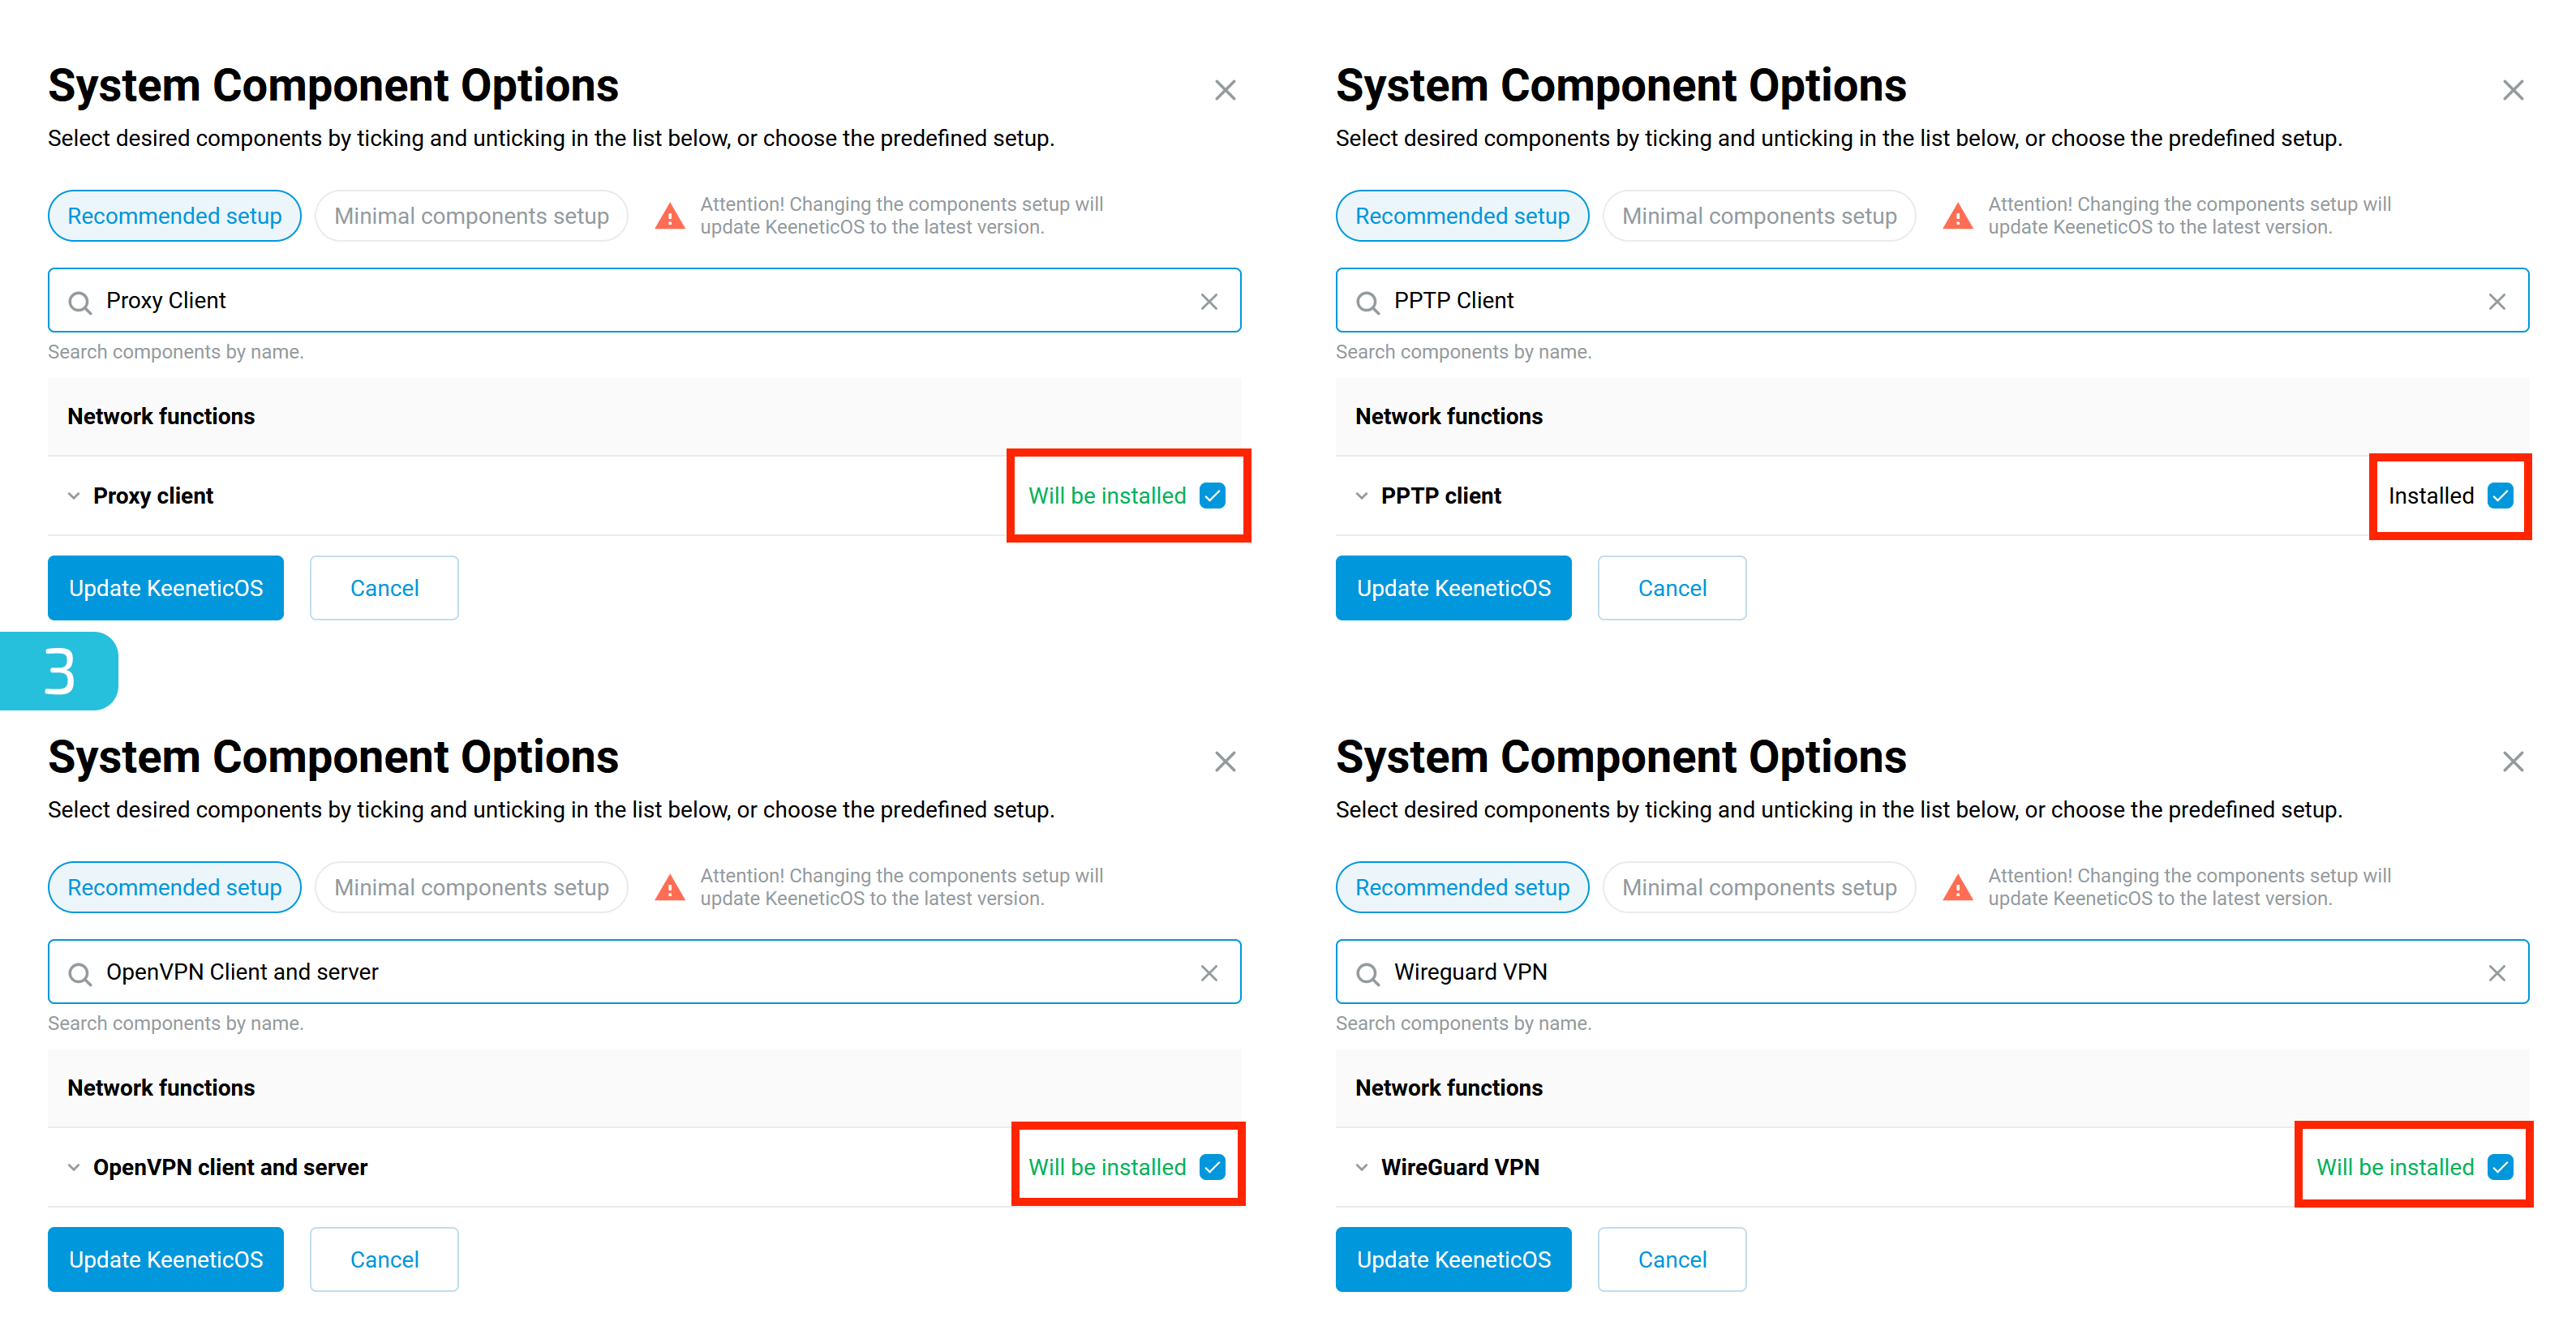
3. Verifying and Installing Required Components
Make sure the following components are installed:
- Proxy Client
- PPTP Client
- OpenVPN Client and Server
- Wireguard VPN (if needed)
If any component is missing, check the box next to its name as shown in the image below.
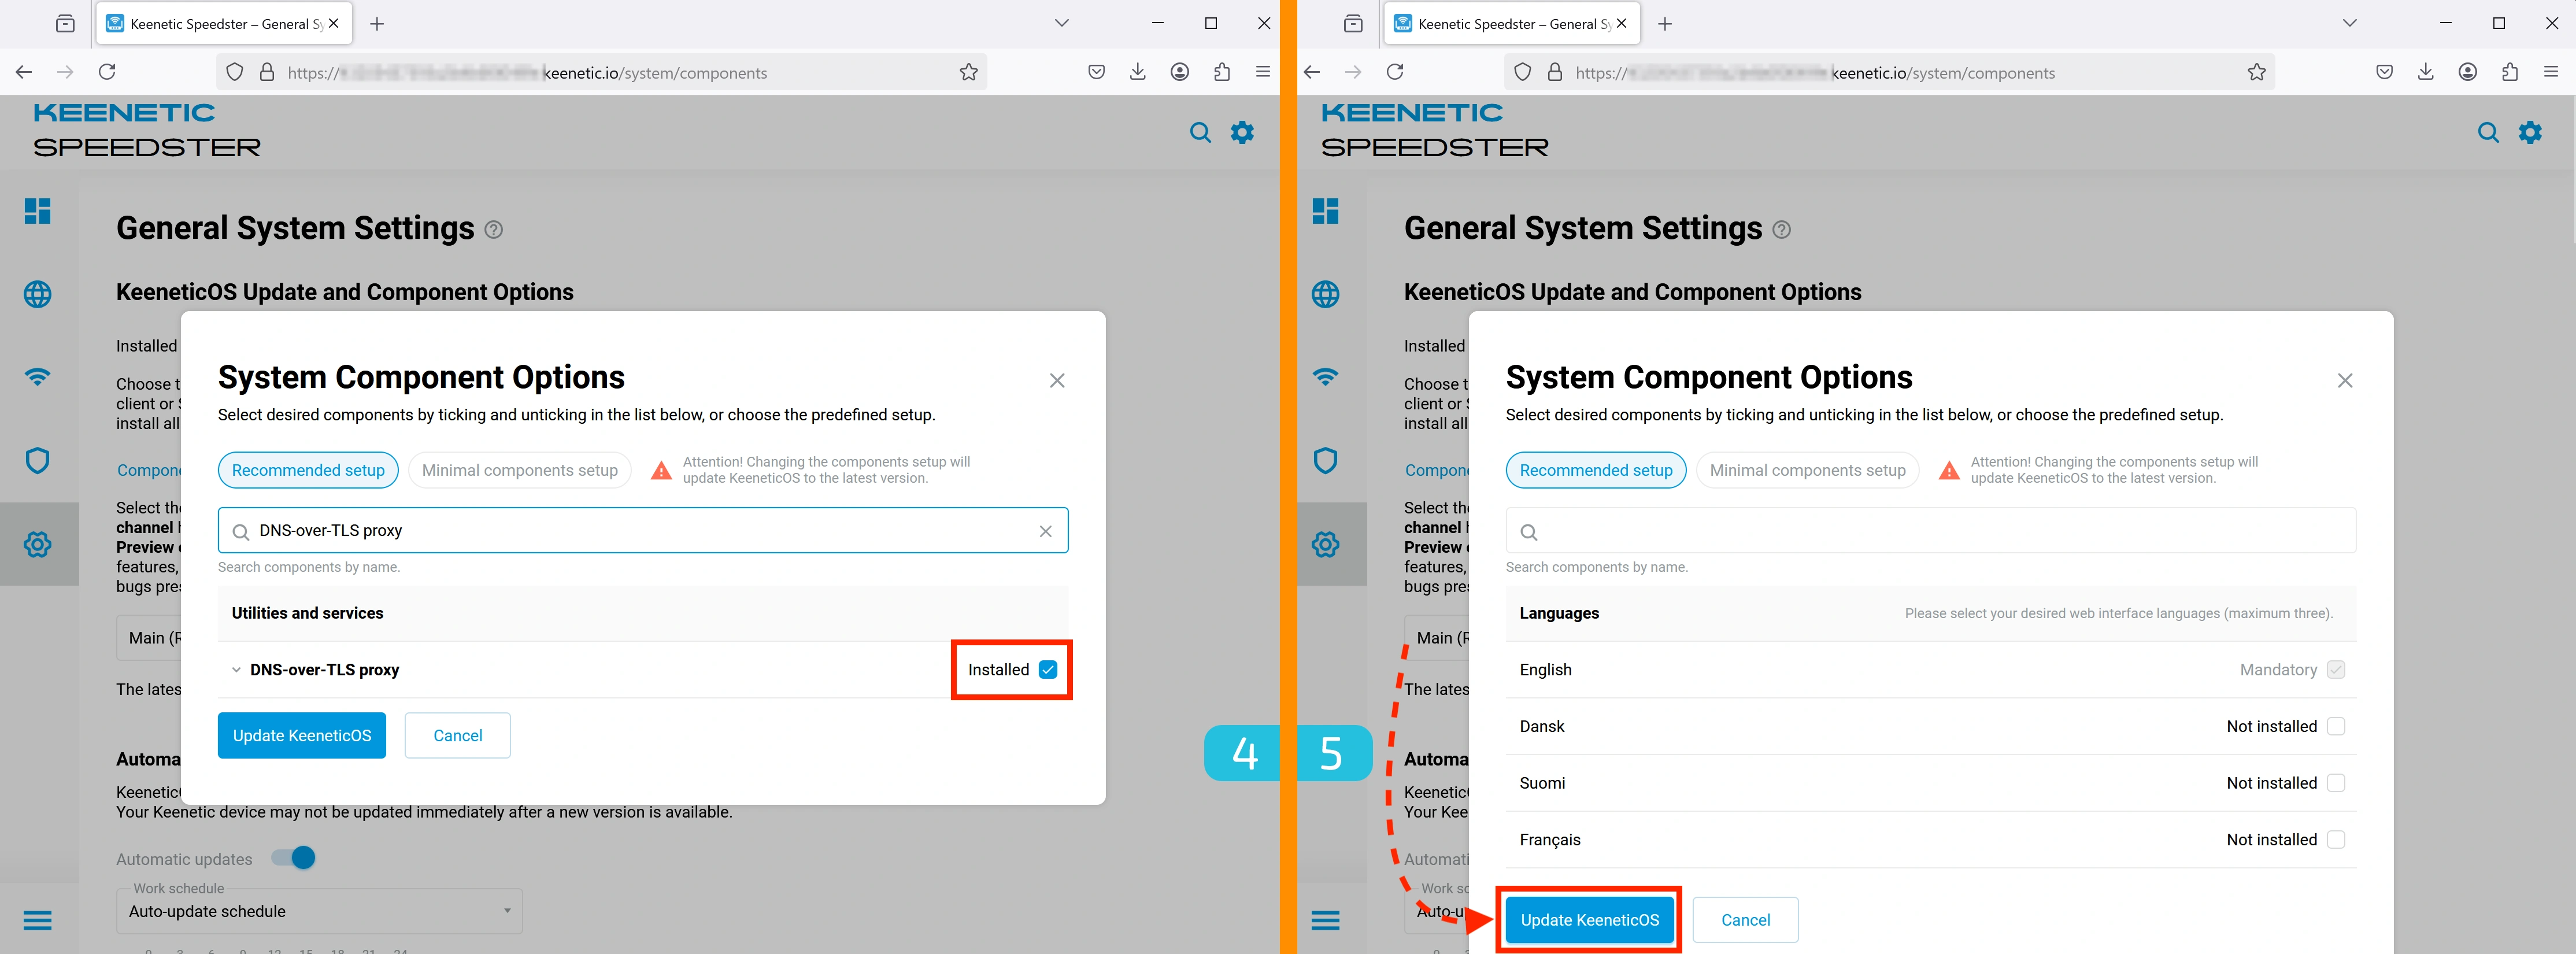
4. Verifying DNS-over-TLS Support
Make sure the DNS-over-TLS proxy component is installed — it is required for proper proxy operation.
5. Updating KeeneticOS
After selecting all necessary components, click "Update KeeneticOS".
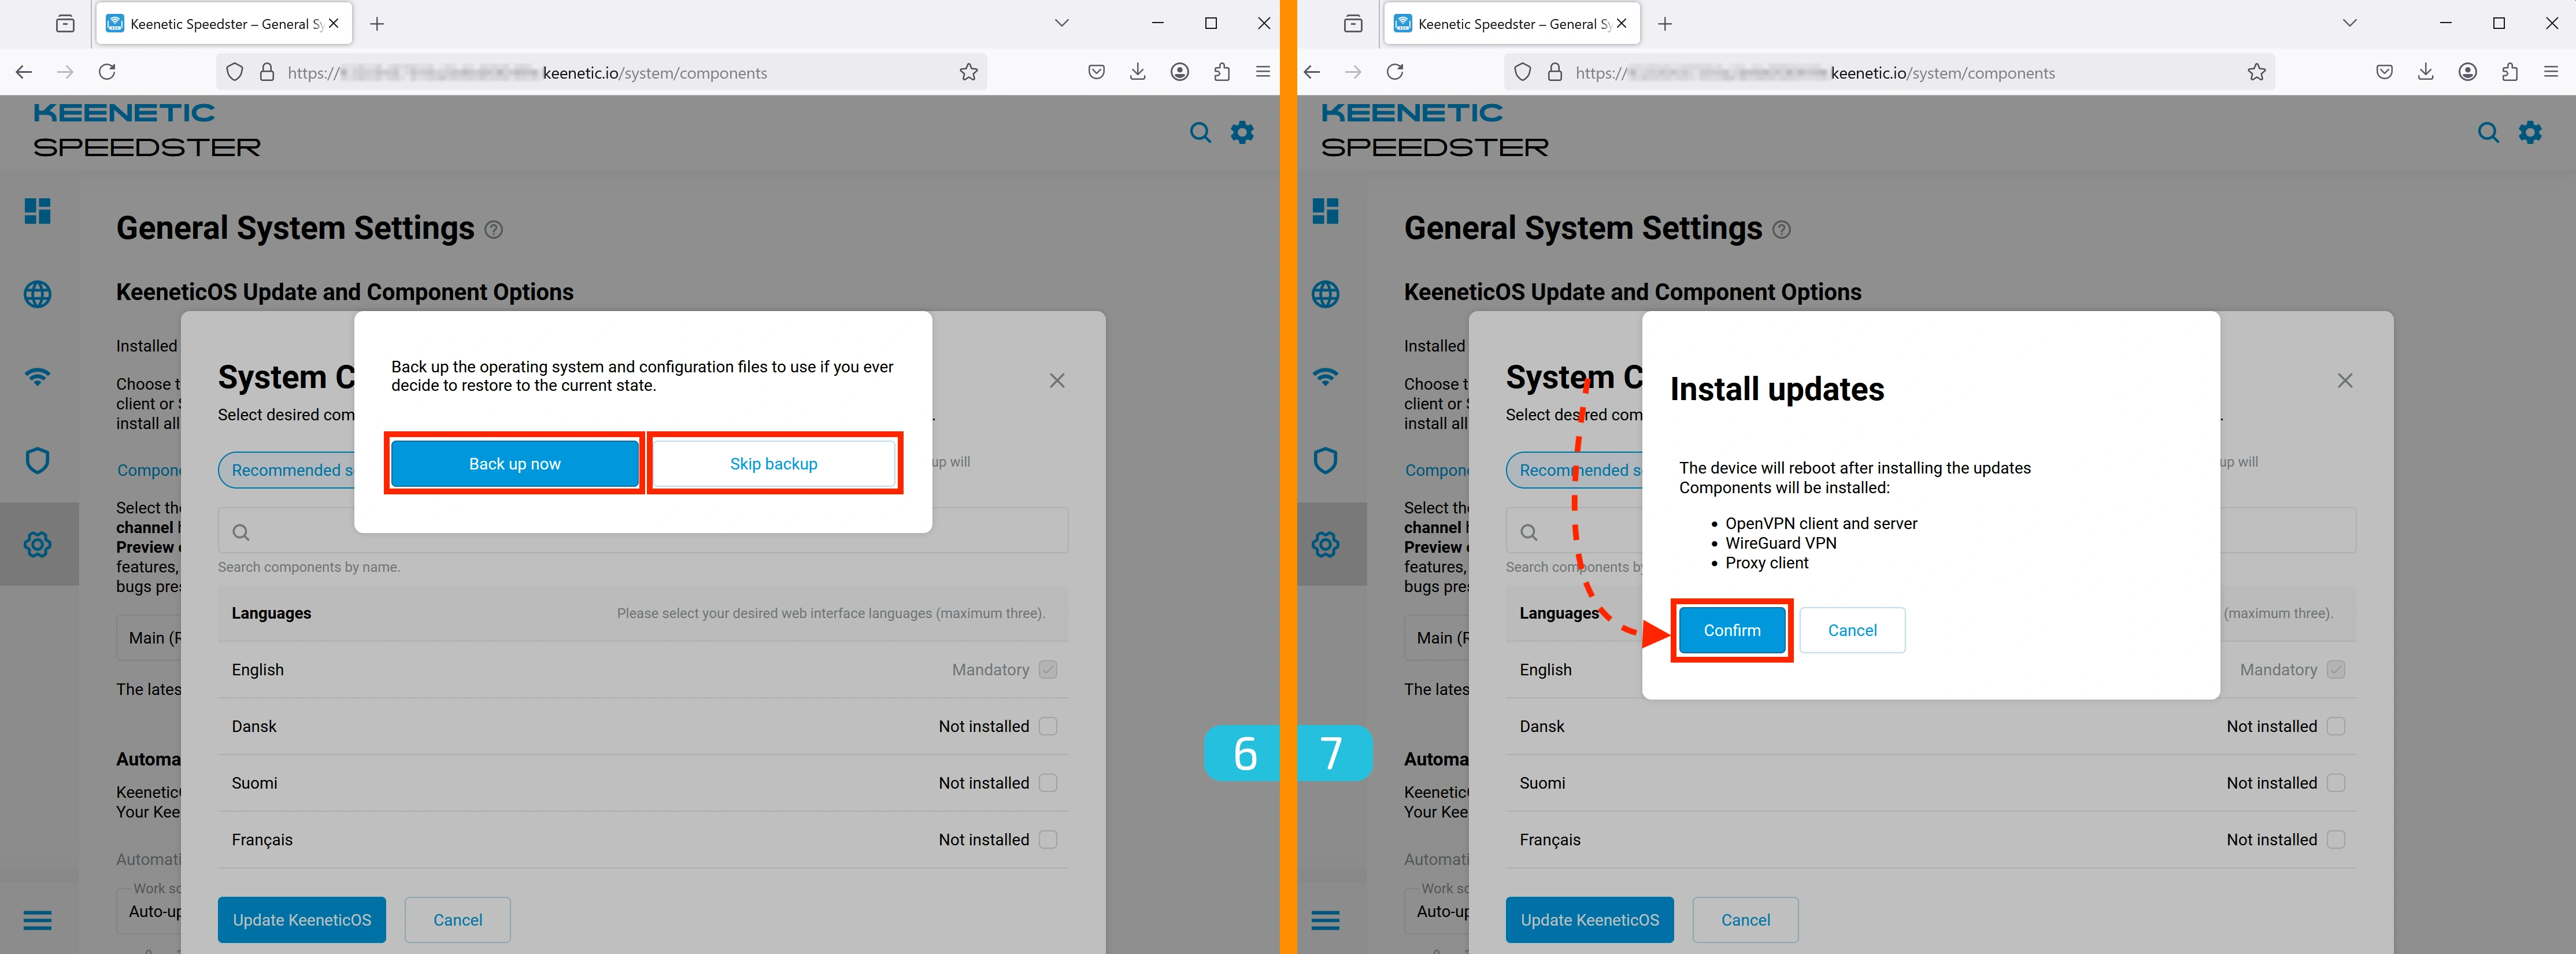
6. Creating a Backup (Optional)
At this stage, you can create a backup of your settings.
7. Confirming Component Installation
A window titled Install updates will appear, listing the components to be installed. Click "Confirm" to proceed.
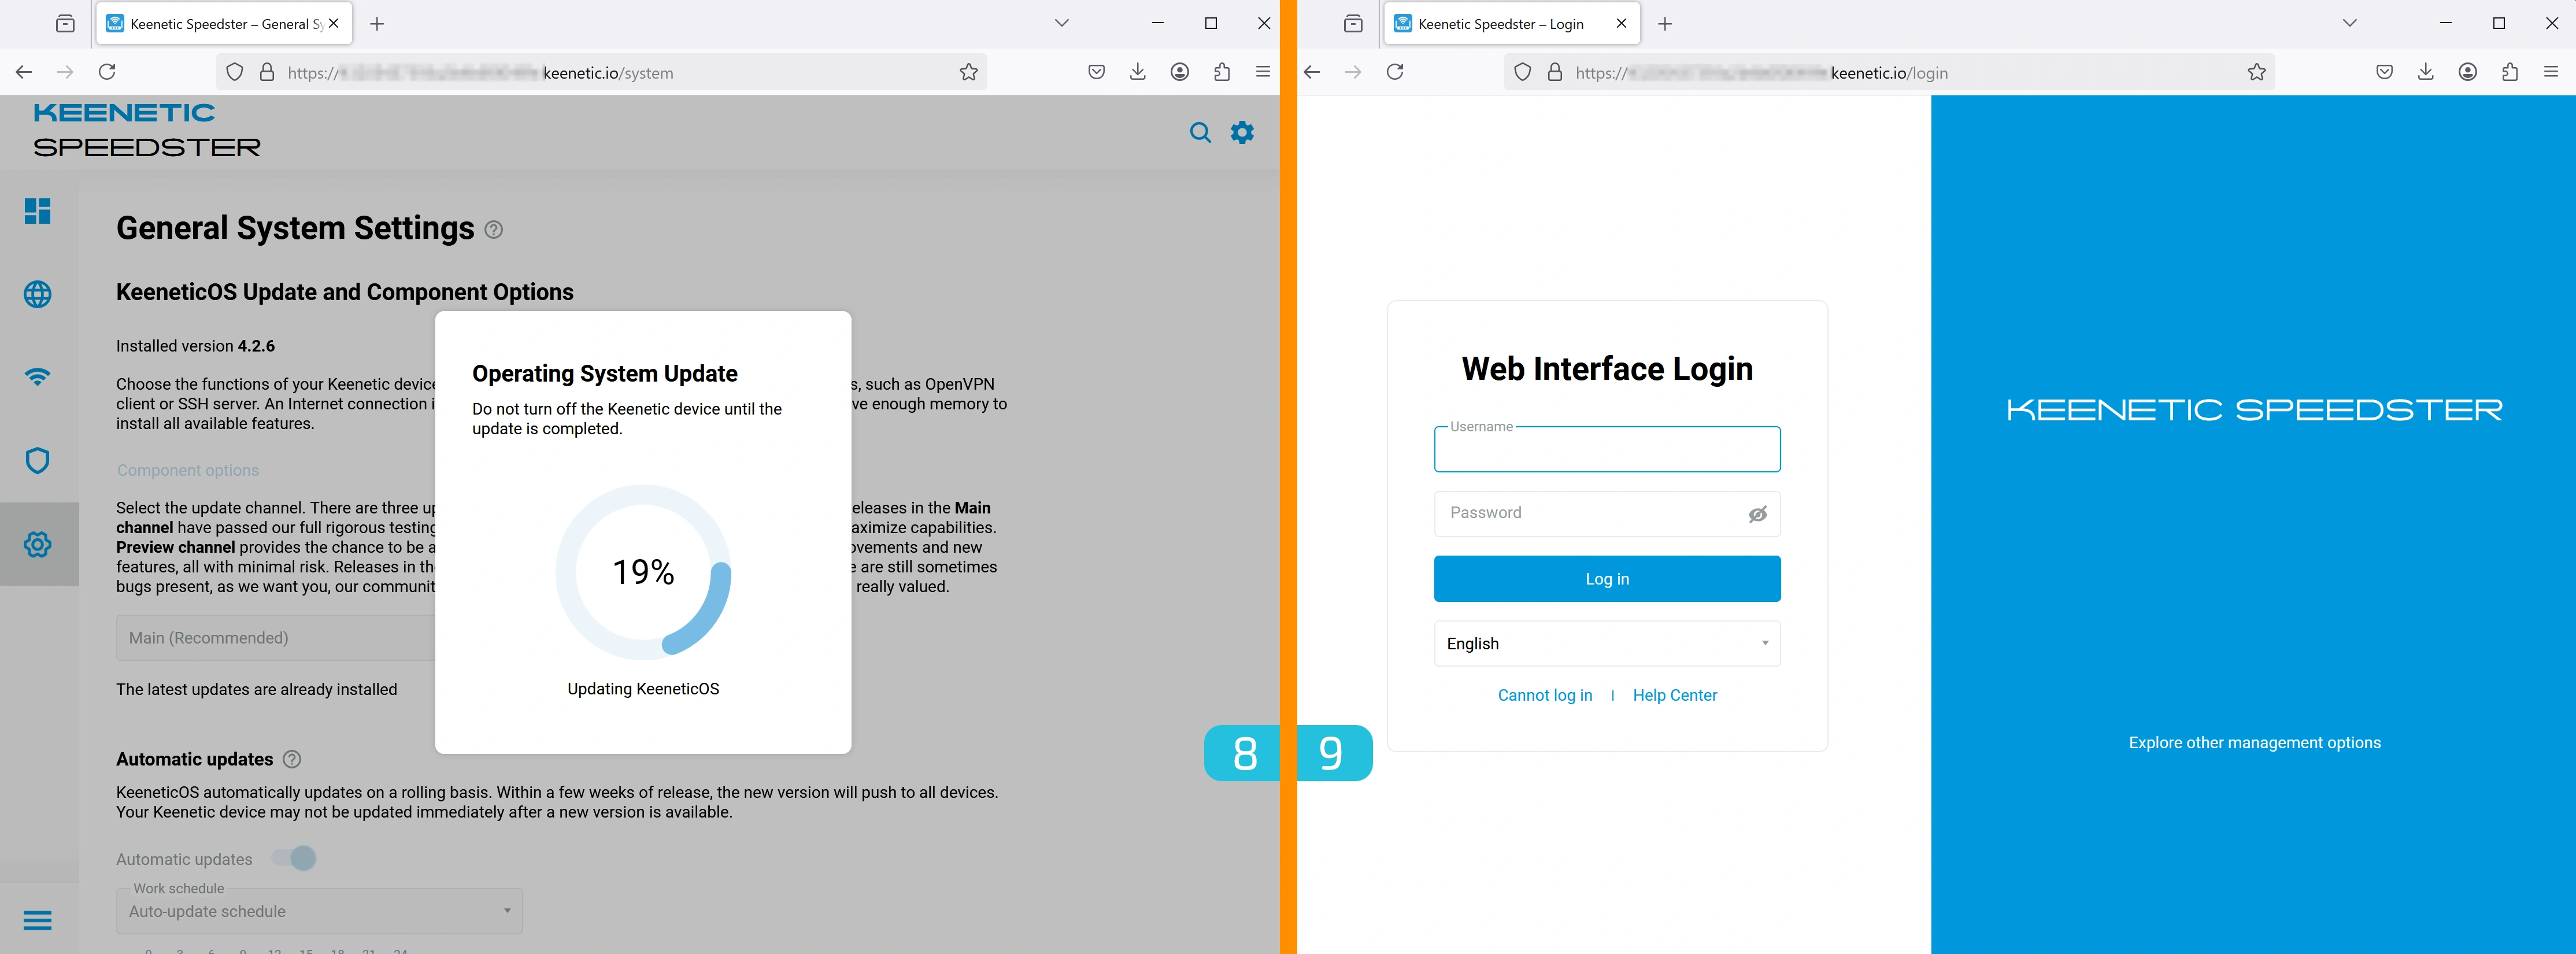
8. Waiting for Update
The update process will take no more than 3 minutes.
9. Re-Logging into the Control Panel
After the components are installed, you will be redirected to the login page. Enter:
- Username —
admin - Password — the one you set earlier.
Setting Up SOCKS5 Proxy
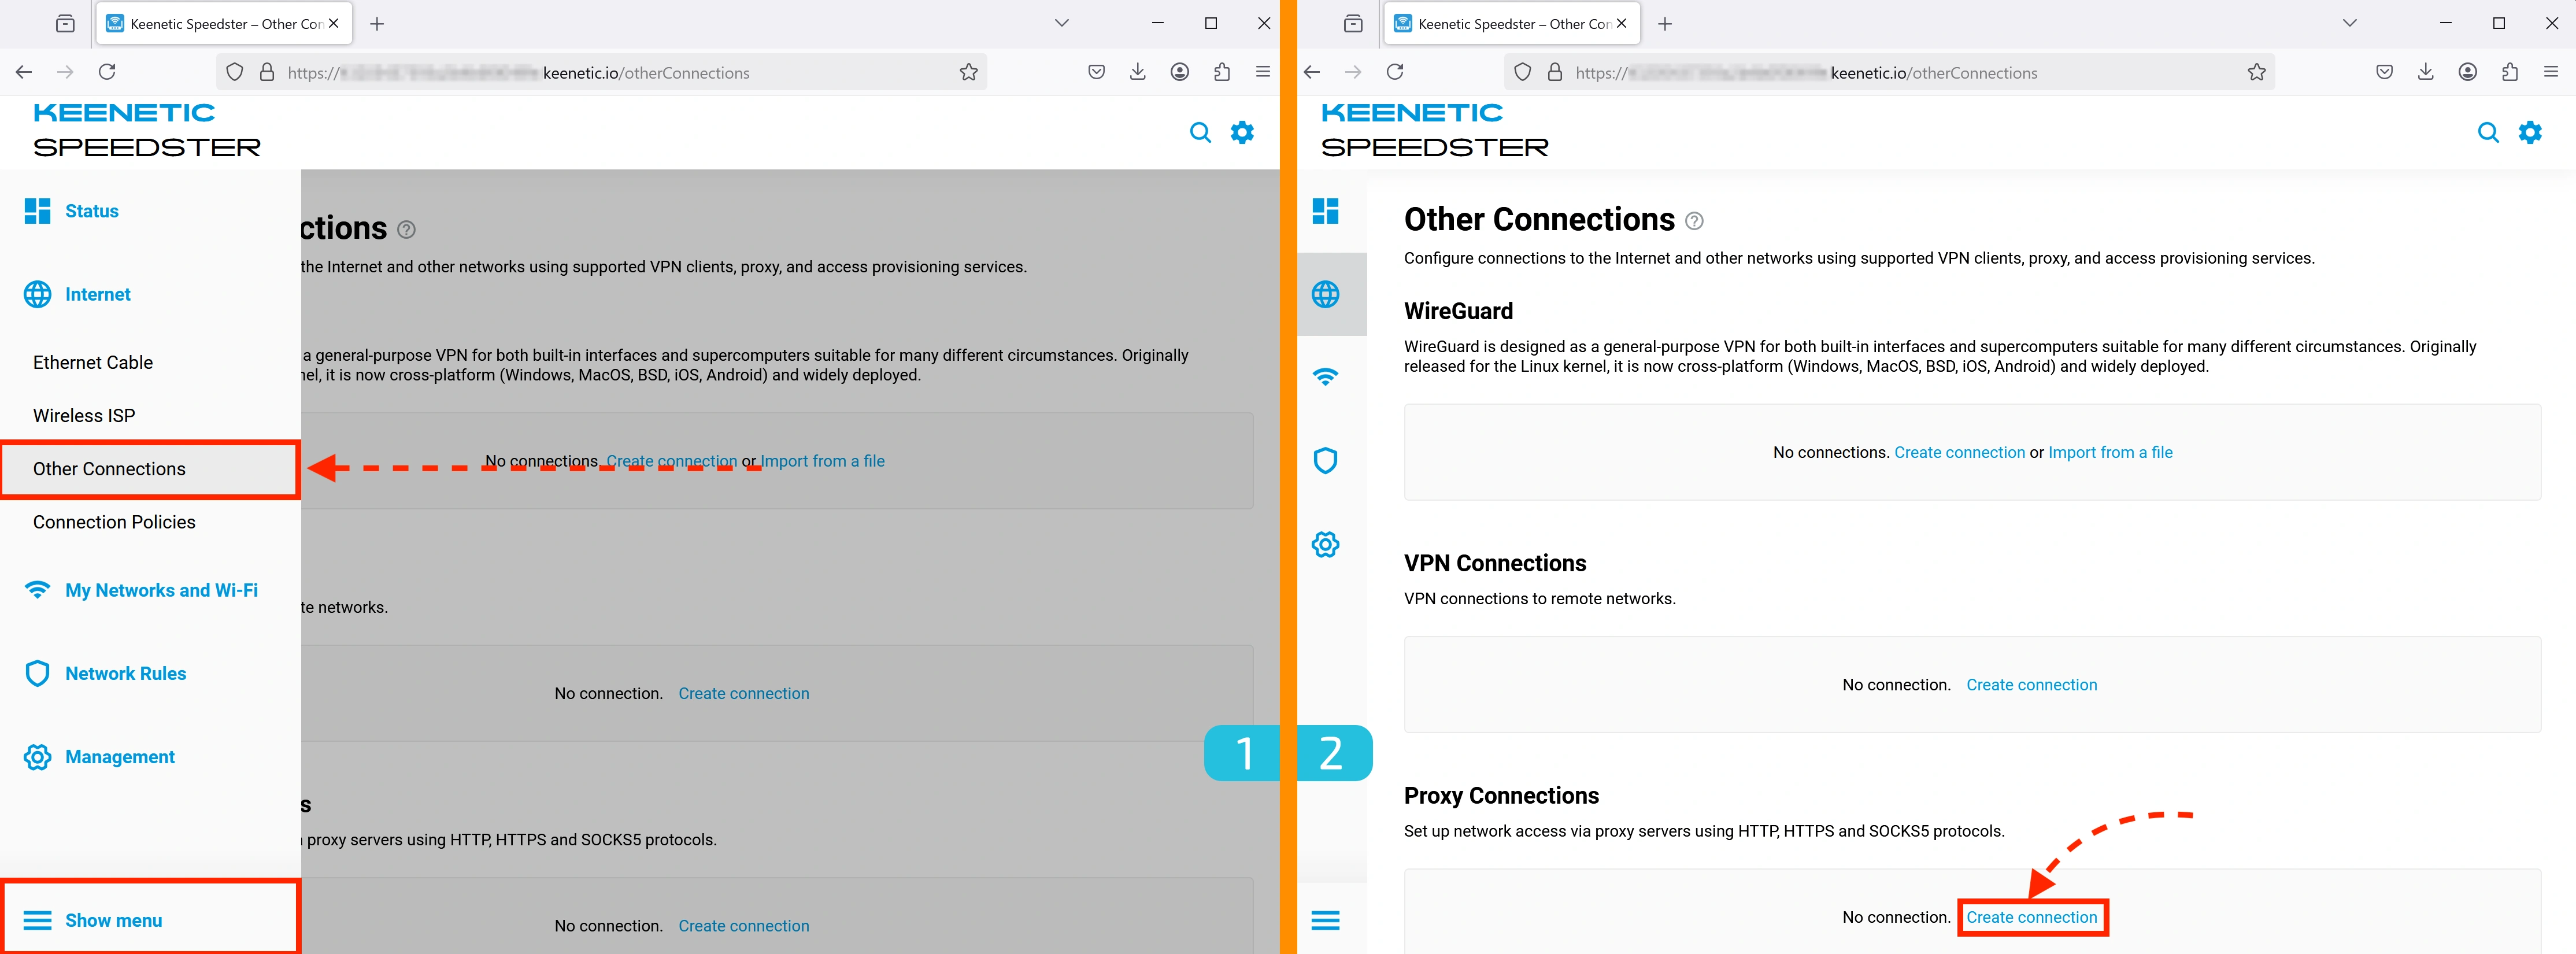
1. Accessing Connection Settings
Go to Internet → Other connections.
2. Adding a New Connection
In this section, you can add various types of connections:
- WireGuard
- PPTP и L2TP
- OpenVPN
- HTTP/S and SOCKS5 proxy
Important:
- HTTP/S proxies do not support UDP at the protocol level.
- SOCKS5 technically supports UDP, but not all proxy services offer this option.
We will demonstrate the setup using SOCKS5. In the Proxy Connections section, click "Create connection".
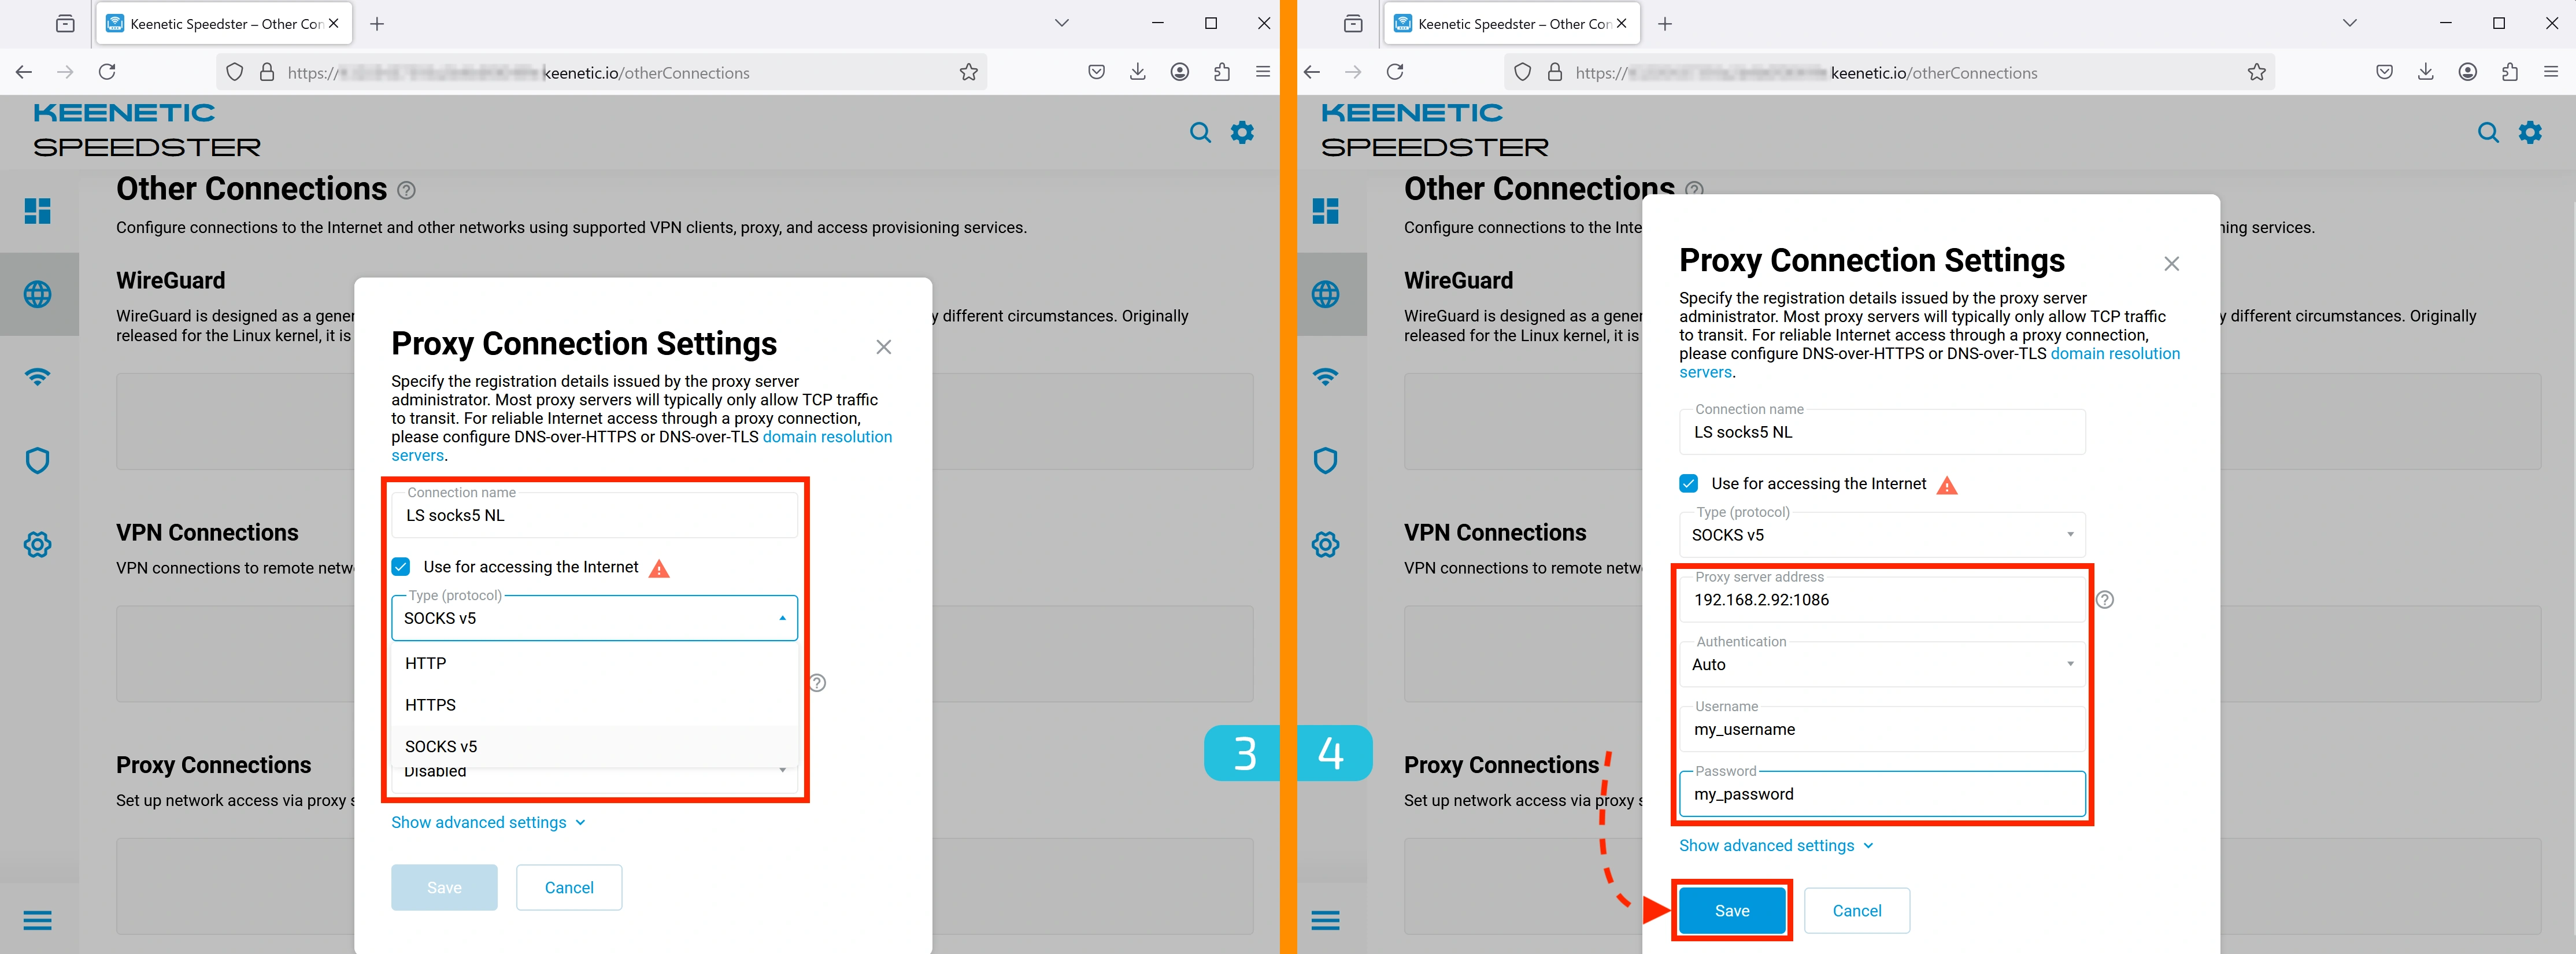
3. Configuring the Connection
- Enter a convenient name for the connection.
- Check the box "Use for accessing the Internet".
- Выберите SOCKS5 как протокол.
4. Entering Proxy Details
- Enter your proxy server's
IP:PORT. - If authentication is required, enter your login and password.
- Click "Save".
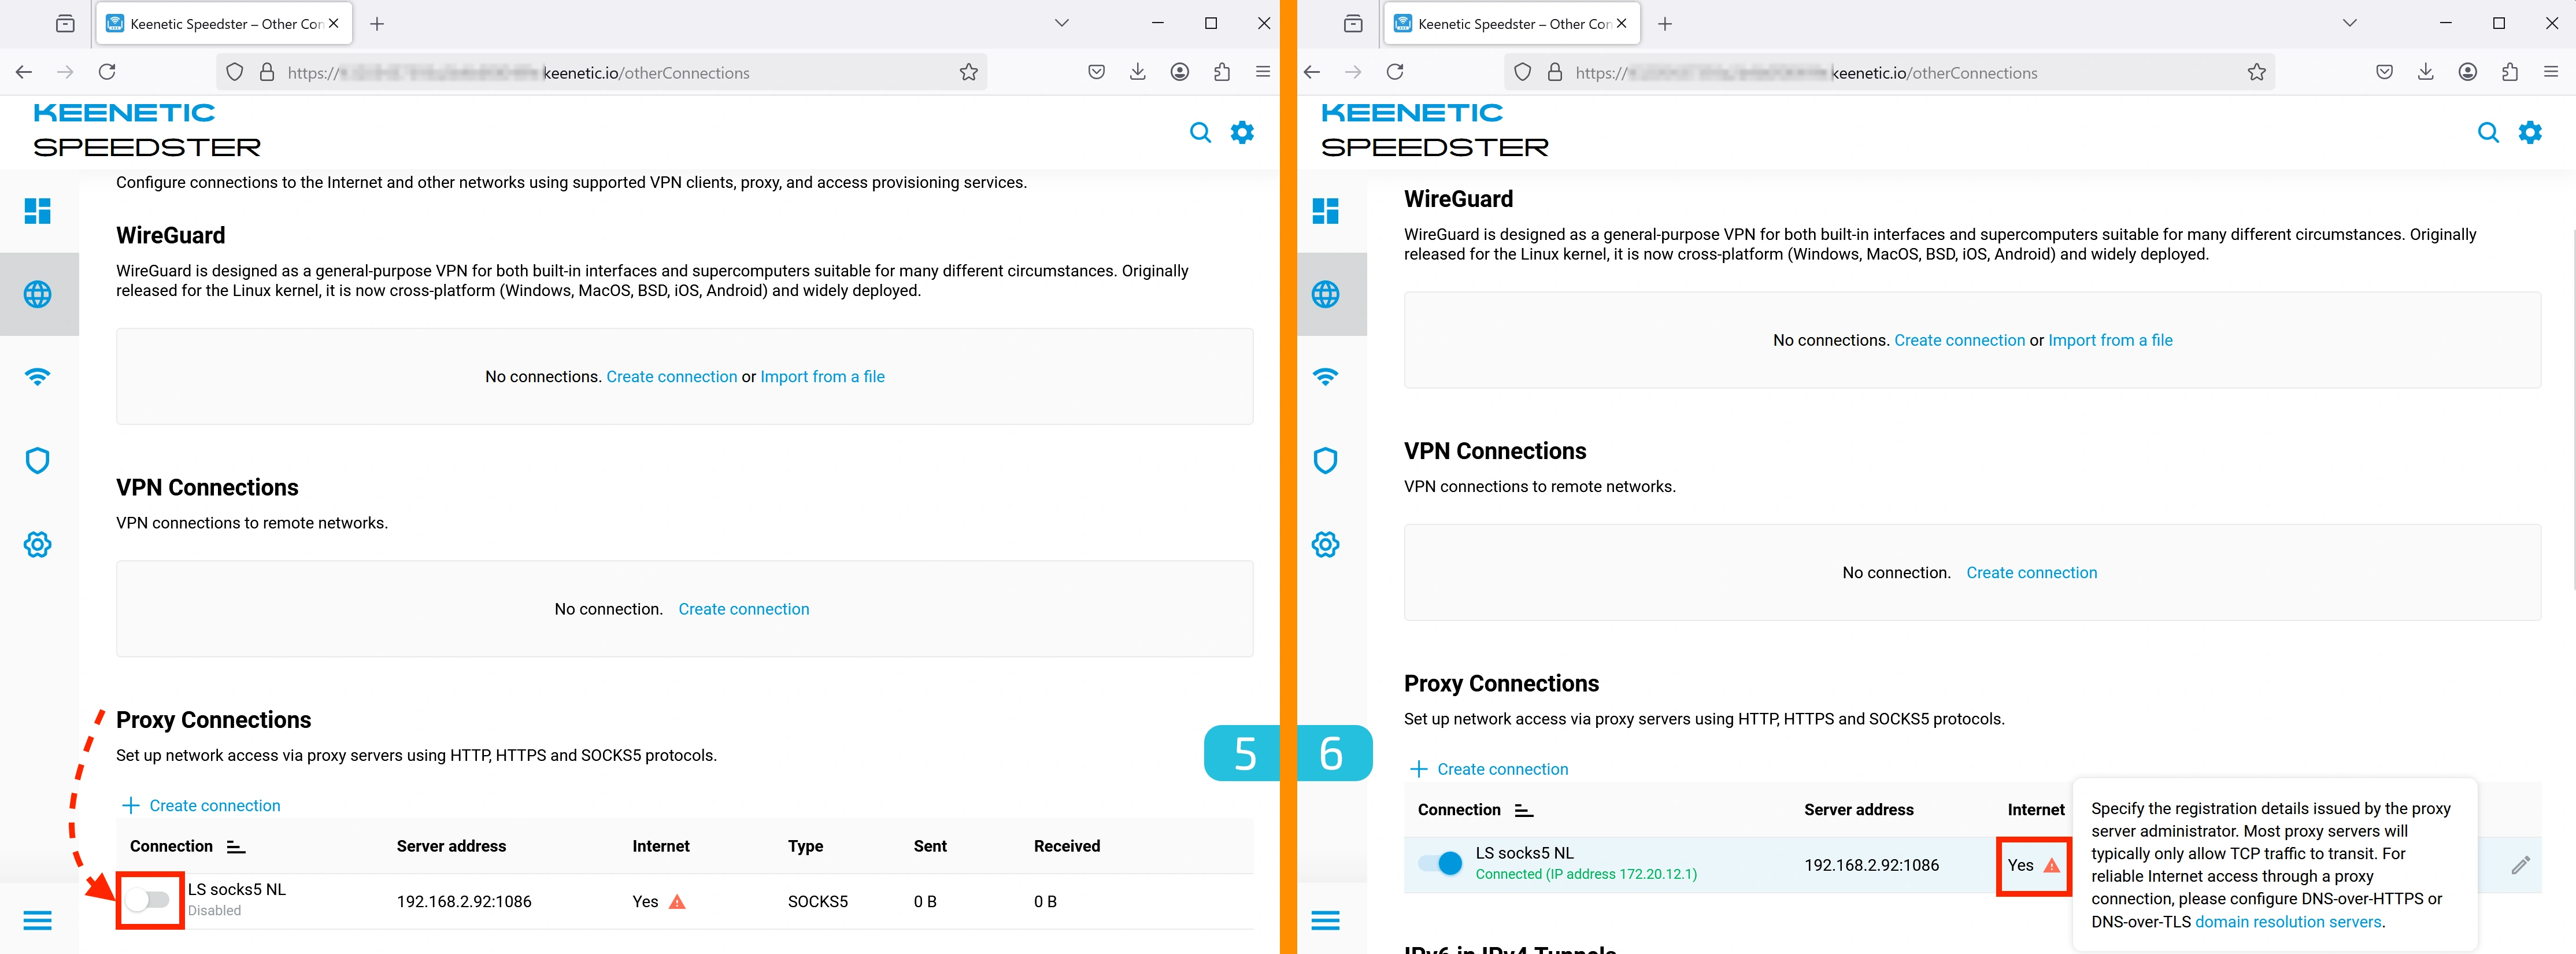
5. Activating the Connection
Enable the proxy by toggling the switch on the left.
6. Configuring DNS for the Proxy
Once the connection is activated, an exclamation mark will appear in the Internet column. This means DNS needs to be configured.
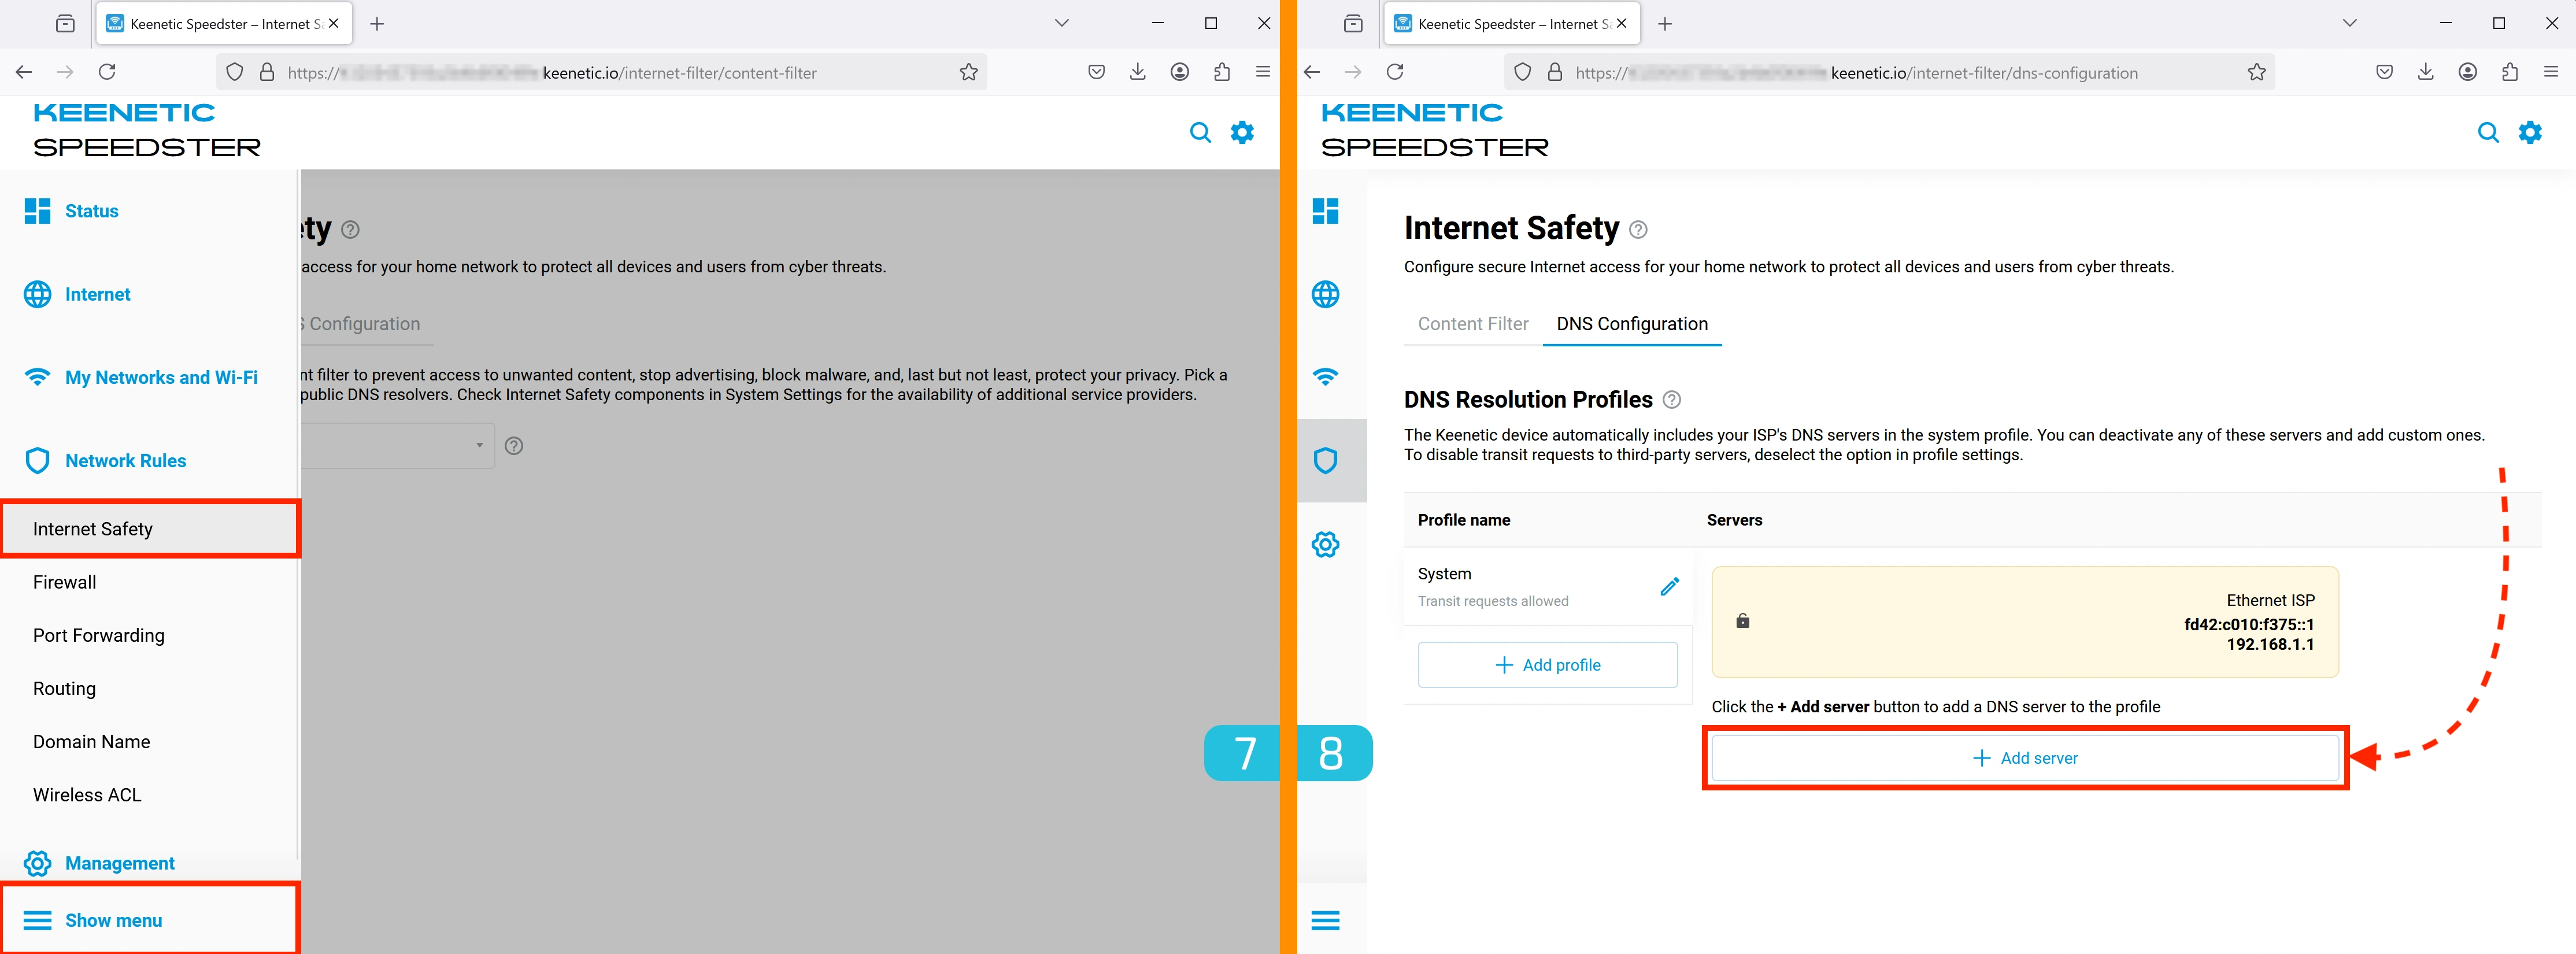
7. Opening DNS Settings
To configure DNS, go to Network Rules → Internet Safety.
8. Adding a DNS Server
In the DNS Configuration tab, click the "Add server" button.
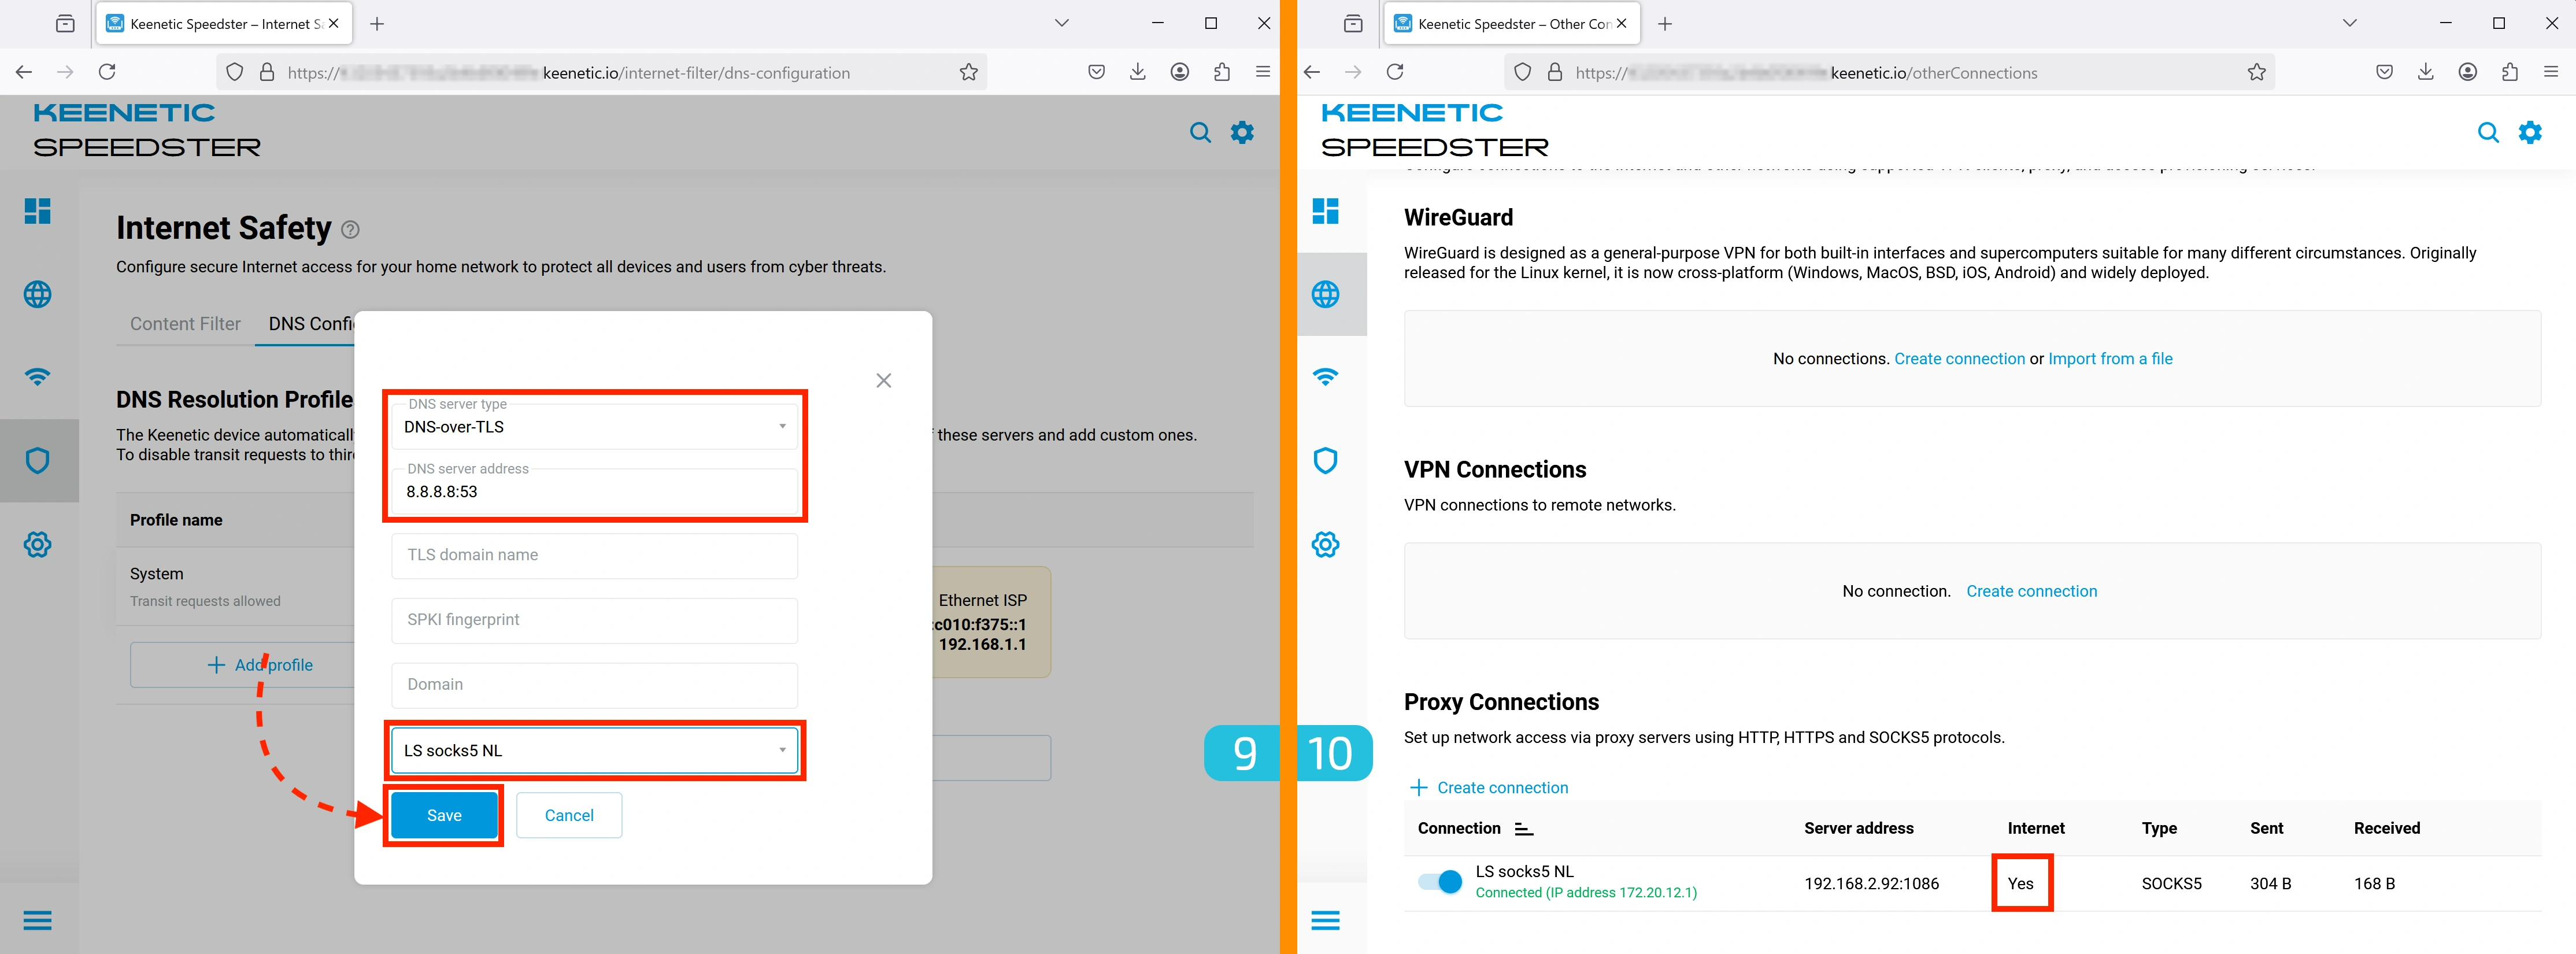
9. DNS Configuration
We'll use Google DNS:
- DNS server type: "DNS-over-TLS"
- DNS server address:
8.8.8.8:53 - At the bottom, select your proxy as the interface.
You can use any DNS server; the following are supported:
- DoT (DNS over TLS)
- DoH (DNS over HTTPS)
- Regular DNS
Alternative DNS servers:
Cisco OpenDNS, LLC
208.67.220.220
208.67.222.222
Neustar Security Services
199.85.127.10
199.85.126.10
Neustar Security Services
64.6.65.6
64.6.64.6
The Constant Company, LLC
8.26.56.26
8.20.247.20
level3
209.244.0.3
209.244.0.4
4.2.2.1
4.2.2.2
4.2.2.3
4.2.2.4
Oracle Corporation
216.146.35.35
216.146.36.36
OVH SAS
5.135.183.146
The Constant Company
195.46.39.39
Amazon.com, Inc.
54.174.40.213
52.3.100.184
Level 3 Communications, Inc.
54.229.171.243
Amazon.com, Inc
54.183.15.10
Amazon Technologies Inc.
185.37.37.37
Cloudflare
82.196.13.196
Strong Technology, LLC
64.145.73.2
209.107.219.3
SoftLayer
104.236.217.252
Ripe
185.52.1.146
Amazon Technologies Inc
128.199.248.157
185.135.8.197
10. Verifying Proxy Readiness
After setting up DNS, the exclamation mark next to the proxy will disappear, indicating successful configuration.
Creating a Connection Policy
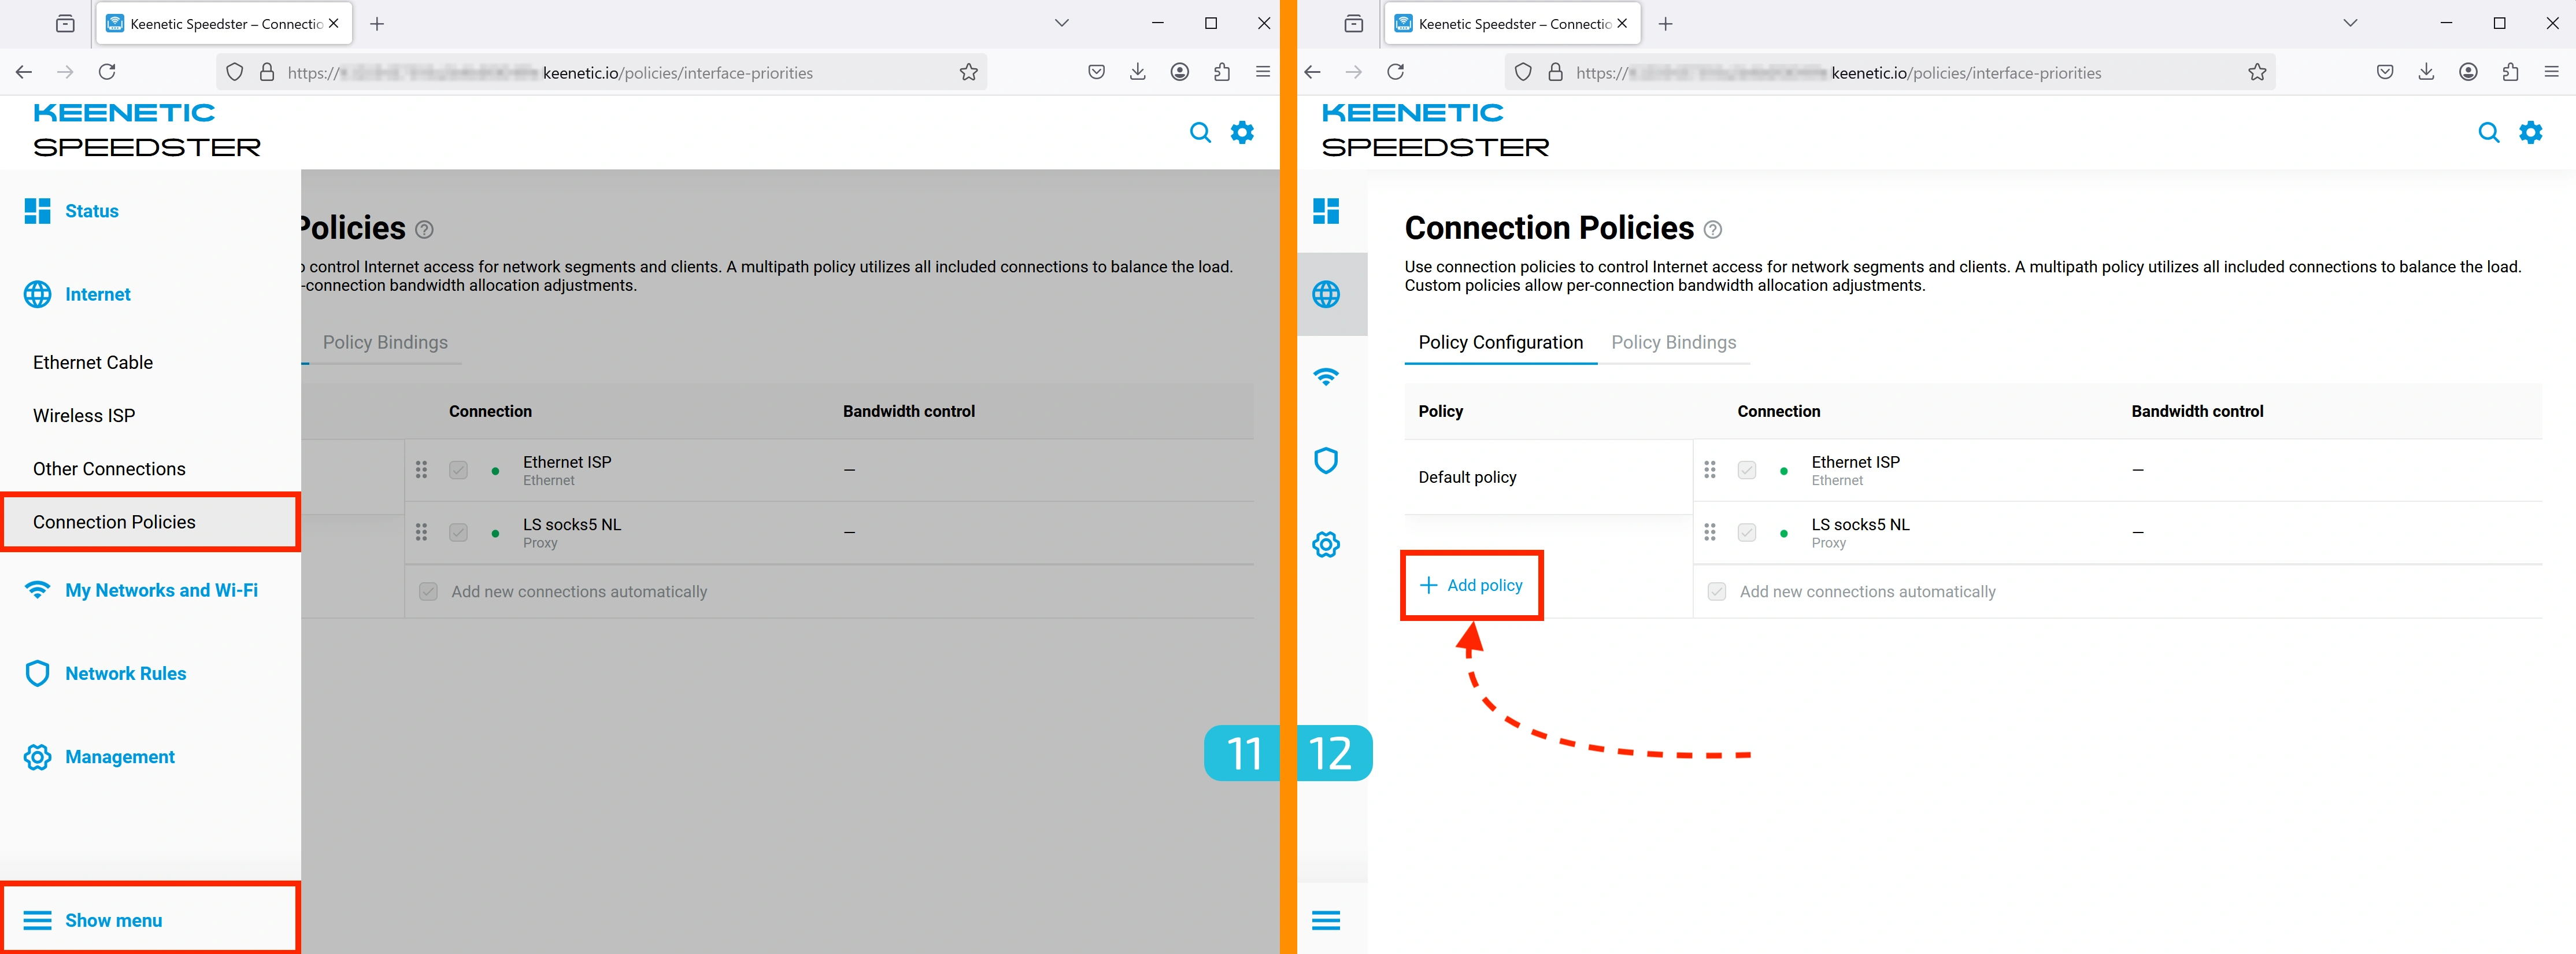
11. Accessing Policy Settings
Go to Internet → Connection Policies.
12. Create a New Policy
Click Add policy.

13. Naming the Connection Policy
- Use the same name as the proxy to avoid confusion
- Click "Save".
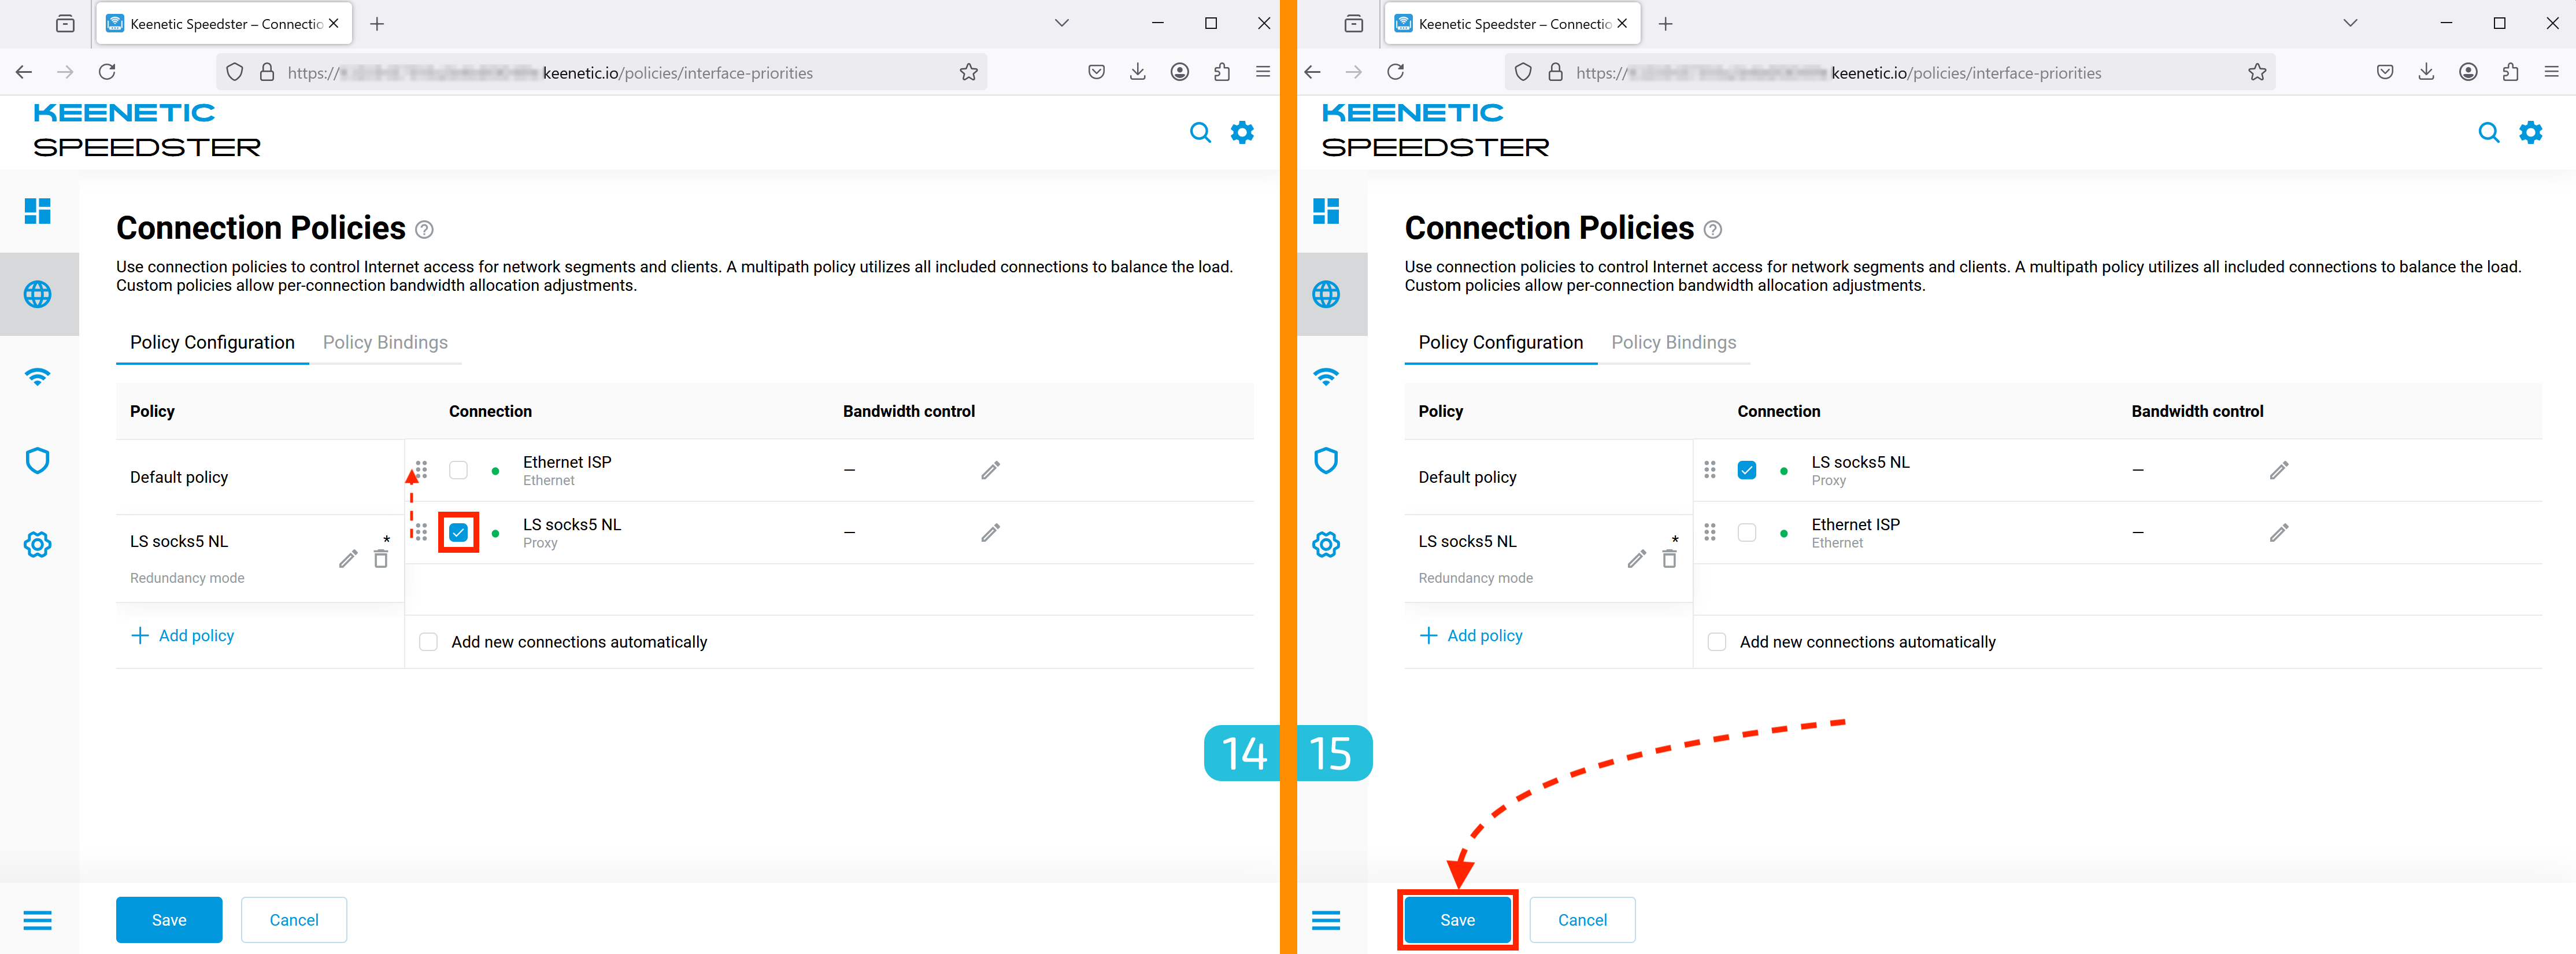
14-15. Activating the Policy
- Check the box to the left of your proxy.
- Drag it to the top.
- Click "Save" (button at the bottom left).
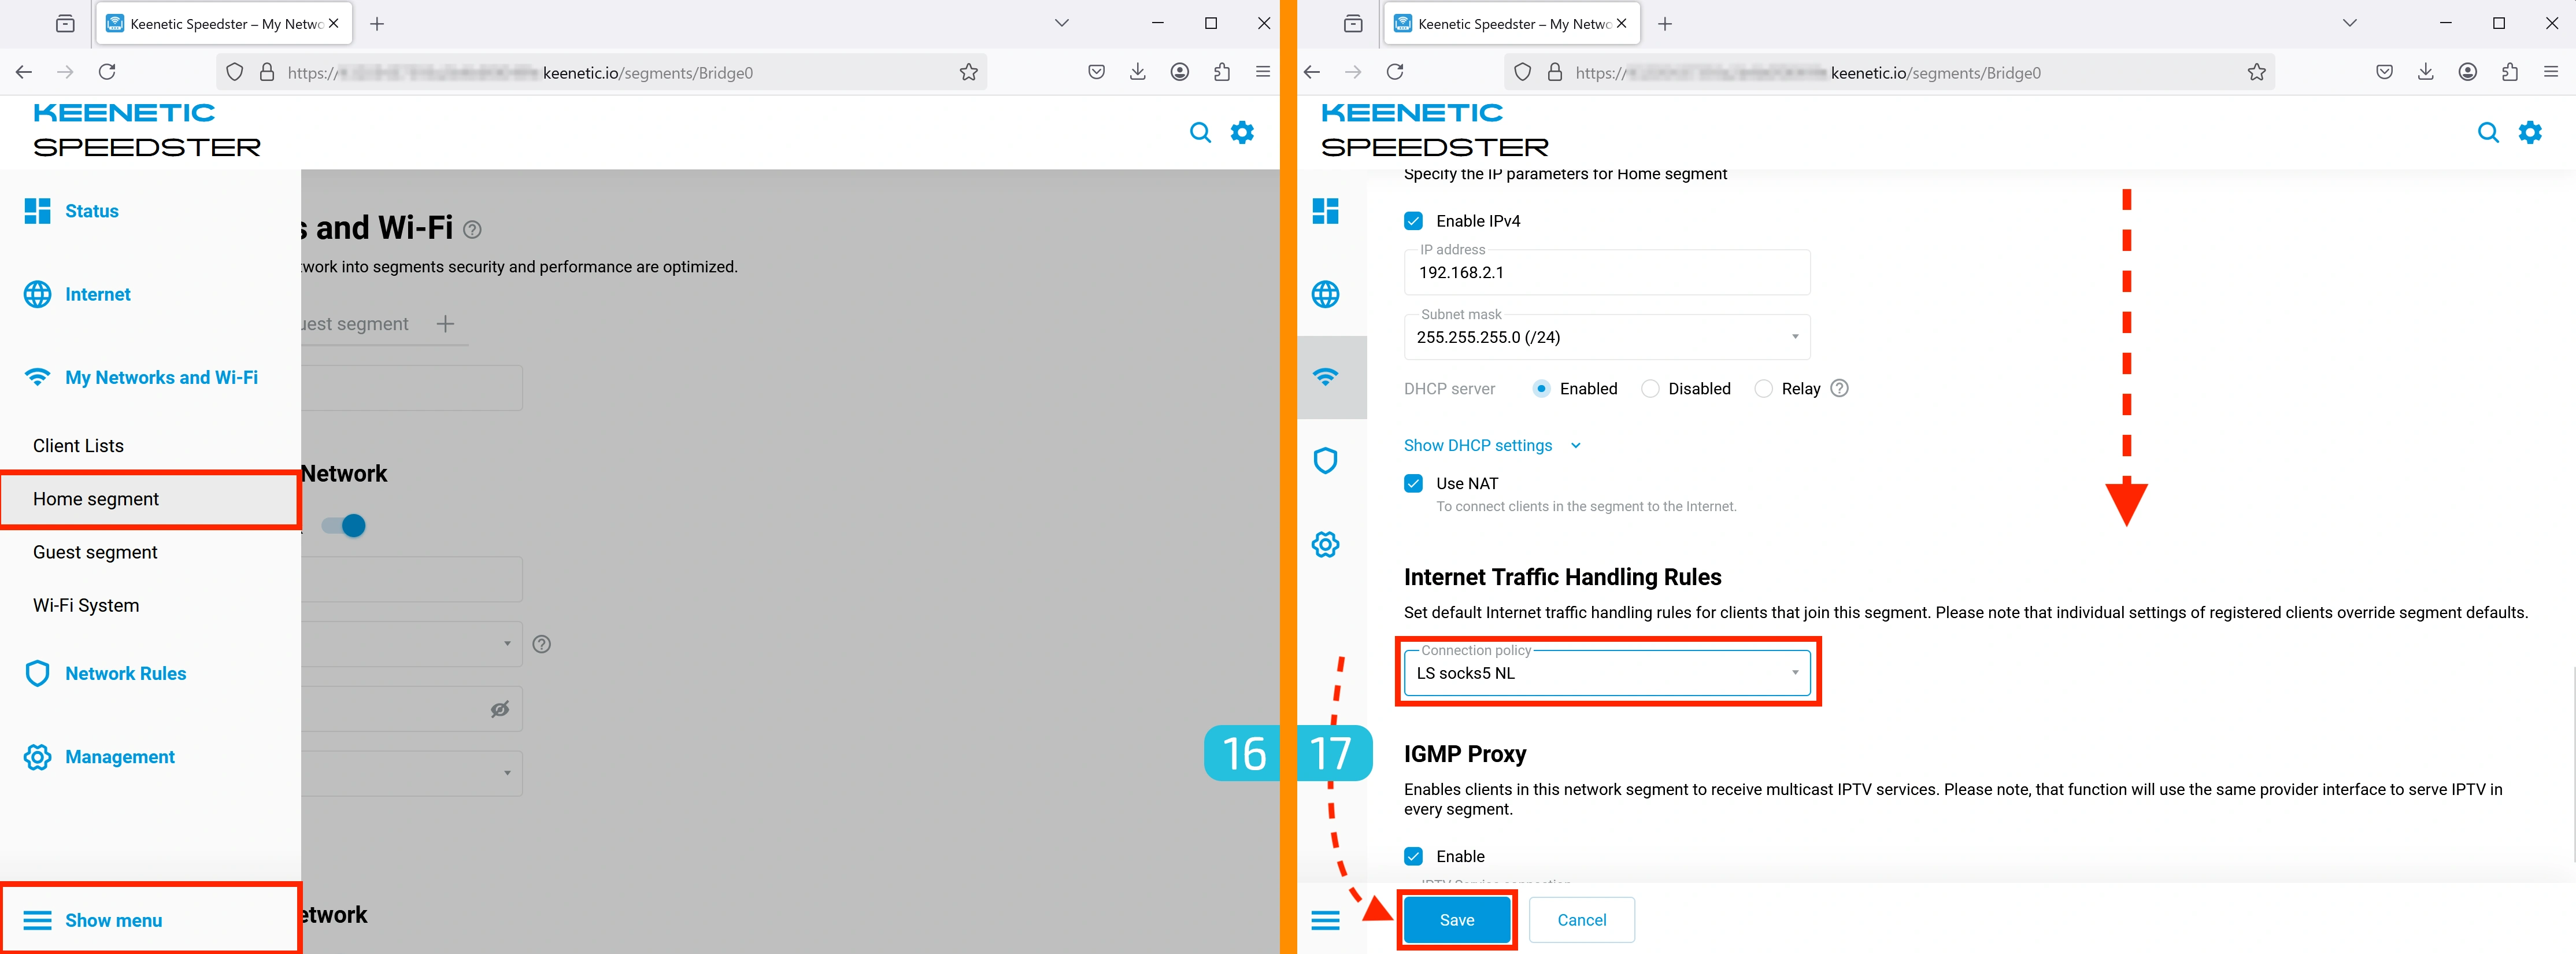
16-17. Applying the Policy to a Network Segment
Apply the policy to the current network segment. You can also create multiple segments and assign them different policies to use various connections simultaneously (e.g., from different devices).
- Go to My Networks and Wi-Fi → Home segment.
- In Internet Traffic Handling Rules, select the created policy.
- Click "Save" (button at the bottom left).
VPN Setup
VPN setup (OpenVPN, PPTP, L2TP) in KeeneticOS is done similarly to proxy configuration, but with some differences.
1. Basic VPN Settings
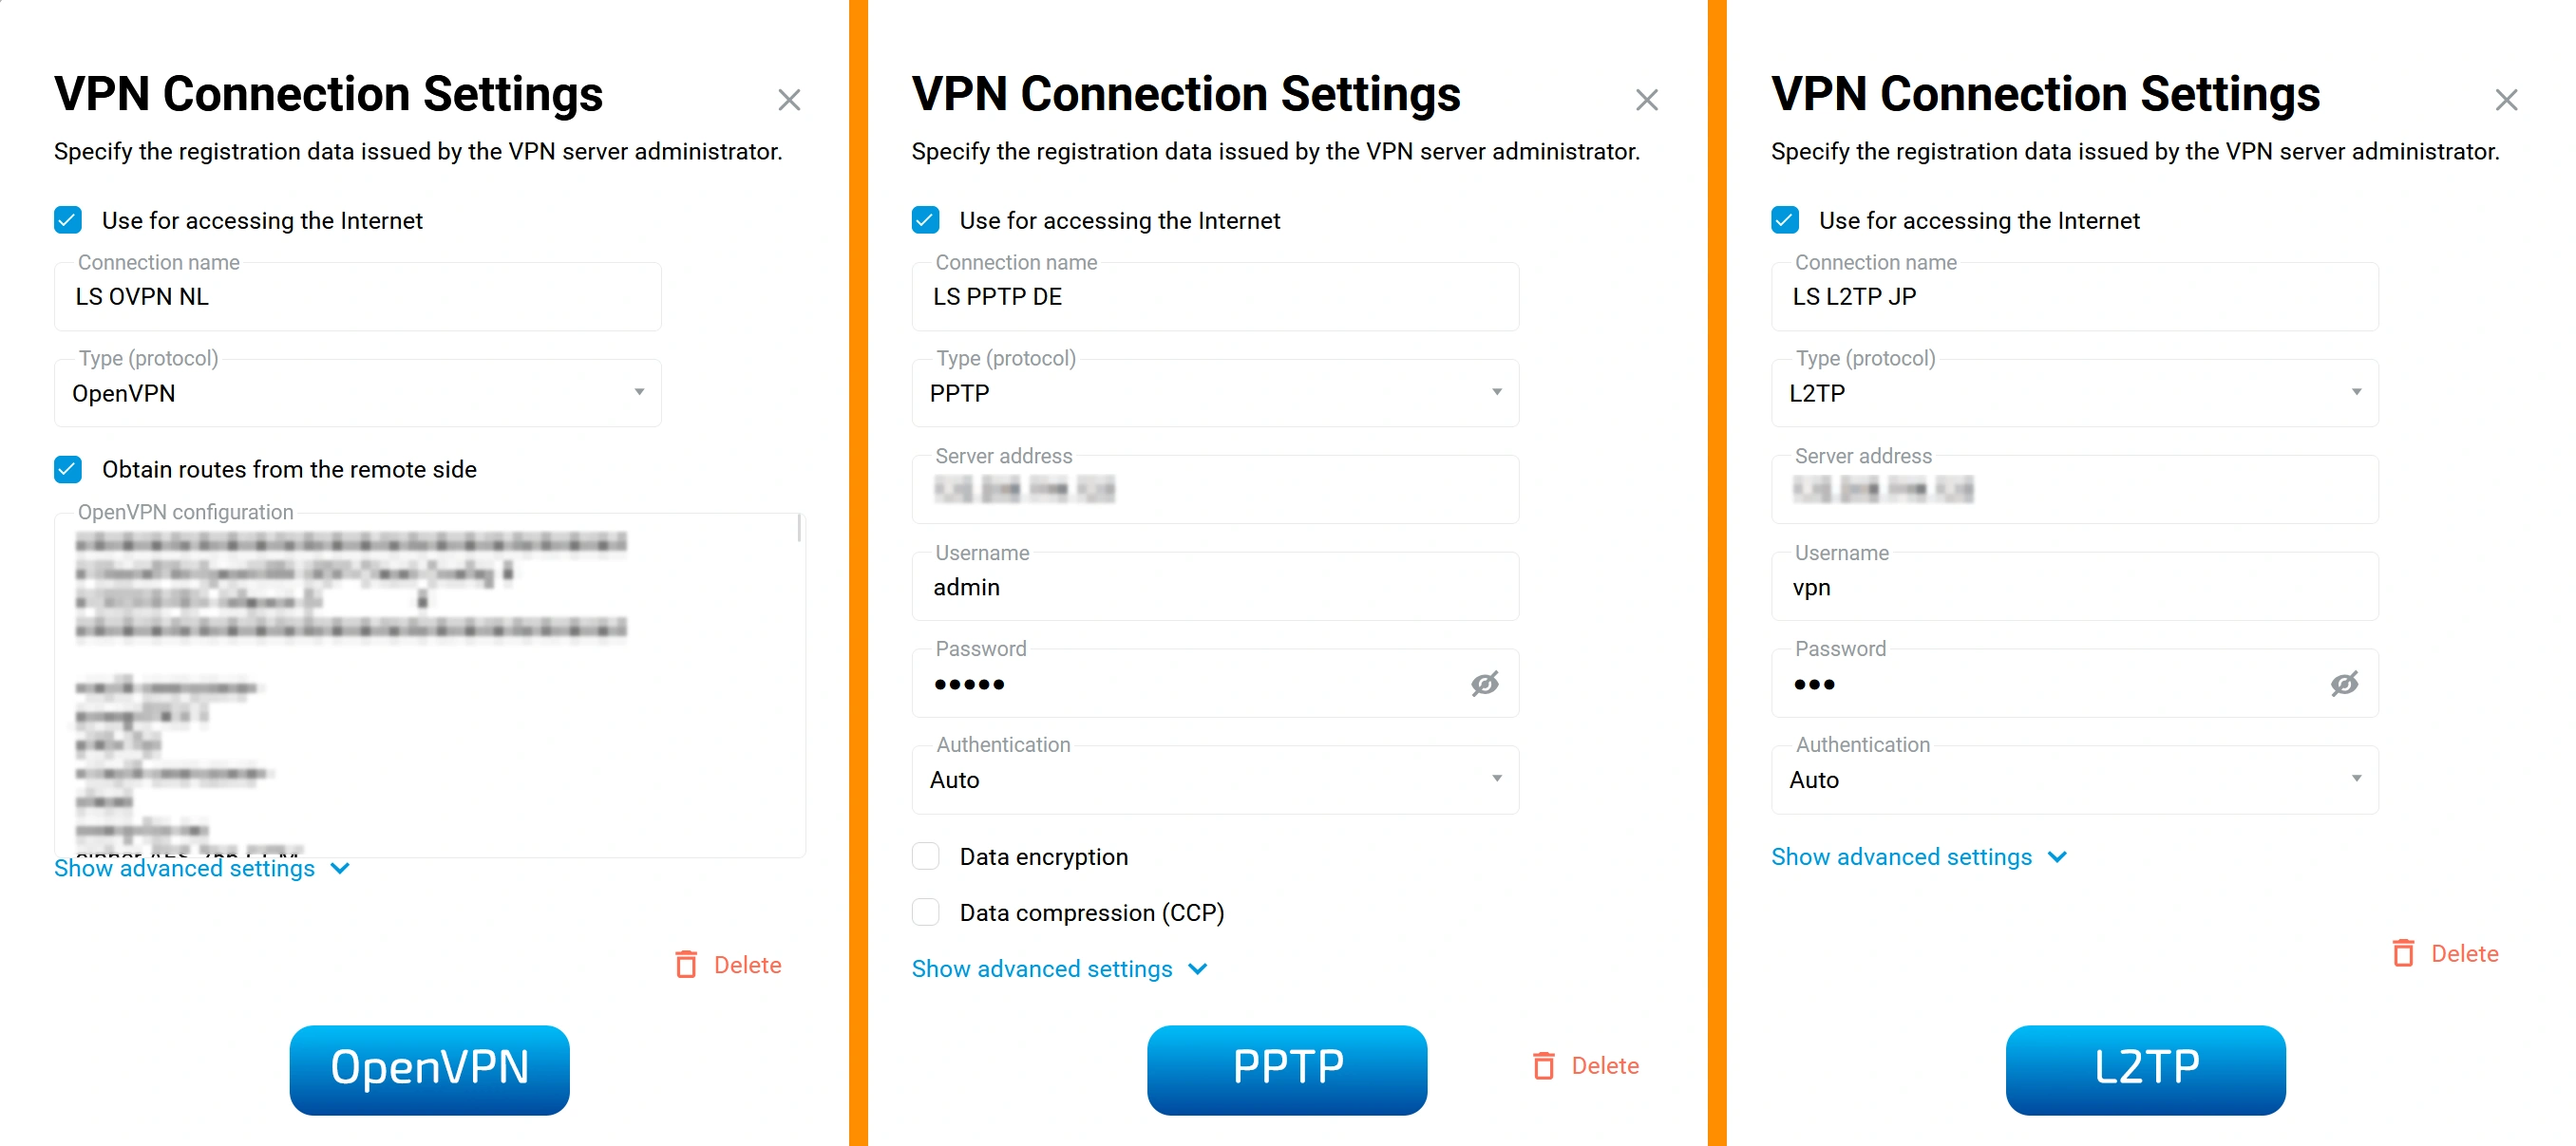
In the setup window, check the following options:
- Use for accessing the Internet – allows the connection to be used for internet access.
- Obtain routes from the remote side – required for proper OpenVPN functionality.
Important: It is usually not necessary to set DNS for VPN separately, but it depends on the configuration you're using. If you notice DNS leaks during testing, you can manually specify a DNS server.
2. Diagnosing Connection Issues
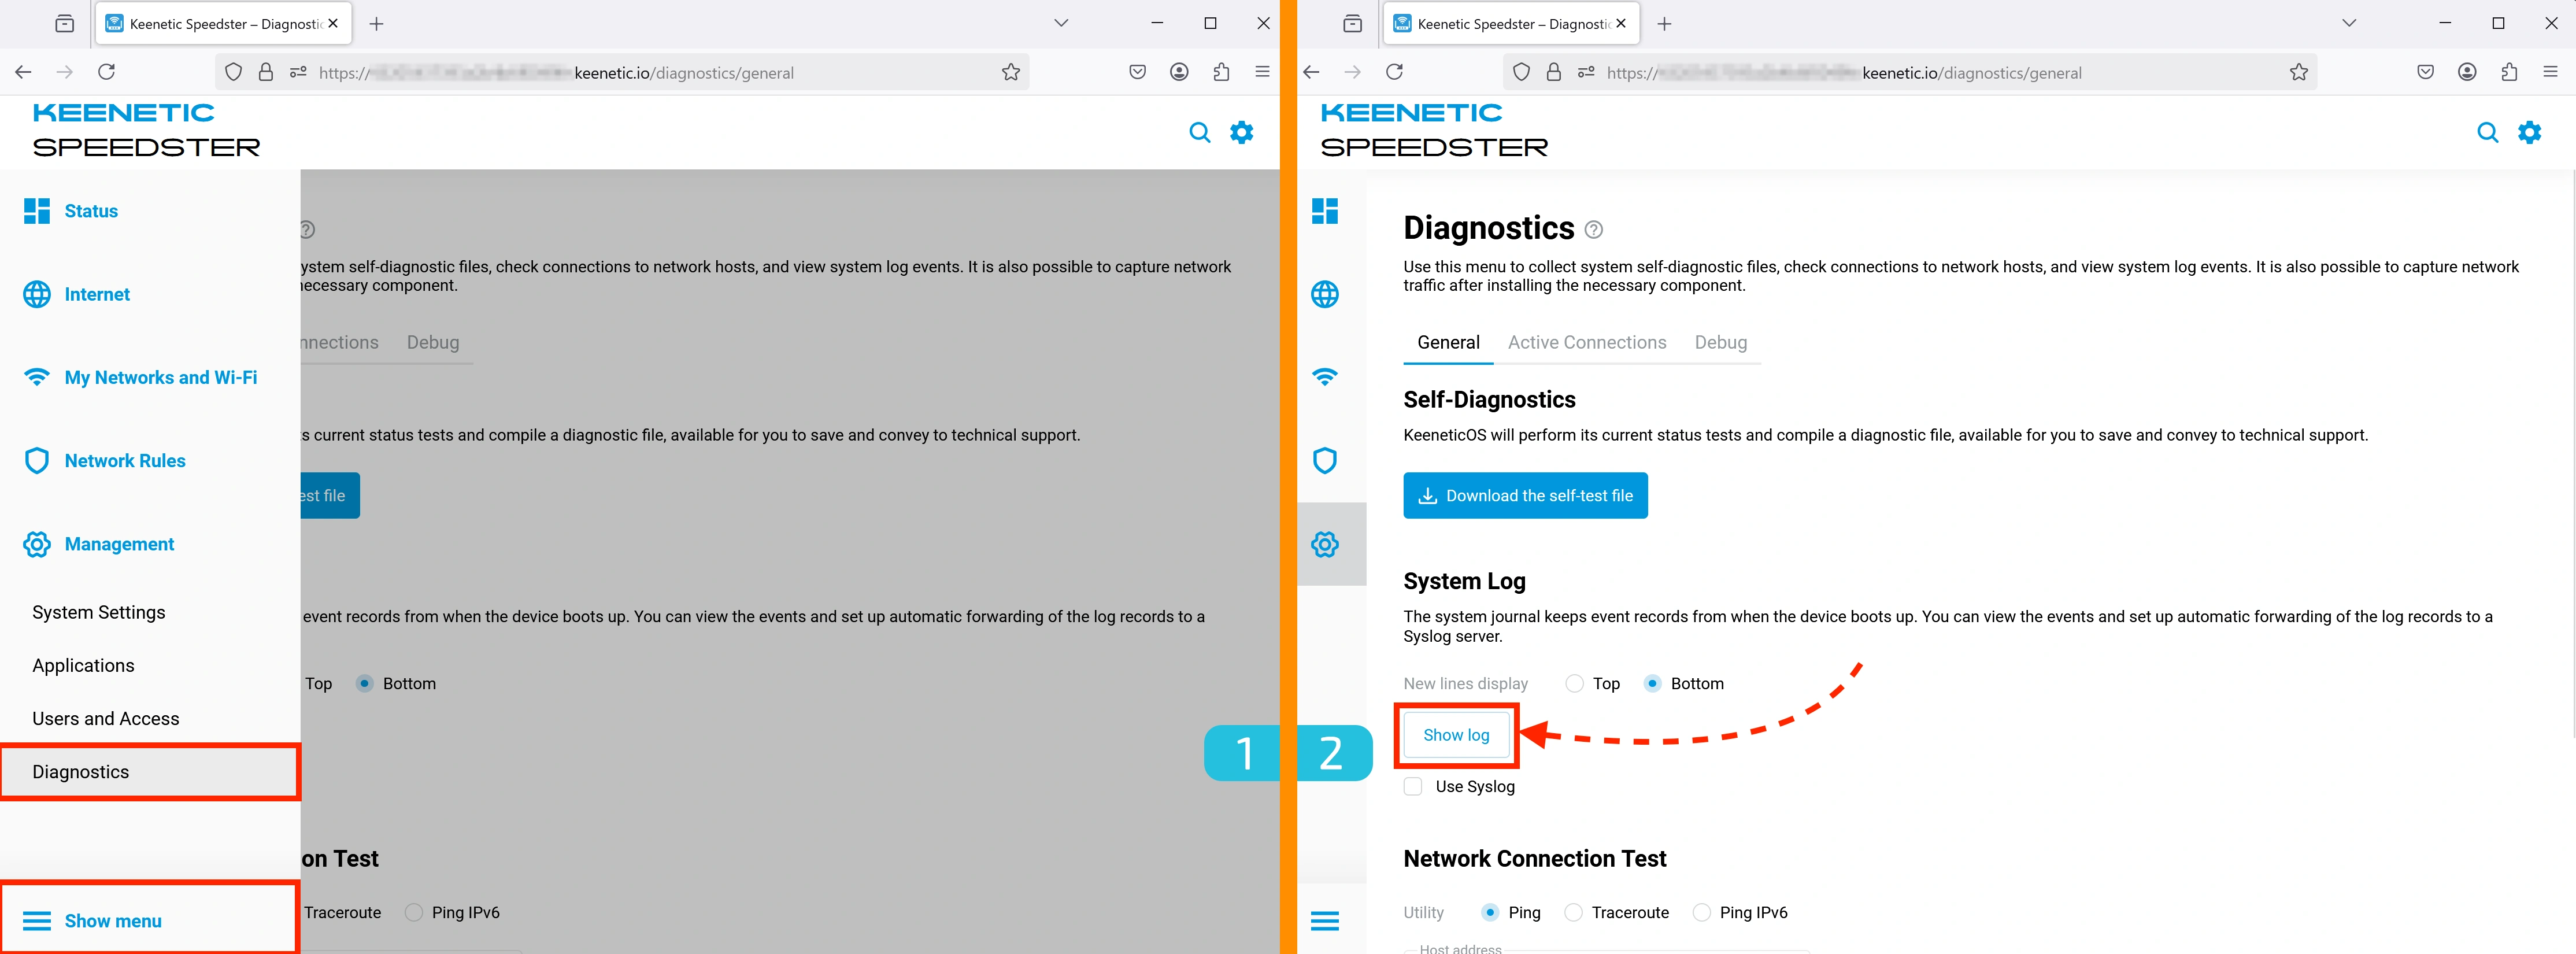
If you're experiencing connection issues, check the logs:
- Go to Management → Diagnostics.
- Click Show log to find detailed information about what might be going wrong.
3. Working with OpenVPN Configurations
Important: KeeneticOS does not have a separate window for entering VPN login/password. Therefore, you must manually insert the credentials into the configuration file.
How to Add Login and Password to the Config
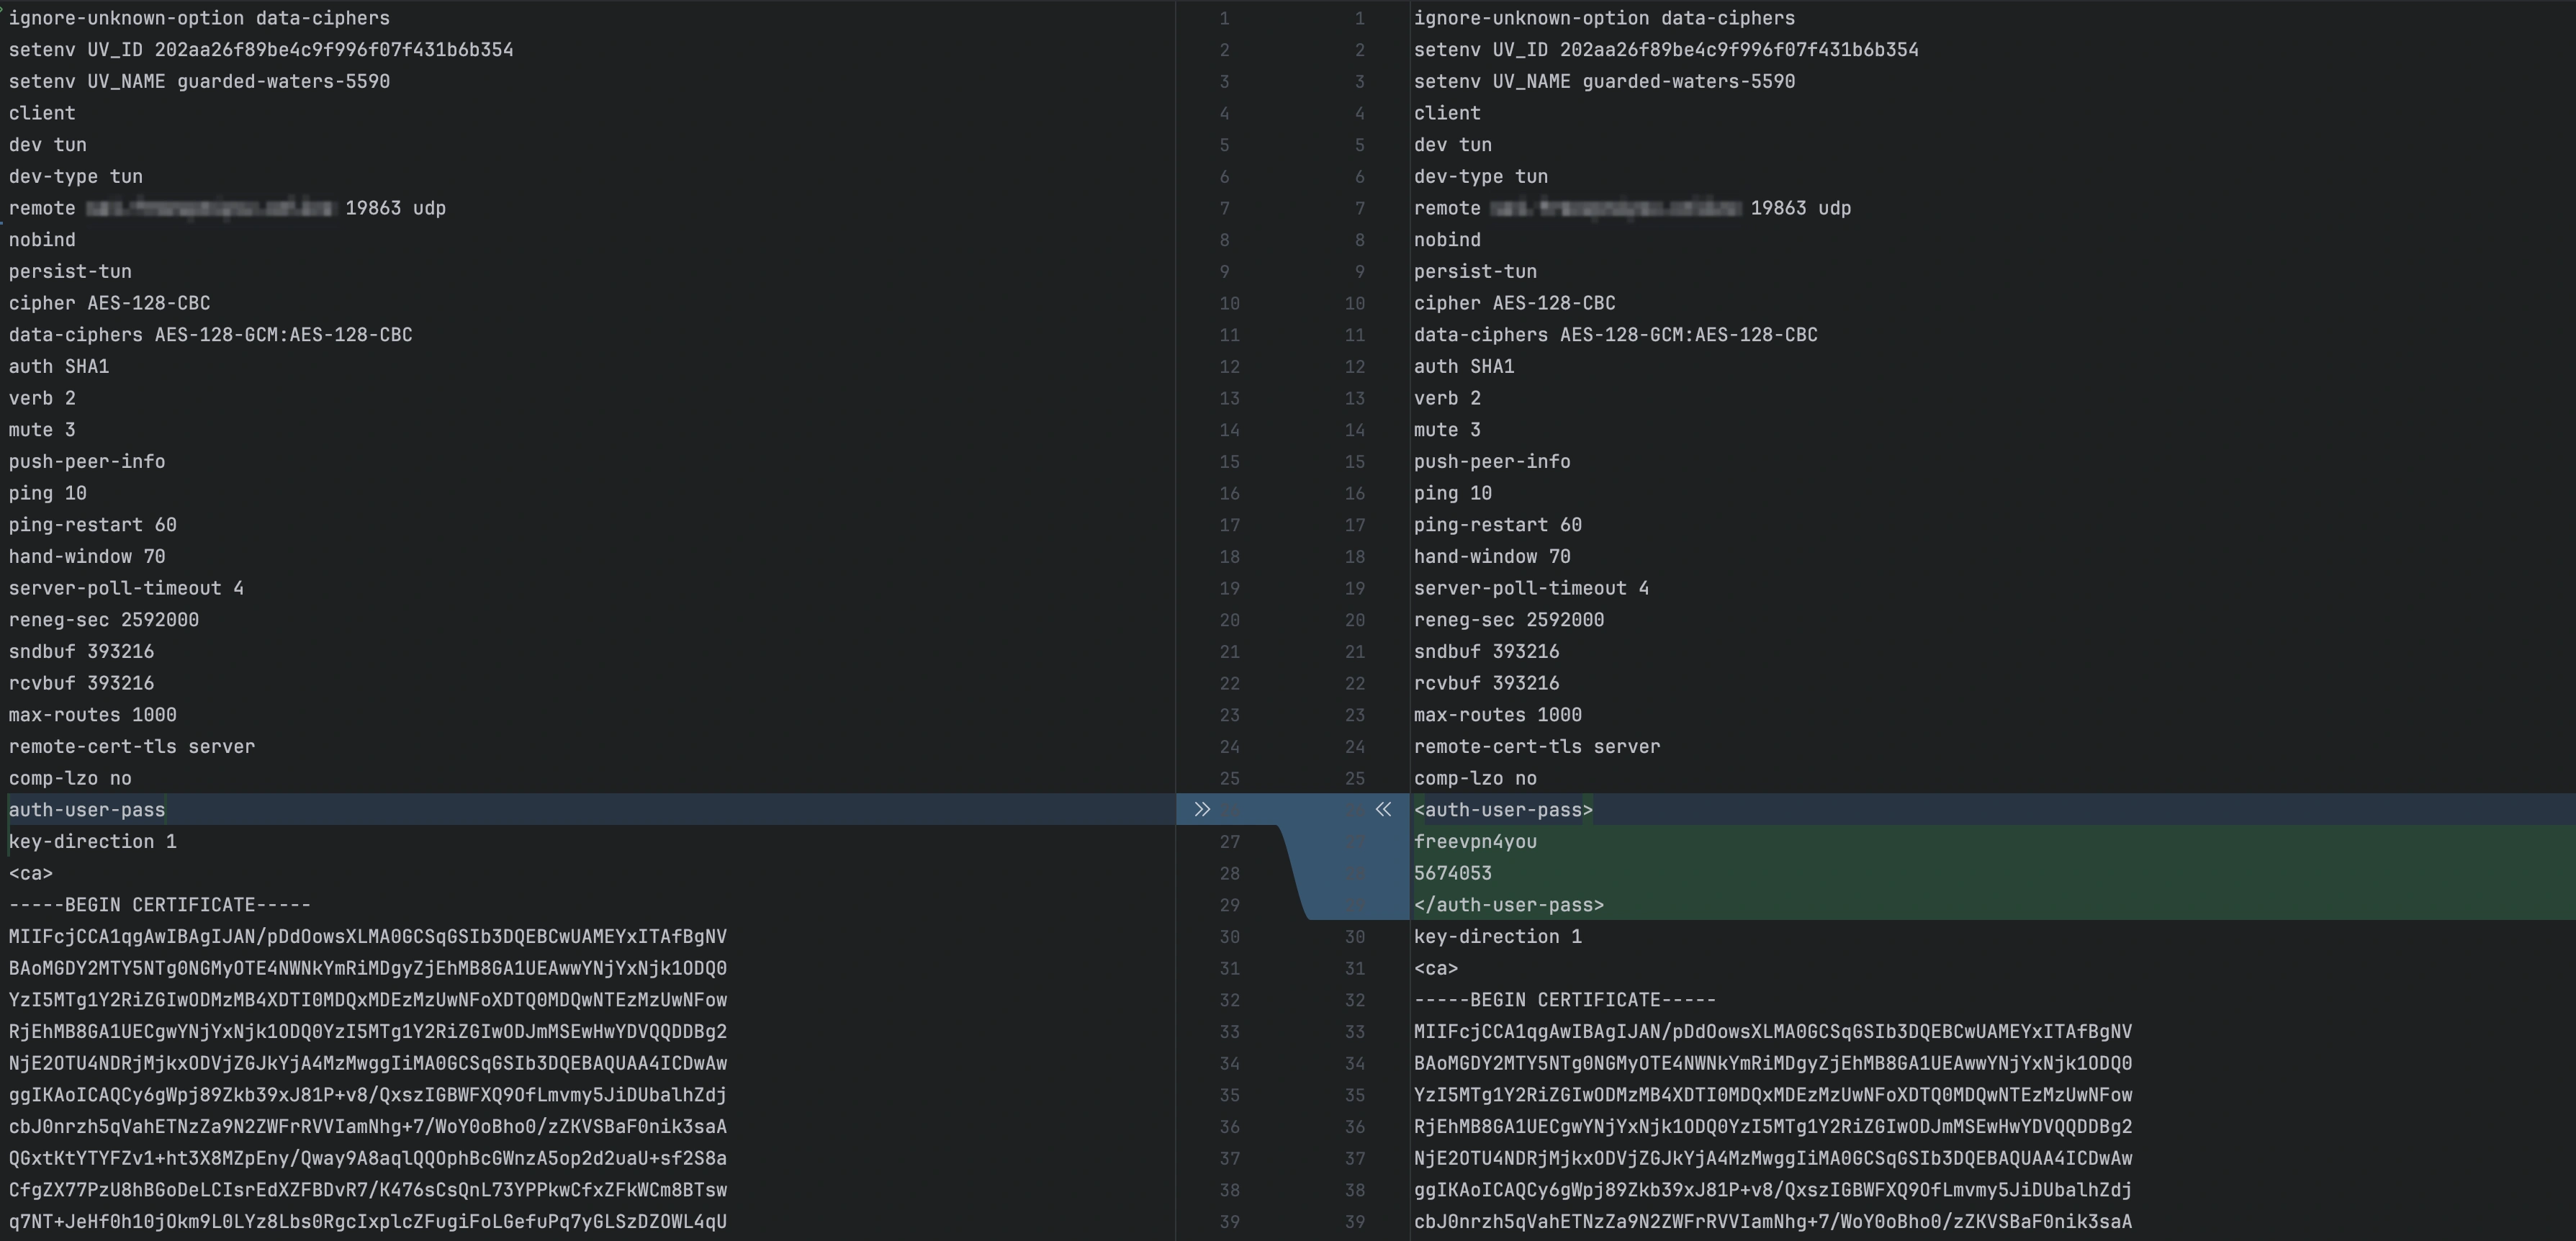
1. Open your .ovpn config in a text editor
2. Find the line auth-user-pass
3. Replace it with:
<auth-user-pass>
username
password
</auth-user-pass>
Where: - username — your login. - password — your password.
4. Keenetic OS Requirements for OpenVPN Configs
Keenetic OS only supports specific OpenVPN parameters. The full list of supported options is available at: https://community.openvpn.net/openvpn/wiki/Openvpn24ManPage
Using unsupported parameters may cause errors and disrupt VPN functionality. For example, some OpenVPN configs contain the parameter setenv opt block-outside-dns, which is not supported by Keenetic OS. To avoid issues, remove or comment it out.
Connection Testing
We will run a series of tests to evaluate the results achievable using SOCKS5 proxying on a Keenetic router. Results may vary with other connection types.
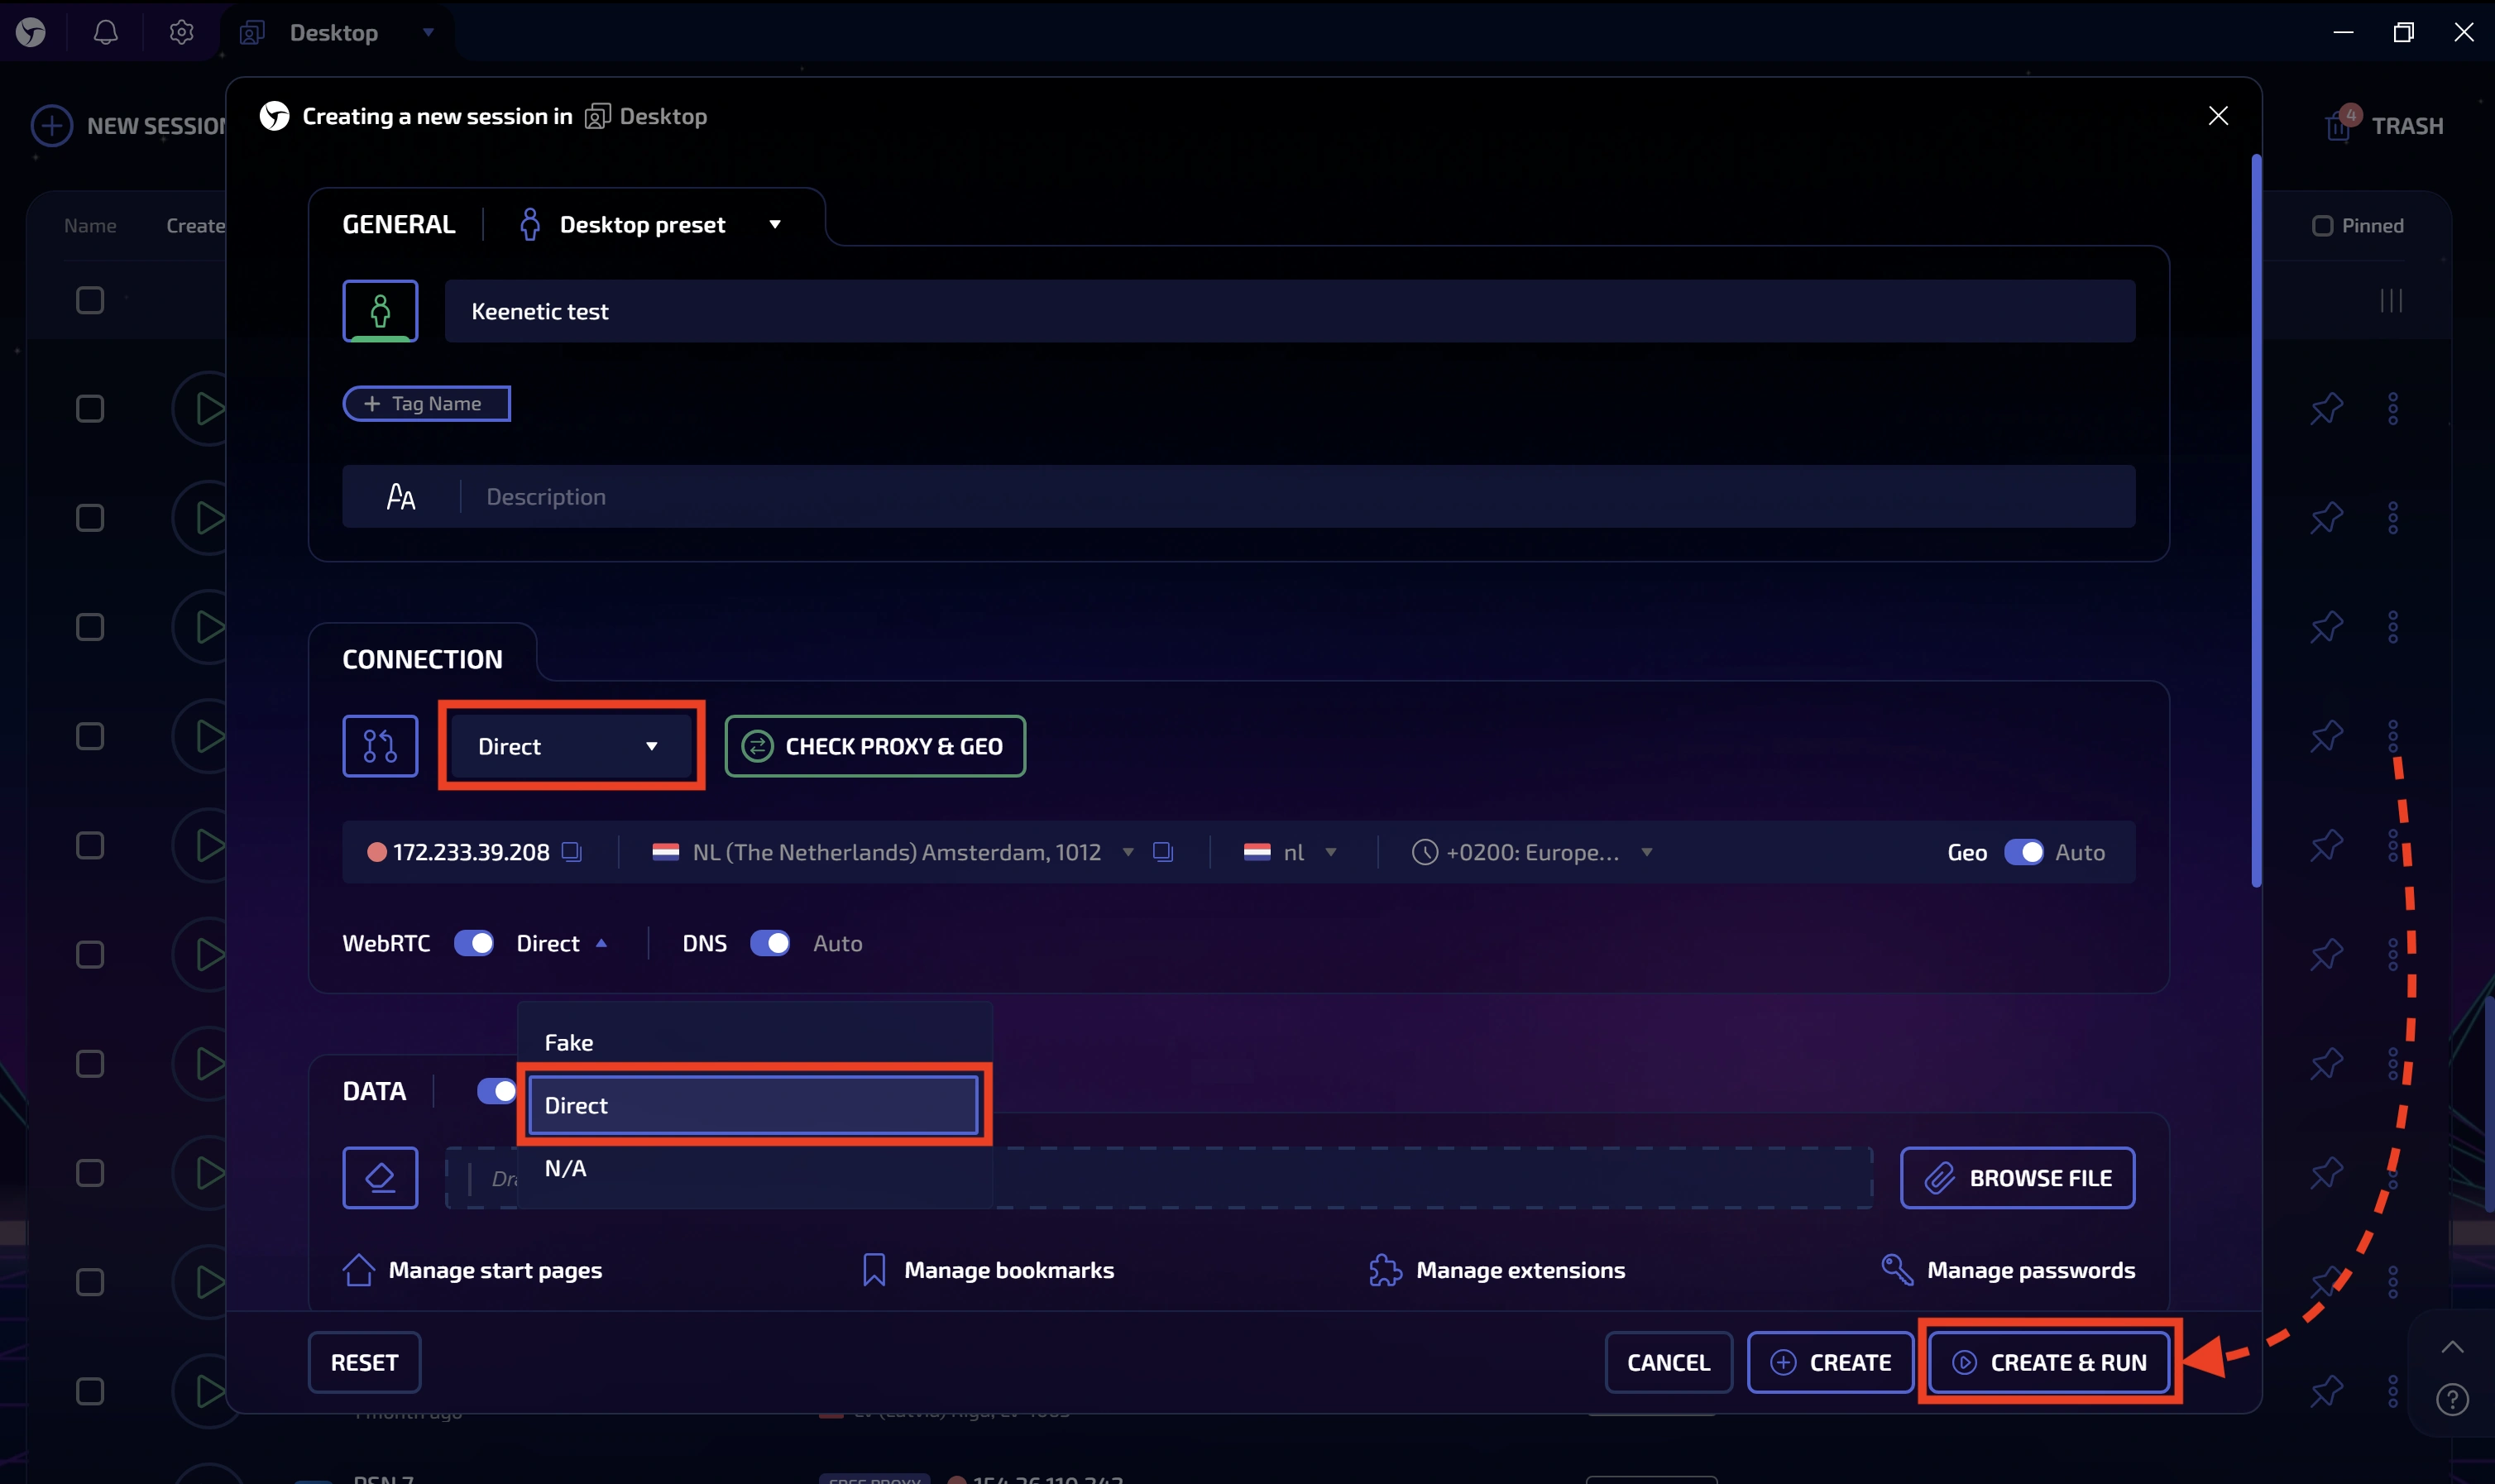
Using a device connected to the Keenetic network, launch Linken Sphere or any other browser.
If using Linken Sphere:
- Create a new session.
- Select Direct as the connection type (traffic flows directly)
- Switch WebRTC to "Direct" mode. This is necessary to fully benefit from the external proxy.
- Launch the session.
1. Checking UDP Support via WebRTC
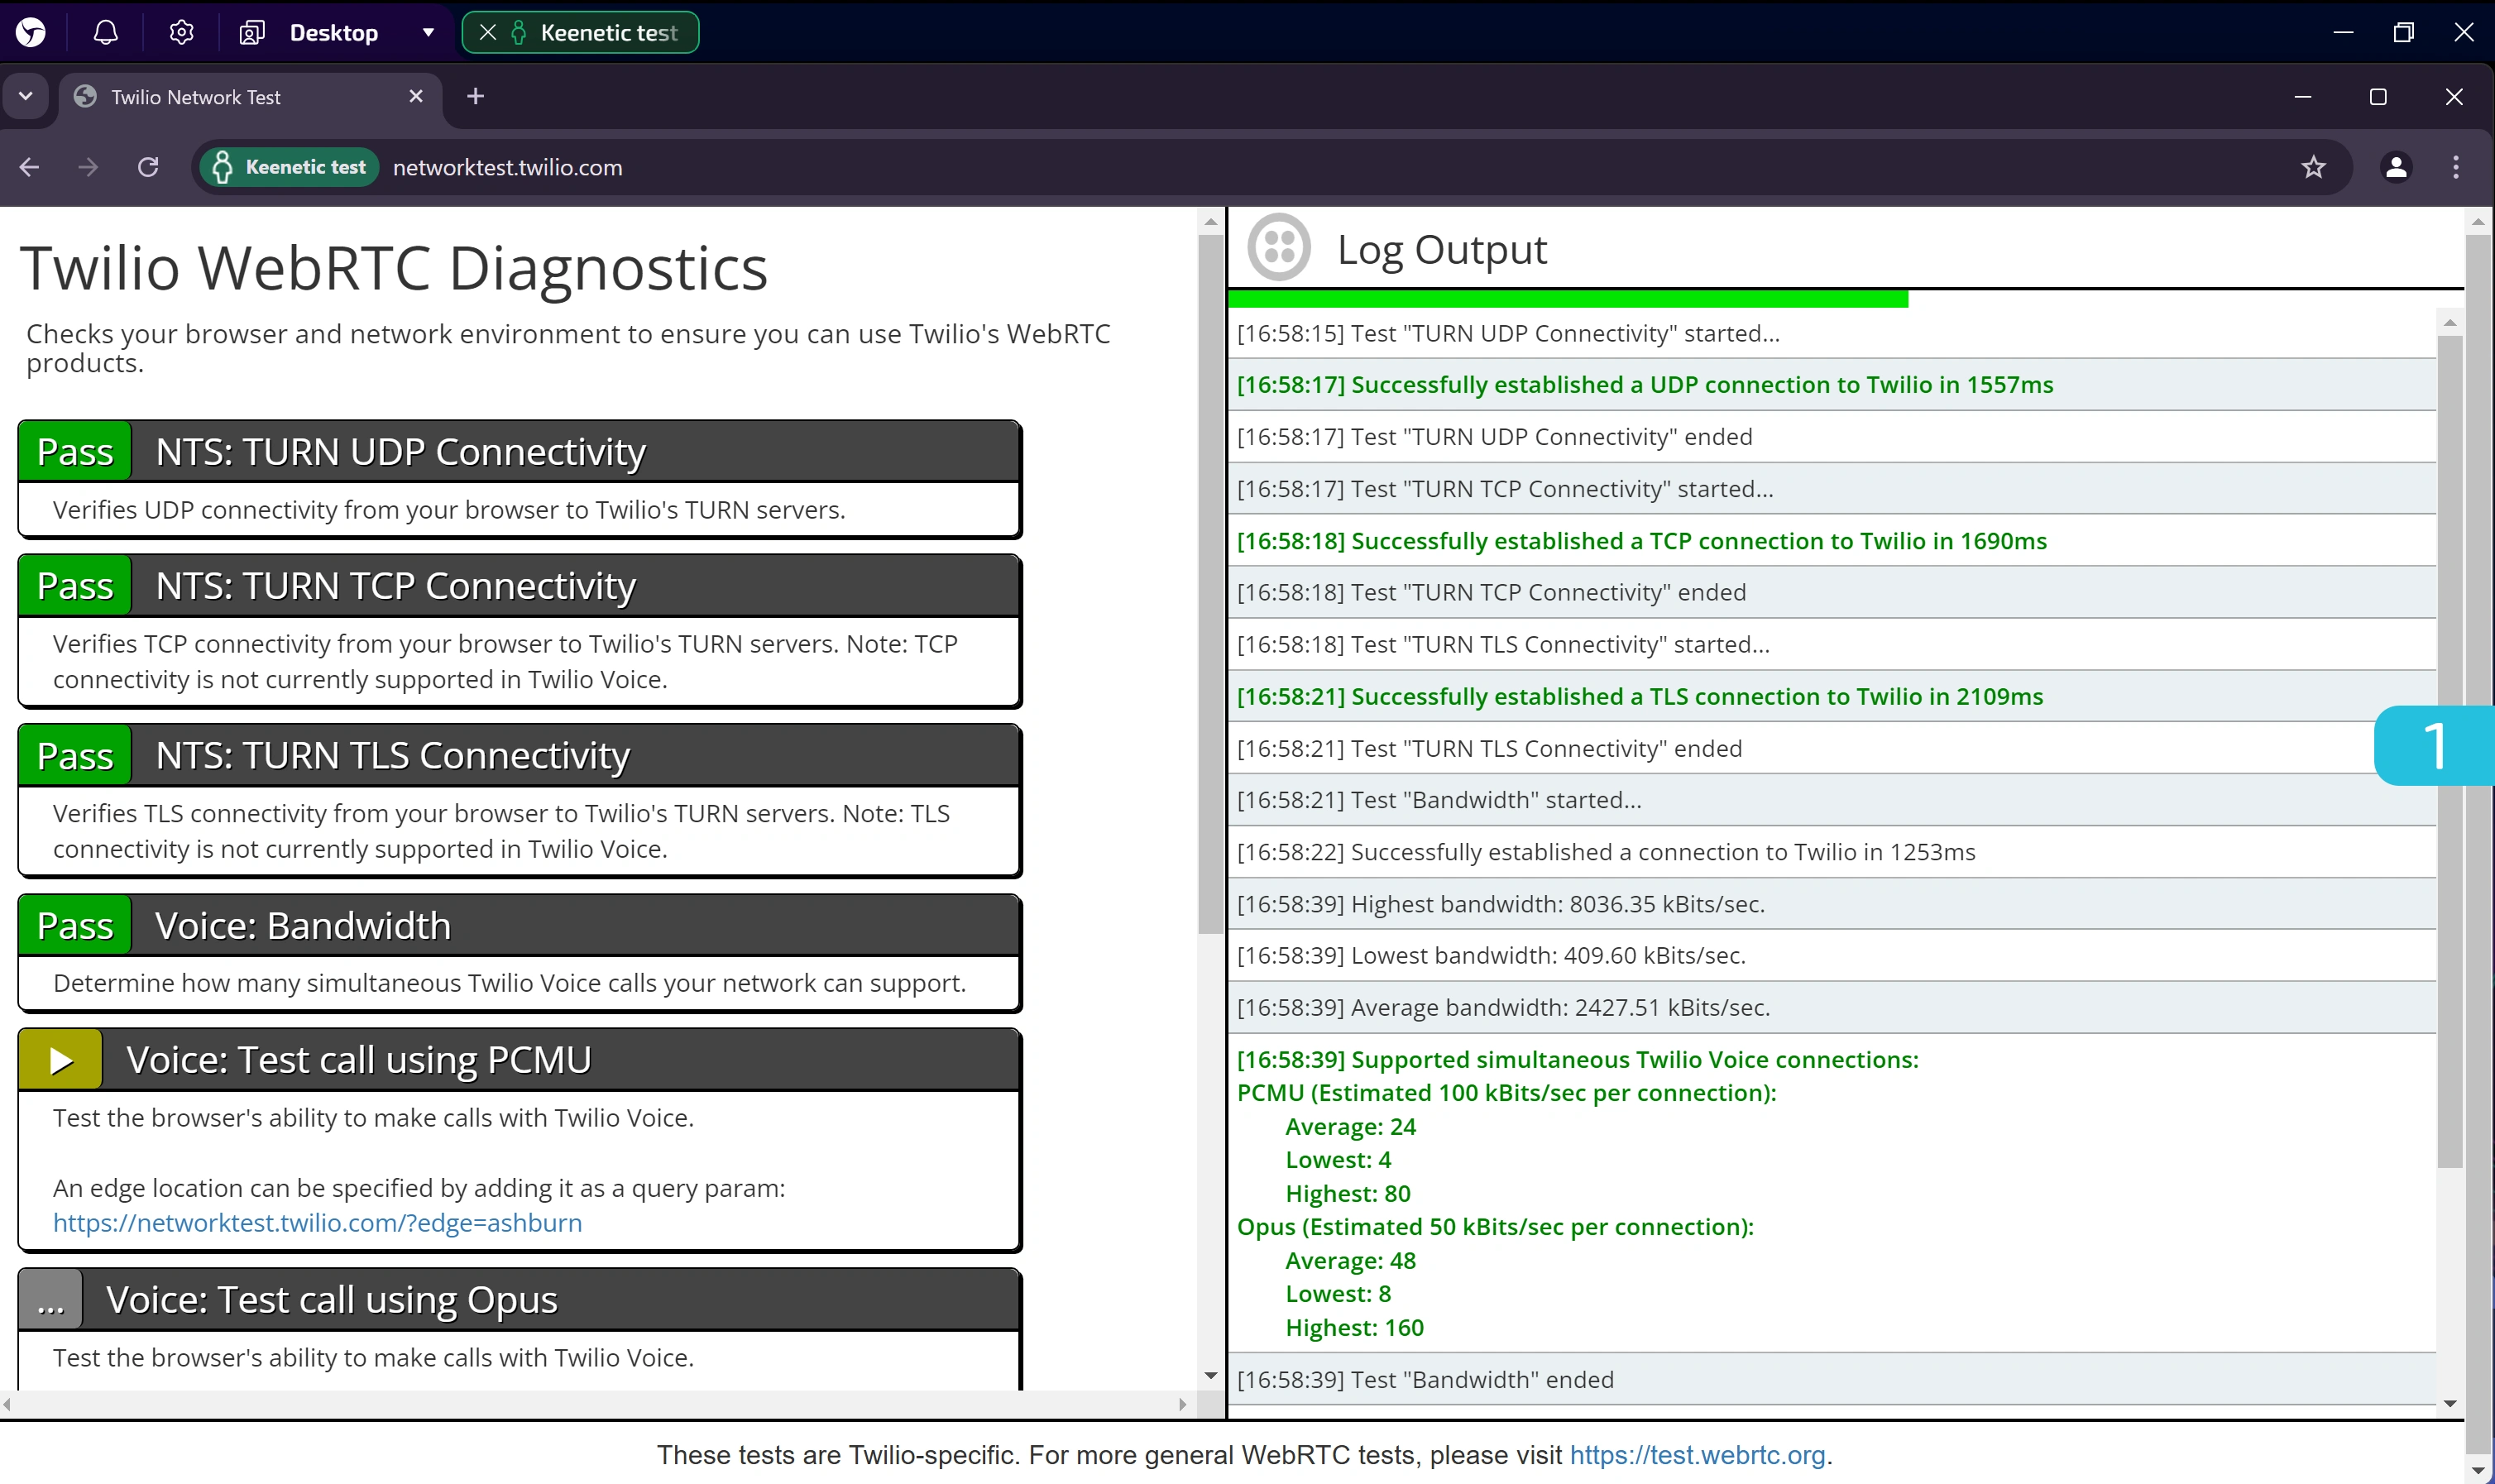
Go to: https://networktest.twilio.com/
This checker helps verify whether your browser supports UDP and TCP via TURN in WebRTC.
The required tests should have a Pass status, indicating everything is working correctly.
2. DNS Leak Test
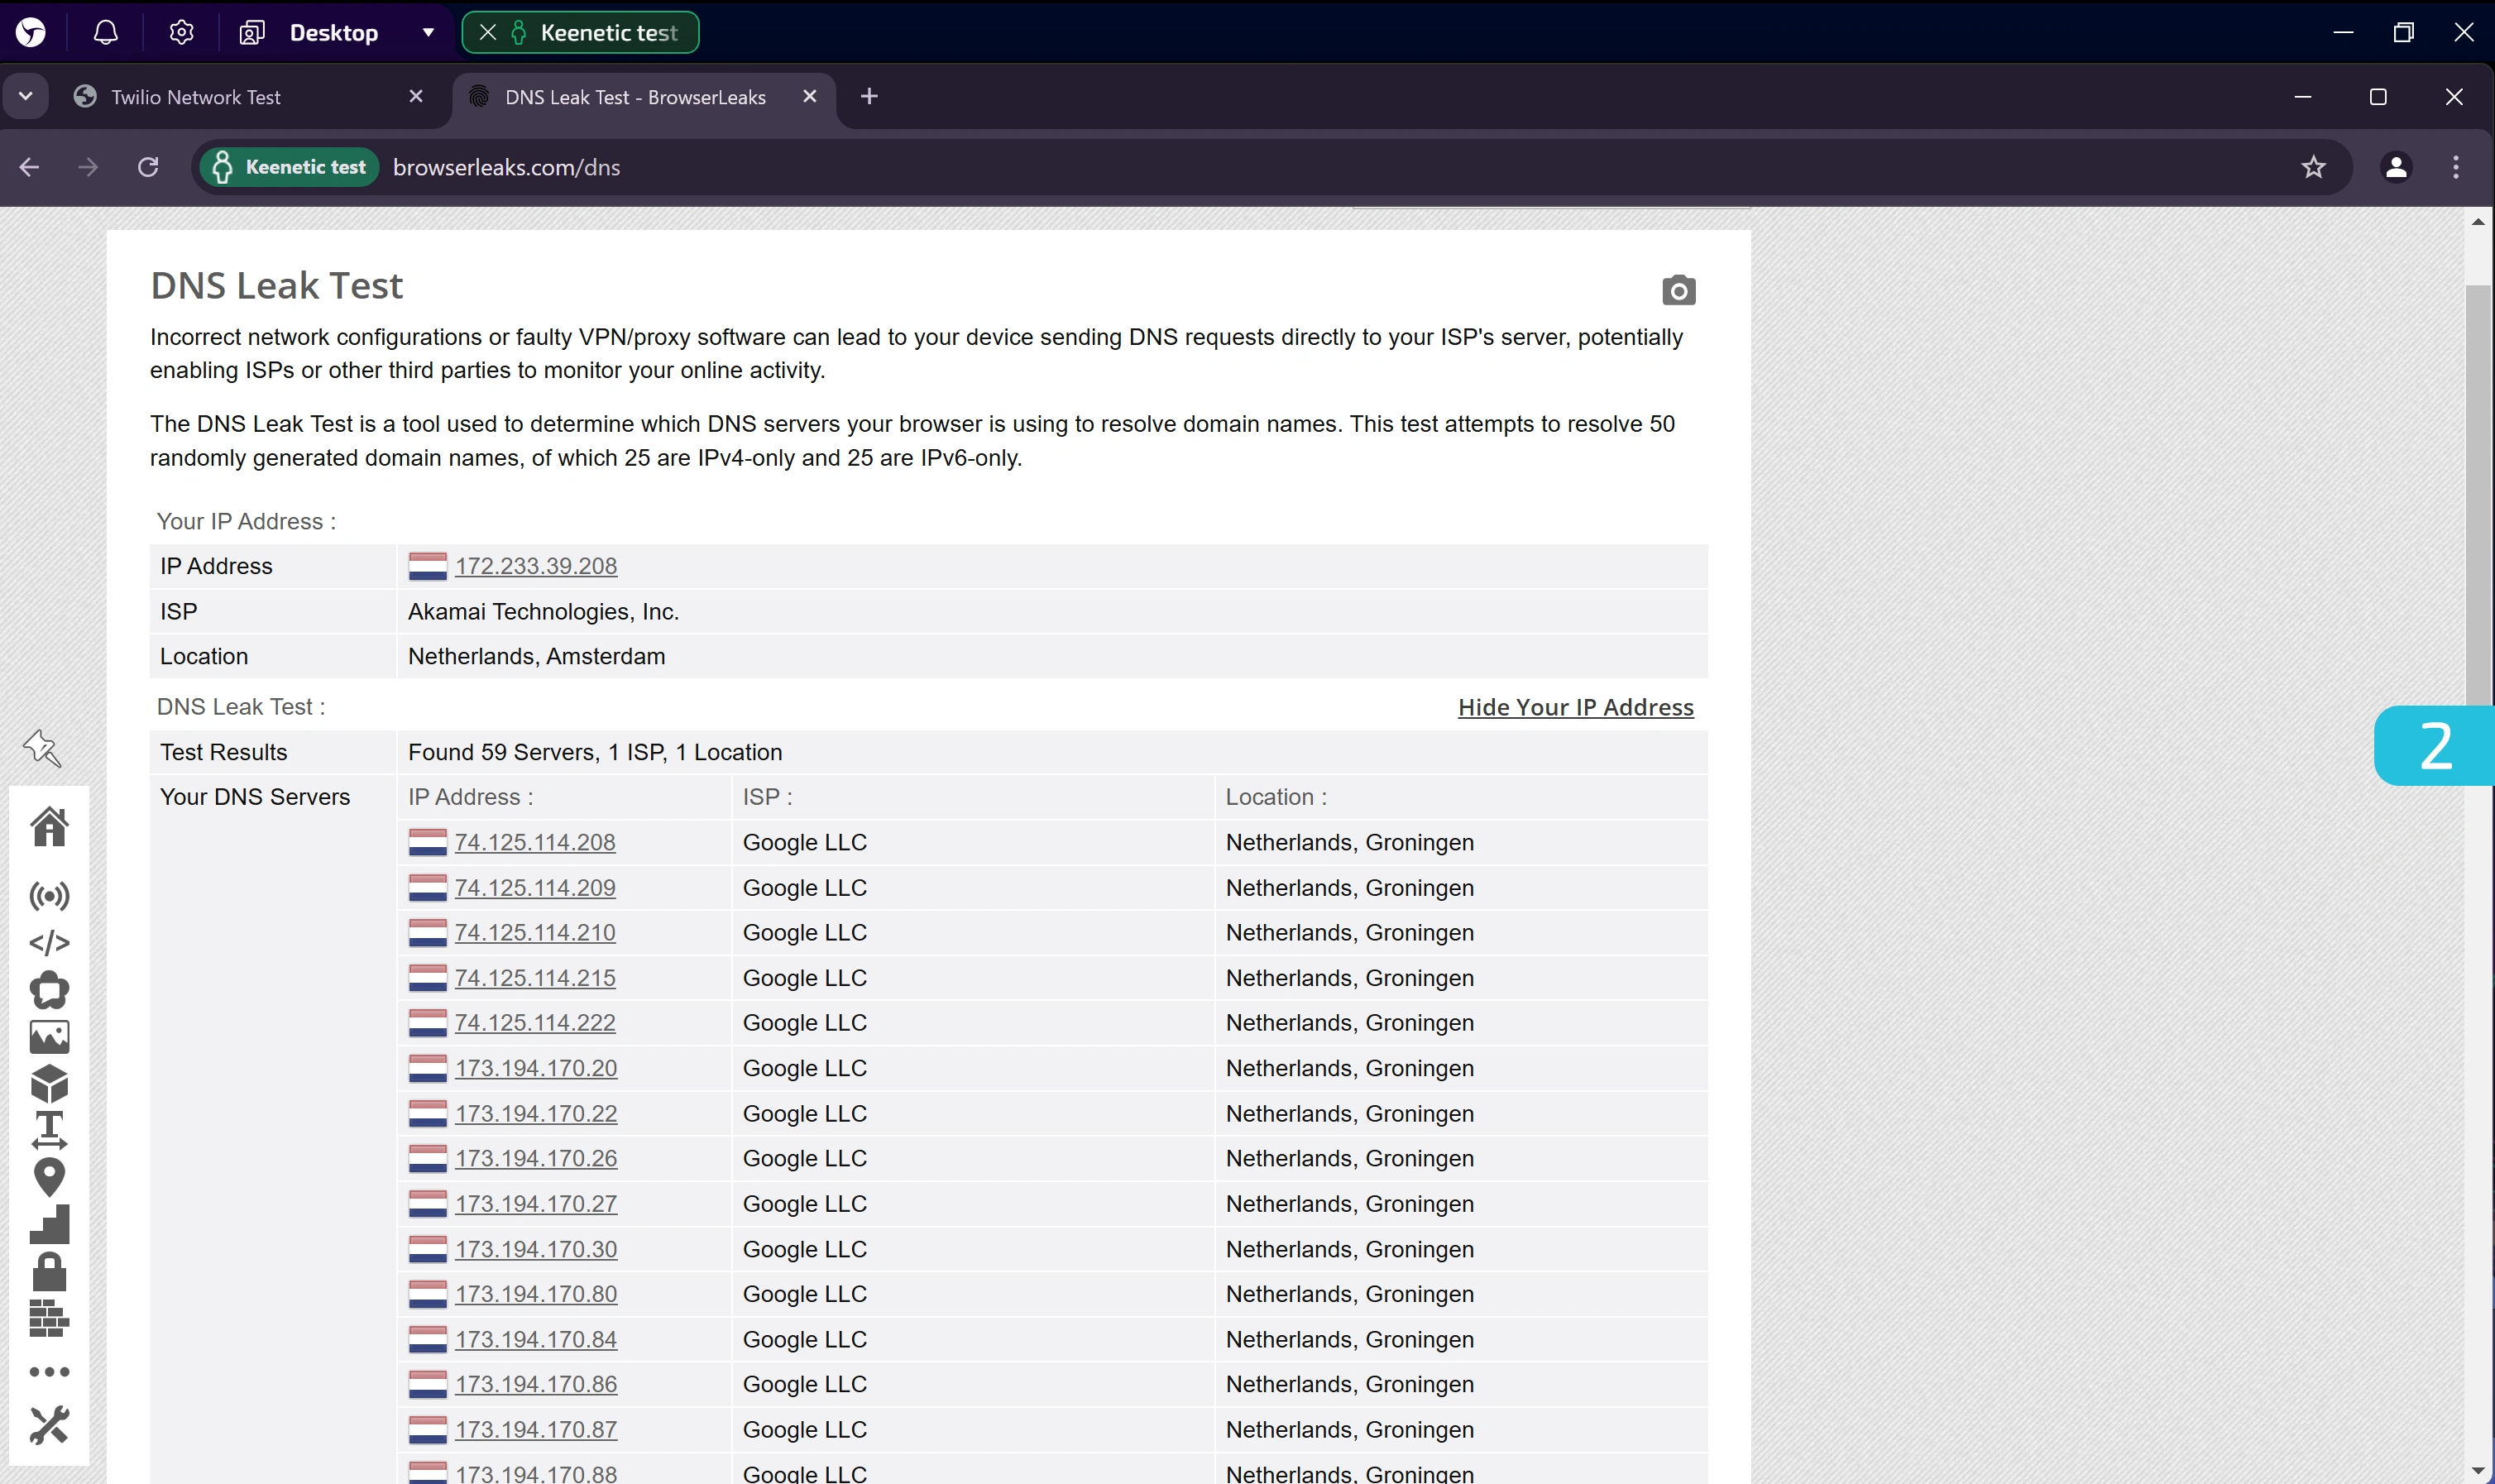
Go to: https://browserleaks.com/dns
This test reveals which DNS servers your browser uses to resolve domain names. Pay attention to whether all detected DNS servers match the expected ISP and location.
In the screenshot above, a single ISP and location are shown, which is a good result.
3. Real IP Leak Check via WebRTC

Go to: https://ipbinding.online/
This test helps identify any leaks via SRTP requests to a TURN server.
- If there are no leaks — the displayed IP address will match the proxy's IP.
- If there is a leak — your real IP address will be shown.
- If the request is blocked — an error will appear or the check will never finish.
In our case, the test passed: the displayed IP matched the proxy’s IP.
4. Full Test on Fake Vision
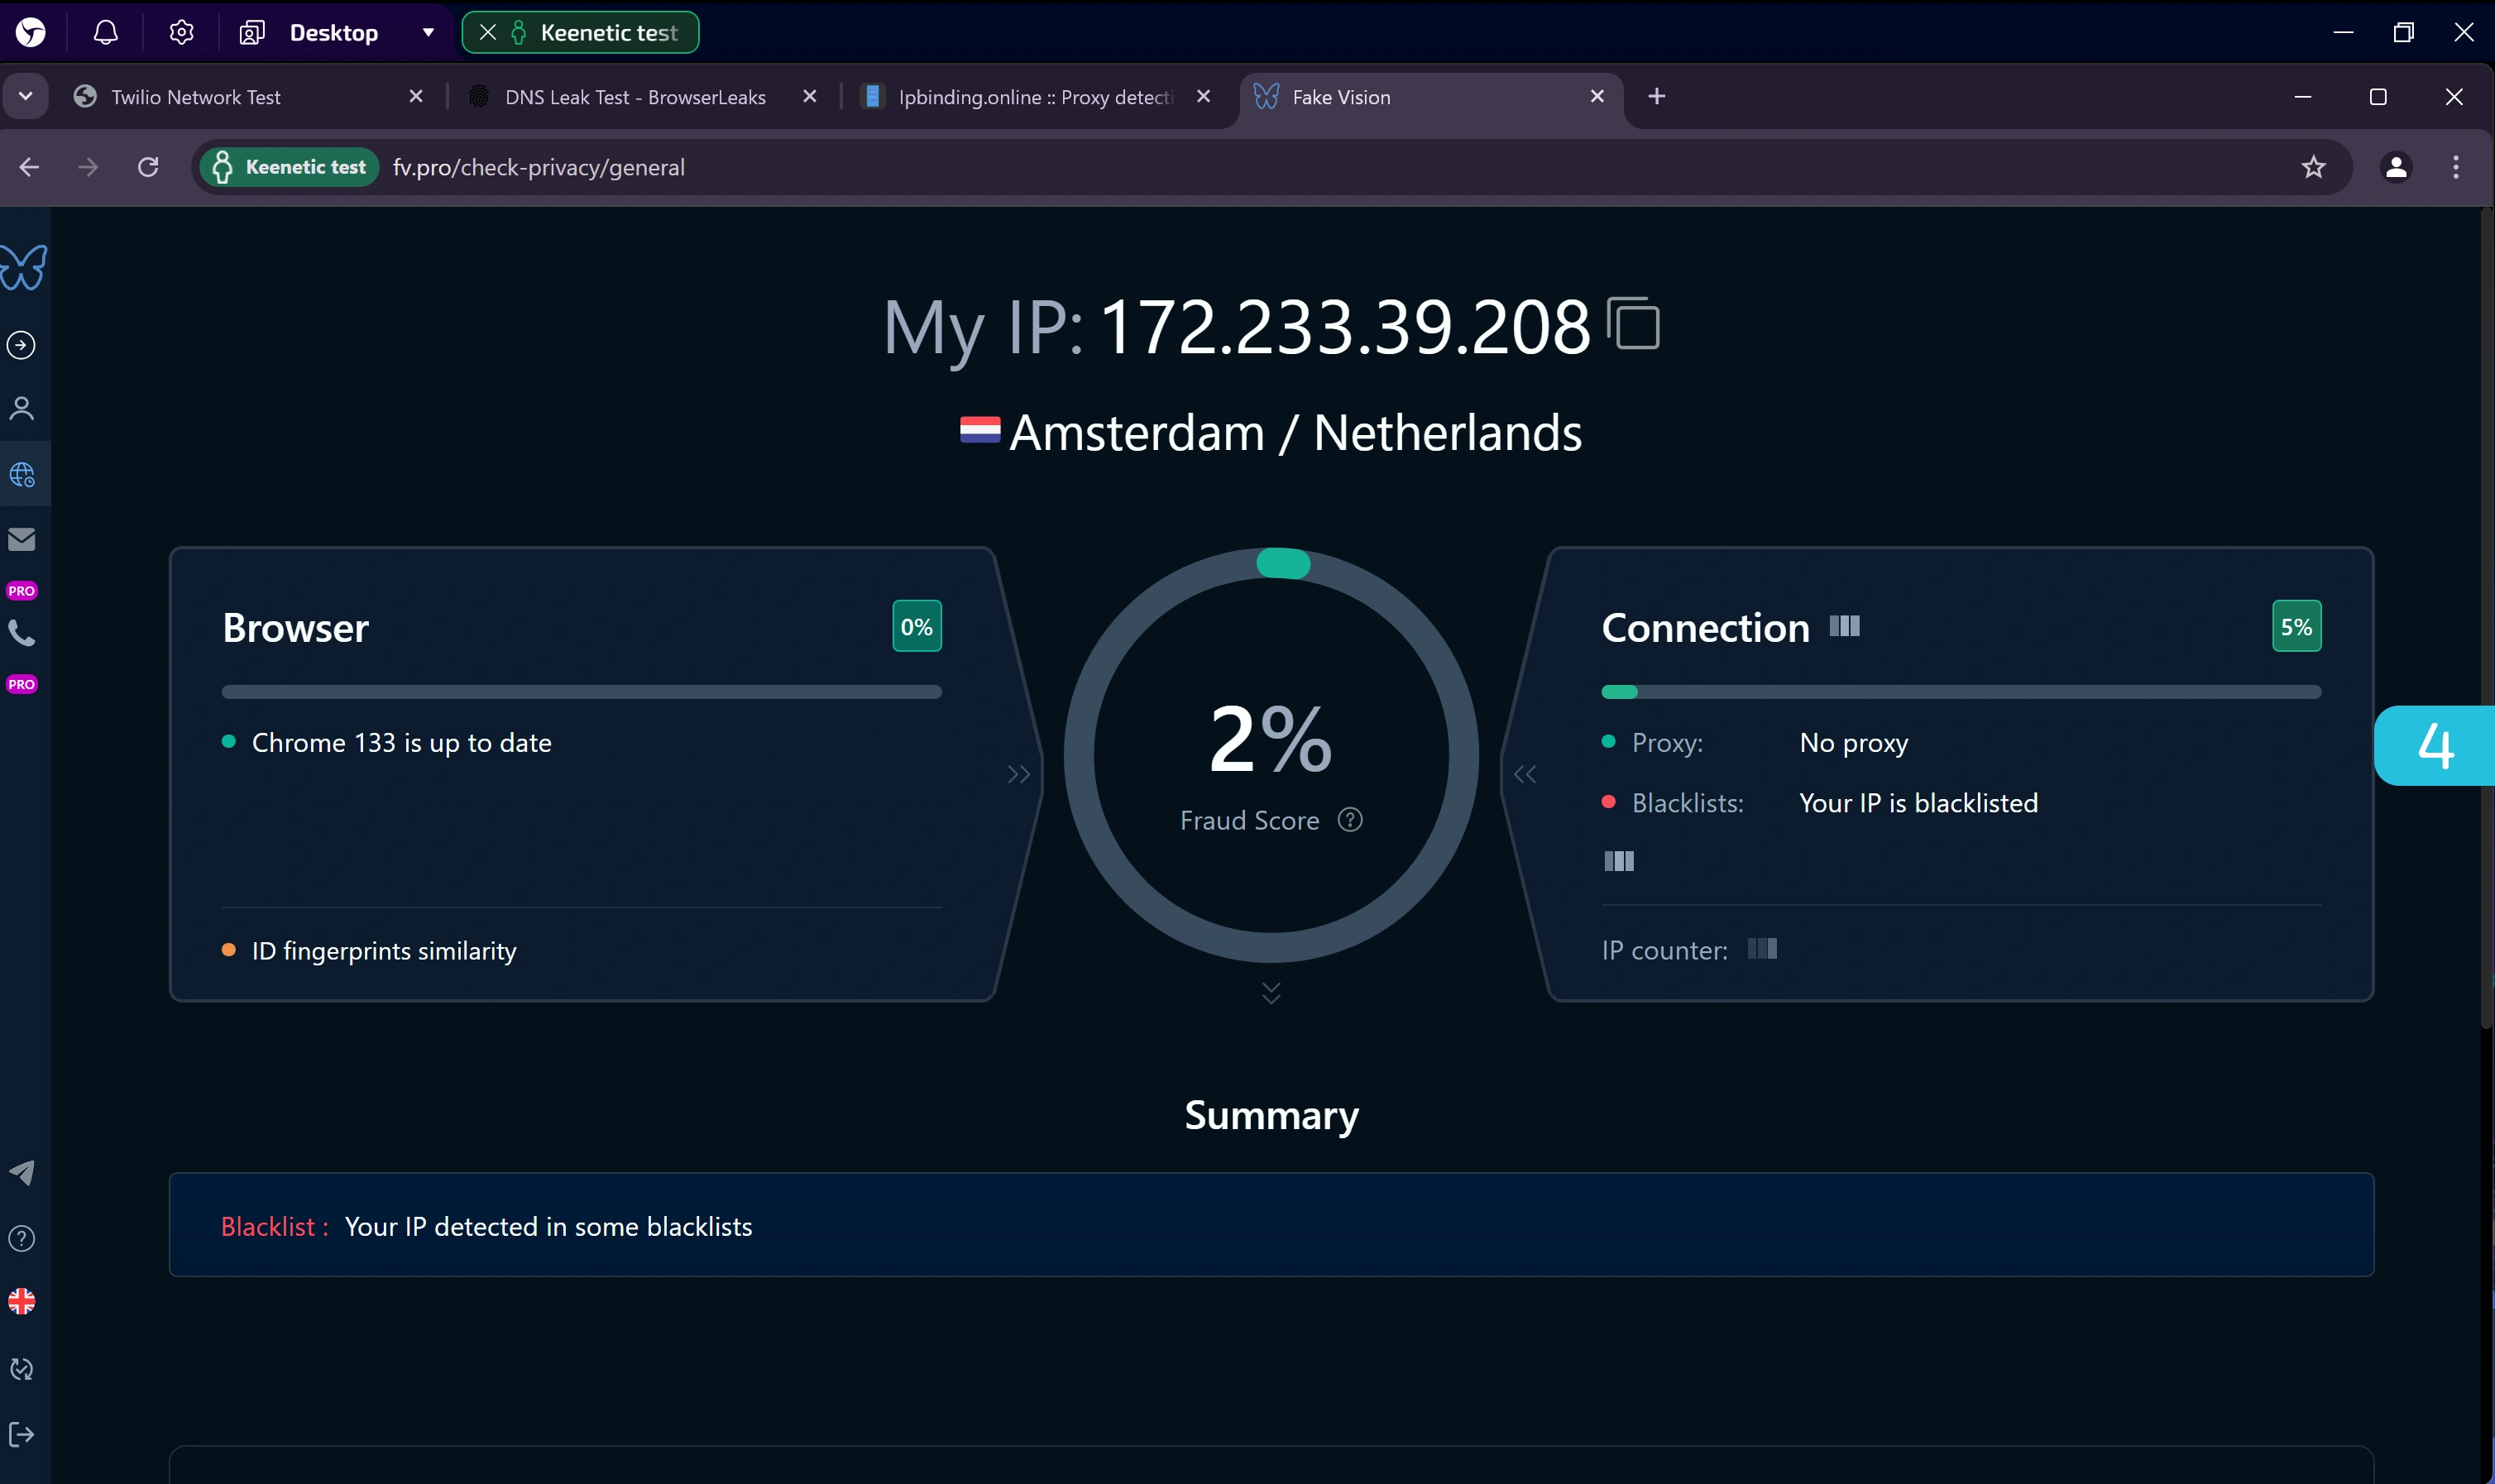
Go to: https://fv.pro/
This all-in-one checker analyzes numerous parameters, including browser fingerprints, environment, and connection.
Errors and inconsistencies are shown in the Summary block. In our test, the proxy IP appeared in some blacklists, but this can be resolved by changing the IP or proxy. Everything else was fine.
5. Checking QUIC Support

Go to: https://quic.nginx.org/
QUIC is a transport protocol based on UDP. Recently, anti-fraud systems have increasingly taken its support into account.
When using SOCKS5 via Keenetic, QUIC support is absent, as confirmed by the image above. It may be possible to enable it using alternative connection protocols.
Conclusion
Using Keenetic routers provides an easy and affordable way to proxy traffic for devices that don’t support this functionality out of the box. Thanks to the tests included in this guide, you can evaluate in advance whether this option is right for you.
Full proxying offers a number of advantages, minimizing potential data leaks. However, it’s important to understand that all traffic from connected devices will be routed through the proxy (or VPN), and the stability and speed of the connection depend on both your internet provider and the proxy service you choose.
Disclaimer: We do not offer router setup services, but all necessary information is available in open sources. By following the instructions in this guide, you can configure the device yourself and get a working solution without extra costs.